The end is near....SCOTTeVEST's Baby

Status
Not open for further replies.

scottevest

Well-Known Member
Site Donor
Messages
1,999
Reaction score
605
Location
Ketchum, Idaho
So, just talked to Gary, and here's the latest summary. I will be reposting select parts of below to Parts needed, but if you have leads, please let me know where to hunt:


  • under rider/horns for rear bumper and holes re same: i see from a text that someone suggested we omit these. Let me know if the parts are there to add these. I kind of like them. If we have them, and not too later, please consider mounting.
Not sure if he has these, so if you know where best to find chromed and ready, please advise. I think I want them.

  • information on how to bolt on front bumper:
    • For the front bumper holes I'd try to force your guys from the shop to close the huge holes by just leaving a small Slot open for the European style bumper brackets. Than make a nice cover for these slots or even use the appropriate rubber grommets and leave simply the slots open if you decide finally to leave the bumper off the car.
      Of Course also in that case Benny should make the front bumper including the brackets fit for your car.
      I would call it a big mistake not to shorten these big and ugly holes until you just end up having these small slots at the front.
that's the plan
send pictures of 72 bumper and under rider

If anyone has pictures or further information on how to do above, it would be appreciated. I gather that the 72 version was different than 73 version, or something like that. Is there a thread that describes this?
  • clock and odometer - can you try to fix per instructions sent? Seems pretty straightforward.
Gary is going to try to do this for me.
  • rotors and brakes - do now? but rotors may not be available
not needed
but order rotors anyway and order caliper rebuild kits to include pistons just to have.
  • be careful with defroster vents - may not be able to replace -
needed

  • should i order sunroof seal
look at let me know


need 2 LOWER BALL JOINTS, boots are gone, connected to control arm, mounts to steering, etc.
 
Last edited:

scottevest

Well-Known Member
Site Donor
Messages
1,999
Reaction score
605
Location
Ketchum, Idaho
I would get 72 and older bumper brackets so you can suck in those bumpers as far as possible
someone in parts will sell for $100. seems fair?
do i need any instructions to show gary how to make the holes or will he understand by seeing brackets?
 

HB Chris

Well-Known Member
Site Donor $$
Messages
19,418
Reaction score
8,759
Location
Huntington Beach, CA
Underriders are very, very hard to find. Front brackets will mount on side of frame rail, just push back far enough and drill holes, earlier car had holes in frames. Buy control arms with integral ball joints as they have new bushings in them, 74 is unique and longer than earlier coupes, you might want to do this later, could be hard to find.

You have so many irons in the fire fix the mechanical stuff later like brakes. Just my humble opinion.
 

JFENG

Well-Known Member
Site Donor
Messages
3,182
Reaction score
1,398
Location
Bahston (Boston)
Scott,
"If anyone has pictures or further information on how to do above, it would be appreciated"
If Gary is any good, he can figure out how to make the appropriate slots for the front bumper mounting.
It's not rocket science. Here's a few comments based on the conversion Mario did for me.
Note: the 74 and up cars had a reinforced section of at the very front of the front frame rails. Because the profile of the front frame rail is different from the 73 and earlier cars ... the slots for the mounting arms end up a bit more outboard than on the earlier cars.

(sorry but I don't know why some pics are upside down. They appear right side up on my laptop. PM me if you want the originals via email.

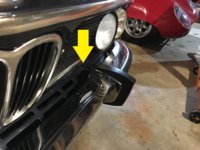
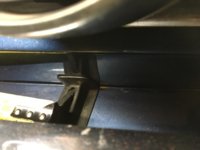
PICTURE #1: yellow arrow shows where the bumper mounting arm goes into the nose of the body.

picture_1.jpg

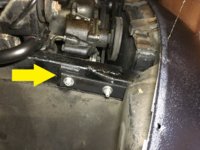
PICTURE #2: shows the arm thru-bolted to the driver-side frame rail. I would use a piece of flat steel stock to transfer this mounting orientation forward to the valance so the slots can be cut at the right place. It's not critical because if you screw up you can weld your mistake shut and cut again. (it seems to have uploaded upside down, sorry about that)
picture_2.JPG

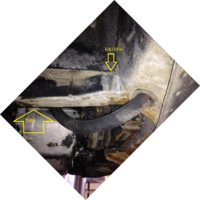
PICTURE #3: shows you the passenger frame rail w/o the mounting arm. Here it's easy to see that the frame rail front part is fatter (reinforced for 74). The early frame rails don't have that front bulge. They are flat along their entire length. This means you will need a spacer for the bumper mount arms to bolt up flat against your frame rails. You can see this spacer in via the yellow arrow in Picture #1.
picture_3.jpg

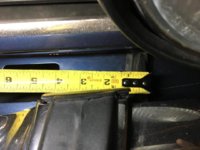
PICTURE #4: close up of the slot with rubber grommet (driver side). The positioning can be determined by the tape measure and distance from the valance oval opening . HOWEVER, I would NOT use this photo and measurement to cut. I would go by what I said about Picture #2, where you project the outside face of the front frame rail up to the inside surface of the nose. That'll show you where to cut the slot.
picture_4.jpg

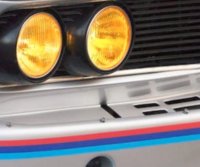
PICTURE #5, #6: close up of the slot in the nose. I would cut it and use the rubber grommet. It'll be almost invisible on a black car. If I had a silver car like this I might leave the grommet off.
picture_5.jpg picture_6.jpg


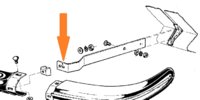
PICTURE #7: Once the slots are cut, clamp your mount arms on to the frame rails, with the front ends sticking out of the front of the nose. Then offer up the front bumper assembly (the whole thing or just the center section, doesn't matter too much at this point). Because the profile of the 74 and later frame rails is thicker, the mounting arms will be spaced a bit wider apart than on the earlier cars. This means the ears at the front of the mounting arms will be laterally too far apart to match the mounting bolts on the back side of the bumper over-riders. You will need to length the end of the mounting arm (e.g. make them laterally wider). This picture has this front "end" of the arm arrowed in orange. Note how it's not very wide, maybe only 2".
picture_7.jpg

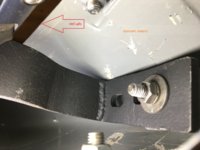
PICTURE #8: this is on the PASSENGER side. It shows the BACKSIDE of the front bumper so you can see the front end of the mounting arm. You can see the weld where the end of the mount arm was cutoff and a new much wider piece added. This wider end extends inward toward the centerline of the car to match the bumper mounting bolt location. Use a slot rather than a hole so you don't have to get the width of this modified end perfect.
picture_8.jpg


Once your arms are modified, then attach the complete front bumper assembly . If you haven't yet drilled out the front frame rails for thru bolts, you can now adjust the fore-aft positioning of the front bumper so the bumper ends are at the right place on the fender sides (see PICTURE #9). The OEM position puts the backside of the bumper pretty close to the lower valance (see PICTURE #8). Note: the clearance between the lower back side of the bumper and the valance was pretty darn tight on my car. My (beatup) CSL spoiler just barely fits in that gap. If I were to do it again, I'd space the bumper as much as 1/4" further forward.

Well, good luck with this. Like I said, this is not rocket science so your shop should have no problem doing a good job. You're getting a pretty big restoration for $16k-ish. That's cheap!

John
 
Last edited:

nosmonkey

In Rust We Trust
Site Donor
Messages
1,104
Reaction score
1,002
Location
London, UK
I'd exercise caution when fitting such high powered bulbs in with 45 year old wiring, takes a big toll on components
 

arnie

Well-Known Member
Messages
222
Reaction score
69
Location
Germany
later you will want the replica, aluminum pop-up wind deflector kit :rolleyes:

He didn't push the button in the mean time ???? :)

BTW Stan: What will (did ;)) he pay for the kit and how long he has to wait for it ?

I'm just fighting with my "finance department" if I need to push the button too some day ....
 

scottevest

Well-Known Member
Site Donor
Messages
1,999
Reaction score
605
Location
Ketchum, Idaho
Gary informs me that the wheels/tires/new springs/shocks are on and he plans to lower the vehicle today. I think I will head over there this afternoon to get a look at things. Stay tuned for another video. Any special requests, let me know.

In the meantime, thanks to this group, I have below what I hope is a final list of things to buy. Before I hit buy now, let me know if I a missing anything.


  • Sunroof seals if needed after checking with Gary, from La Jolla, or W&N http://www.bimmerdoc.com/parts-finder/bmw/2002e3e9-sunroof-seal/
  • Engine stickers: Going to call Carl at La Jolla today
  • Defroster vents: Hoping to find....
  • Euro bracket for front bumper - Al is selling me one! Thanks Al
  • Gary is going to try to fix the clock and odometer
  • Lights are coming today, and will show them off.
  • I got BMW roundel stickers for wheels.
  • Someone local is looking at the wood today/Monday. If he can't do it, I will send to Bella.
I have to admit that I am tempted to get anti-sway bars while I am at it, but likely will wait. What am I missing?​
 
Last edited:

JFENG

Well-Known Member
Site Donor
Messages
3,182
Reaction score
1,398
Location
Bahston (Boston)
@bfeng BINGO! Wow. Thanks VERY much for the detailed instructions.
BTW, any bets on when I will be on the road. I believe by end of April.
98% of the content in these 32 pages of discussion could have been bypassed by going to an E9 specialist like LJ, VSR1, etc. But I also understand why you want this done locally. If you think about the value this forum has made to your project it's got to be in the 20-40 man hours (@ $75hr that's a grand)

... make a small donation to the forum .... and my shirt size is L ;-)
 

JFENG

Well-Known Member
Site Donor
Messages
3,182
Reaction score
1,398
Location
Bahston (Boston)
Sway bars.

If this Gary guy is a good pro, installation of the antisway bars might take AS LONG AS 45 minutes! OMG. The key is having a lift.

If you aren't going to do this in your own garage (free labor), and given that this project is no longer a cheap-ass cosmetic refresh .... I'd say get him the bars and have him put them in. While the IE motorsport price of $440 seems high (I paid $200 or $250 3 years ago), doing it how will save you labor and your own time. I'm guessing you'll immediately appreciate the quicker steering response and flatter cornering (people subjectively like less body roll even though it might be actually performing worse). It was a night and day transformation as measured by my soft wide butt. Of course I was planted in a Scheel-Mann sport seat (ultra firm foam) so I have a more direct connection between tire patch and ass.

Anyway, you're so deep into it at this point just get it done now.
 
Status
Not open for further replies.
Top