The end is near....SCOTTeVEST's Baby

Status
Not open for further replies.
Today's update:
  • video is a bit long, so only die hard viewers should watch today
  • Benny promised me I would be on the road by May 15, if not sooner. I can't wait. I didn't expect it would take this long.
  • They added the creases in the sides thanks to this forum for pointing that out.
  • doesn't seem like that much else was accomplished since last visit, but sure I am missing something.
  • Gary thinks rear anti-sway bar would make the car faster/better, despite some contrary comments here.
  • will do another video soon documenting all the rust remediation and get the scope out too to show before we close it up.
  • someone on this forum asked me for more information on how to configure bumpers, etc. I will do a video describing just that to help others. Lots involved.
  • Gary is not comfortable taking clock and odometer off without damaging it.
  • Is there any need/use for the sound deadening material on interior of the engine, or can/should we just omit?
  • Benny is going to try to get me added costs soon. Sort of uncomfortable not knowing but I know Gary will be fair.
  • that's all folks!
Thanks!

Where should I go for a road trip in May when done?
 
despite all... some remarks Scott...
- the welding on the tower seems not that prof ... more trial and error
- that famous line .. is this now all bondo ? OEM it is in the body plates ...??
- those rear welded holes ( ex bumper) must be threated now, no matter how they did it before, welding makes it inside clear metal prone to rust ...
- your rear floor pans have no stamp !

:D:D:D
I don’t understand any of your comments. What should I communicate to Gary?
 
i was just kidding Scott , see my "smilies" ?
but... after each joke , there's some truth in it ... don't worry , not important ! :)
 
I'm going to try translating Flemish ;-)

(1) Bumpers: Scott, my personal advice is to not delete the rubber on the bumpers. I heard the discussion about closing up those little holes, but don't forget the big ass holes at the ends of the bumper that also need to be welded shut. I predict the chrome shop will want an extra $500 to finish up the closed holes because it's a day of copper and polishing and copper and polishing and copper and ... That's on top of the 4 hours of labor that the body shop will spend doing the primary welding. I personally don't think it's worth the cost, and you can always do it later if you change your mind. FWIW, the rubber strips will protect you from the inevitable yahoo that bumps you in a parking lot.

(2) Rust: i have to say your trunk looks really solid. That lip around where the gas tank mounts looks clean as a whistle and I've seen lots of them just rusted all away. It's a really solid car back there. You should be happy.

(3) What Barry was mentioning when he said, "no stamp," is that you've got patches in the rear floor areas that are not shaped like the original metal. Check out the part where Benny is pulling the goop off the the bottom of the front seat floor area. See the big hole and the diagonal X pressed into the sheet metal. This is original and correct. Your patches in the back are smooth flat plates and the originals had stiffening beads or contours. From a practical standpoint this is irrelevant and your patches look just fine. But if someone saw pictures of the undercarriage, they might say to you, "someone patched the floor of your car quicky style, why didn't they use the correct patch panels available from W&N?" When that happens, just tip your head back and look down your nose at them and give a little harrumph. Tell them this was unimportant compared to the structural integrity of the car, which is in excellent condition. Someday if you want to go for a #2+ condition car, you ought to get those generic patches replaced with correctly contoured panels. Until then, don't worry, be happy.

(4) "welding on the tower seems not that prof" The patch in the passenger side cowl is sloppy but then it's also not finished. Once it's ground down smooth it should be invisible. And this patch isn't structural so it doesn't matter if it's a hack job with a MIG. Also it seems like Benny is telling you that you don't want to get into that fender any further because then you'll be chasing a deep rust pocket all the way back to the base of the windshield. I'd agree with that advice.

(5) Sway bars: every car and driver is different. Since you are NOT racing it, don't worry about the fact that one guy said his particular car was quicker without the rear bar. Talk to some people who actually race stock E9's to see what works for them. And ... you have to take into account that their driving style might be different than yours. Having the rear a bit lose (e.g. slide a bit early) is necessarily NOT a bad thing if you know how to use it to your advantage. Just get the car done, drive it and decide for yourself if you prefer more roll stiffness (less understeer and quicker transitions) or if you can live with the roll because it gives you a bit more rear grip at the limit. There's no right or wrong way here.
 
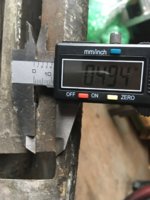
The upper bumper hole is a little bent so this is an approximation. In inches for the muscle car gents...

FCAB138F-6475-49CE-964C-198858799088.jpeg
04D7D79C-C7E5-4672-8BDB-057DDA18FE70.jpeg
86F20F9F-C389-4C52-9229-110B05328E9F.jpeg
4378CD01-FD88-414B-8B32-7CC5FD8E947A.jpeg
CACE3448-2495-44F7-A0C4-026EC46C1540.jpeg
 

Attachments

  • A6048E27-5FD4-443B-8369-0752F75C0B54.jpeg
    A6048E27-5FD4-443B-8369-0752F75C0B54.jpeg
    211.6 KB · Views: 170
This measurement looks correct for cars originally fitted with chrome bumpers.

On a 74 and newer the front stub-rails are reinforced at the ends where the huge DOT shock absorbers fit inside. Therefore they are wider than the 73 and earlier front stub rails.

This means if the bumper mounting arms are bolted to the outside of the stub rails, they will end up spaced a bit wider apart on a 74 ( in comparison to a 73 and older). I think it's just about one inch per side. The safest thing to do is to use a piece of straight steel stock to project the side of the '74 stub rail forward so you know exactly where to cut the valance and rear/inner face of the radiator panel. I could be wrong, but when I converted my 74 to 1972 bumpers this was one of the complexities of the job that Mario explained to me (it's not a bolt on retrofit). The other implication is that the wider spacing puts the slots in the front of the arms too far apart. Mario cuts the front ends of the arms off and welds on a new wider piece (extends further in toward the center of the car). Again, I don't recall exactly how much but its around 1" per side. Maybe a tad more.
 
Thanks for all the feedback here. I can't believe how many little details are involved with the bumper conversion, and everything else.
Gary mentioned some concern about the vinyl on the wood dash, but I didn't realize what he meant until I re-watched the video. Yea, I re-watch all my videos after posting to make sure I didn't miss anything.
I now understand what it is, but not sure what I am supposed to do? Do I need to source black vinyl? If so, any leads?

Any bets if I am on the road by May 15?

Let me know what I should document for rust remediation, or if this thread with my videos will be more than sufficient to anyone when I die and they buy this car?
 
Firewall padding: keep or replace with new stuff. It helps woth noise and heat.
should we just buy generic stuff and cut and glue in for the soundproofing within engine? We are going to leave the firewall padding as is since can't find replacement.
 
The videos are a great idea btw. The banter is really entertaining.

Documentation: many pictures showing bare metal patches (eg before primer). They can’t take enough pics.

Scott, Our local race shop guru is the opposite of your guys. He is a man of few words. When I started racing he would come up to me on the grid, check my belts, accusump, fire system pin etc, but he would only said two words, “don’t crash.”

Once a car came in from the track on a flat bed leaking oil, smoking, etc. Clearly the motor had failed catestrophically. He reached into the engine bay, put a 1/2 of a rod cap in the owners hand, said “rod bearing,” and walked away.

I think I lost opportunity to take hi-res images on the patches before primer, but hope past videos are sufficient.

BTW, your story, sort of reminds me of another story, although completely unrelated.

My wife Laura would say to me every time before I went race car driving. As I was leaving, she would say: "If you get in trouble on the track, just remember dead not mangled." I remembered that everytime I went into a corner too fast. She didn't want to take care of me if I got hurt. I complain a lot with the mildest sickness.
 
removing seats , carpet, sound deadening ... cut the floors, prep welding 8 hours ? welding new ones 4 h ? coating under , paint above , new sound deadening , carpets, seats... 4 h ?
so i assume 16 h work and 2 rear floor panels approx 300$...

between $1500 and $2000 i guess.
 
removing seats , carpet, sound deadening ... cut the floors, prep welding 8 hours ? welding new ones 4 h ? coating under , paint above , new sound deadening , carpets, seats... 4 h ?
so i assume 16 h work and 2 rear floor panels approx 300$...

between $1500 and $2000 i guess.
All just to say my floors are correct? No thank you so long as I have some rust protection down there based upon the work previously done
 
Do you think it is worth getting the speedometer fixed to calibrate for larger wheels?

The cost to repair the trip odometer, and re-calibrate the speedometer for larger wheels, will be approximately $265.00 + shipping. It is not possible to give an exact estimate, because I can not be sure without testing the speedometer, if the trip can be repaired, or the trip odometer wheels will need to be replaced. For this reason I will say that this repair could cost between $265.00 and $350.00 + shipping. If you were to send us your speedometer, I would be happy to look it over, and call you with a free estimate.


In order to calibrate the speed accurately, you will need to complete the attached ratio test form.

Hartmut C. Mees
Palo Alto Speedometer, Inc.
 
Scott

The tires you got are stock diameter. It’s because you went lower profile on the tires to off set the larger diameter wheels.
 
Status
Not open for further replies.
Back
Top