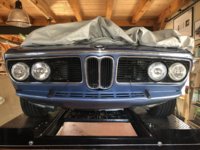
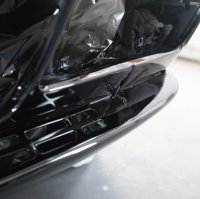
I can't tell from the video, do you know on the front bumper there is a little rubber trim piece on the ends?
I notice about 1/2 the E9s I look at don't have it
We have that part
Sent from my iPhone using Tapatalk
I can't tell from the video, do you know on the front bumper there is a little rubber trim piece on the ends?
I notice about 1/2 the E9s I look at don't have it
We have that part
Sent from my iPhone using Tapatalk
Seems sort of obvious but I will let Gary knowMake sure they go on before the bumper does
I found that the clips on mine had rusted and expanded inside the trim causing small splits in the trim that only showed up after rechroming, they said they could be filled with silver solder and rechromed but I had a spare set that they did at no extra cost to me and these turned out to be OK. I will cover everything with Waxoyl when I put them back on the car.Agree - that's a bit barbaric for the level of refinement we'd like to think our cars have.
Scott,
"If anyone has pictures or further information on how to do above, it would be appreciated"
If Gary is any good, he can figure out how to make the appropriate slots for the front bumper mounting.
It's not rocket science. Here's a few comments based on the conversion Mario did for me.
Note: the 74 and up cars had a reinforced section of at the very front of the front frame rails. Because the profile of the front frame rail is different from the 73 and earlier cars ... the slots for the mounting arms end up a bit more outboard than on the earlier cars.
(sorry but I don't know why some pics are upside down. They appear right side up on my laptop. PM me if you want the originals via email.
PICTURE #1: yellow arrow shows where the bumper mounting arm goes into the nose of the body.
View attachment 43203
PICTURE #2: shows the arm thru-bolted to the driver-side frame rail. I would use a piece of flat steel stock to transfer this mounting orientation forward to the valance so the slots can be cut at the right place. It's not critical because if you screw up you can weld your mistake shut and cut again. (it seems to have uploaded upside down, sorry about that)
View attachment 43205
PICTURE #3: shows you the passenger frame rail w/o the mounting arm. Here it's easy to see that the frame rail front part is fatter (reinforced for 74). The early frame rails don't have that front bulge. They are flat along their entire length. This means you will need a spacer for the bumper mount arms to bolt up flat against your frame rails. You can see this spacer in via the yellow arrow in Picture #1.
View attachment 43206
PICTURE #4: close up of the slot with rubber grommet (driver side). The positioning can be determined by the tape measure and distance from the valance oval opening . HOWEVER, I would NOT use this photo and measurement to cut. I would go by what I said about Picture #2, where you project the outside face of the front frame rail up to the inside surface of the nose. That'll show you where to cut the slot.
View attachment 43207
PICTURE #5, #6: close up of the slot in the nose. I would cut it and use the rubber grommet. It'll be almost invisible on a black car. If I had a silver car like this I might leave the grommet off.
View attachment 43208 View attachment 43209
PICTURE #7: Once the slots are cut, clamp your mount arms on to the frame rails, with the front ends sticking out of the front of the nose. Then offer up the front bumper assembly (the whole thing or just the center section, doesn't matter too much at this point). Because the profile of the 74 and later frame rails is thicker, the mounting arms will be spaced a bit wider apart than on the earlier cars. This means the ears at the front of the mounting arms will be laterally too far apart to match the mounting bolts on the back side of the bumper over-riders. You will need to length the end of the mounting arm (e.g. make them laterally wider). This picture has this front "end" of the arm arrowed in orange. Note how it's not very wide, maybe only 2".
View attachment 43210
PICTURE #8: this is on the PASSENGER side. It shows the BACKSIDE of the front bumper so you can see the front end of the mounting arm. You can see the weld where the end of the mount arm was cutoff and a new much wider piece added. This wider end extends inward toward the centerline of the car to match the bumper mounting bolt location. Use a slot rather than a hole so you don't have to get the width of this modified end perfect.
View attachment 43211
Once your arms are modified, then attach the complete front bumper assembly . If you haven't yet drilled out the front frame rails for thru bolts, you can now adjust the fore-aft positioning of the front bumper so the bumper ends are at the right place on the fender sides (see PICTURE #9). The OEM position puts the backside of the bumper pretty close to the lower valance (see PICTURE #8). Note: the clearance between the lower back side of the bumper and the valance was pretty darn tight on my car. My (beatup) CSL spoiler just barely fits in that gap. If I were to do it again, I'd space the bumper as much as 1/4" further forward.
Well, good luck with this. Like I said, this is not rocket science so your shop should have no problem doing a good job. You're getting a pretty big restoration for $16k-ish. That's cheap!
John
ok. i thought someone in this thread thought it could be done much more easily. Not a huge deal I suppose. I suspect i will end up leaving the bumper on for several years until i get sick of it, then take it off for a few years.On 1969-73 cars the front bumper has captured carriage bolts in the frame rails. It's a 2 person job to remove Athena's bumper and a 3 person job to install with the air dam on.
I am using the 73 bumper with the 72 rod to install to get closer.Just FYI: US/NA coupes in ‘73 have the 2 1/2 mph bumper and no carriage bolts. The bolt goes all of the way through the frame rail. As posted earlier, it’s not a lot of fun reinstalling a front bumper.
Just FYI: US/NA coupes in ‘73 have the 2 1/2 mph bumper and no carriage bolts. The bolt goes all of the way through the frame rail. As posted earlier, it’s not a lot of fun reinstalling a front bumper.
He followed Mario's suggestion, but feels that removing bumper in future will require taking headlights out....


While I appreciate your opinion, in this case, the imperfections were really glaring; not good at all, and pointed out to me by someone else that is familiar with paint work. He told me unequivocally not to except the vehicle unless those are fixed. You could not see that well in the video but trust me if you saw them it would bother you immensely. Basically there is dirt on the base coat of paint. It was sloppy in a couple of areas that need to be fixed. The rotor I understand. Gary explained it to me well after the video was over. The guys are not upset with me at all but I can assure you without a doubt that if you saw the couple of imperfections that I pointed out you would not accept the vehicle. Overall the paint work and everything else is fantastic but these couple of areas frankly I would have repaired if they happen tomorrow after I picked up the car.Hi Scott,
I don't want to sound too harsh but you should do yourself and the shop a favor and stay away for a few days. That last video was a little tough to watch, I felt sorry for those guys. One of the guys was trying to talk to you about his concerns with the rotors and you ignored him by getting completely got lost in the imperfections in the paint. Those guys have done ton of work on your car and it looks really good but as he says in the video, your not paying for a show perfect paint job - that would have cost thousands more. There are going to be some imperfections. They look like they take a lot of pride in their work. If I was them, I would have been really pissed off about this last visit where you basically asked why isn't there more done and why does all of this look so shitty. Just a suggestion (before they kick you out), don't go back for a couple of weeks and let them get some work done.
In the meantime, go look at the paint on some new BMWs at the dealer, I bet for sure your new paint job looks way better.
Vince
