Peter - the car is looking great! Super work. I just did almost the same thing on the Alpina( http://www.bimmerforums.com/forum/showthread.php?1799935-Alpina-Restoration ). I know you will be proud when it is all said and done. Still miss the E9.
You are using an out of date browser. It may not display this or other websites correctly.
You should upgrade or use an alternative browser.
You should upgrade or use an alternative browser.
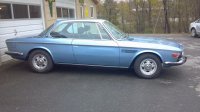
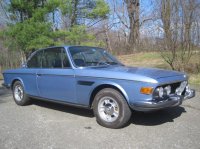
Will have to start somewhere
- Thread starter Peter Coomaraswamy
- Start date
-
- Tags
- restoration list
Thanks all for the replies, I think I will try my best to do myself, now that you say that they ARE painted. I will try the Wurth, and Roger, that is one bad @ss looking 850- hey, I have 2 e9's maybe we can trade one ??? ")
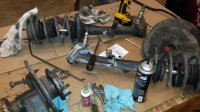
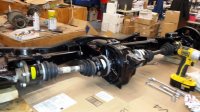
Not sure I'll get it done by the end of the week but I cleaned up the rear sub frame pieces and am in the process of putting it back together. The aftermarket undercoating that ended up all over the parts was/is quite a pain to remove but as I mentioned before it probably saved allot of the car so I'd rather clean and scrape than weld. I know that this has been touched on before but the swing arm bushings are very easy to replace once the sub frame is out- I would not like to do it while still in the car but I guess it's possible. The tool I am using to both eject and insert the new bushings is a ball-joint puller. It works great for this application, not sure how it would work on ball-joints though. And to prevent the bushings from mushrooming I am using a close fit ID pipe which you can see in one of the pictures. As with most clean-up jobs it's rather messy but the end result should look ok even though I was unable to find any rattle cans that were even a close match to the original subframe color. I would probably have to enlist in the German Army to have access to that shade. Anyhow, I'm shooting for Friday to get it up in the car with the suspension in so I can start to put the trunk back together. I'm tempted to do that now but I may have to crawl around back there to get the shock bushings in.
Thanks for the comments and help so far- It's allot easier the second time around
Thanks for the comments and help so far- It's allot easier the second time around
Attachments


Peter,
Did you spray the Wurth up above the subframe area already?
Did you spray the Wurth up above the subframe area already?
What is the preferred lubricant for the LSD (1970). I think it has 90 wt. in it now but want to do a nice re-fresh before raising her up
Stick with the 90 wt hypoid gear oil, http://www.redlineoil.com/product.aspx?pid=46&pcid=7
Thanks Andrew!
Chris, have not cleaned/sprayed the area yet- not looking forward to it either
Chris, have not cleaned/sprayed the area yet- not looking forward to it either
Someone was asking
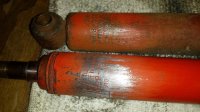
Sorry I could not find the original thread on this but someone was asking about the original shocks on a '70 2800 CS and I think these are the original equipment as I just pulled them out of my car which is supposed to be fairly original. I may be wrong but I post for reference;
Sorry I could not find the original thread on this but someone was asking about the original shocks on a '70 2800 CS and I think these are the original equipment as I just pulled them out of my car which is supposed to be fairly original. I may be wrong but I post for reference;
Attachments
Need some advice please
I'm putting the front/rear suspension back together and I have the CN springs with the Bilstein HD's? Because I am seeking to remain "stock", has anyone used the Bilstein shocks with the stock springs, and assuming that the original springs have seen 80K, and many years of sitting stationary. The suspension in the Blue coupe is modified (for better or worse) and I would really like to make the Polaris Coupe something that rides very much the same as when it was new.
Open to all comments
Thanks,
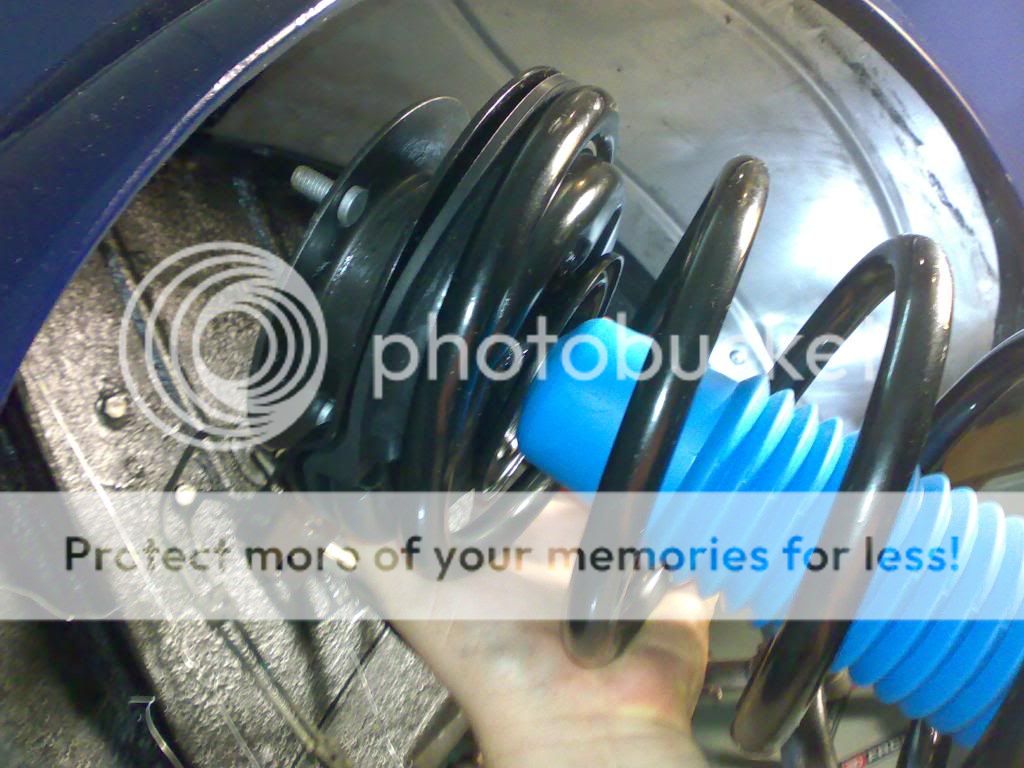
As a side note, DeQ, in the picture below you have the insert cover cap (or whatever it is called) installed -just above the blue cover-but no "European" cover around it. I thought that was left out. please advise- thanks
I'm putting the front/rear suspension back together and I have the CN springs with the Bilstein HD's? Because I am seeking to remain "stock", has anyone used the Bilstein shocks with the stock springs, and assuming that the original springs have seen 80K, and many years of sitting stationary. The suspension in the Blue coupe is modified (for better or worse) and I would really like to make the Polaris Coupe something that rides very much the same as when it was new.
Open to all comments
Thanks,
As a side note, DeQ, in the picture below you have the insert cover cap (or whatever it is called) installed -just above the blue cover-but no "European" cover around it. I thought that was left out. please advise- thanks

Last edited:
I'm putting the front/rear suspension back together and I have the CN springs with the Bilstein HD's?
That is the way to go. Athena has CN springs up front and stock springs in the rear, click the regisrty link in my signature for the details. I did my suspension system over a week while driving the car. Bilstiens and front springs eliminated the floating feeling she had. The anti sway bars made her corner like an E83 X3, 2004-1010. The air dam added stability at highway speeds of 65+ I drive a lot of highway miles and the car is comfortable and can handle twisty roads with ease.
The pictures show before and after the suspension work. She has a much better stance now. The reveal of the tire to the fender is the same ooks and feels right to my eyes and more importantly butt.
Attachments
Thanks Andrew, any thoughts on the rear springs, I have CN's in the shop now so I can go either way. Thanks for the shots!
If you want it to look stock put the CN springs all the way around. Otherwise you'll have a California rake, the front 7/16s lower than the rear.
If you want it to look stock put the CN springs all the way around. Otherwise you'll have a California rake, the front 7/16s lower than the rear.
i do not see this, the CN do not make the coupe to look stock
at least at the front the CN make the car lower than the original stock
I'm putting the front/rear suspension back together and I have the CN springs with the Bilstein HD's? Because I am seeking to remain "stock", has anyone used the Bilstein shocks with the stock springs, and assuming that the original springs have seen 80K, and many years of sitting stationary. The suspension in the Blue coupe is modified (for better or worse) and I would really like to make the Polaris Coupe something that rides very much the same as when it was new.
Open to all comments
Thanks,
As a side note, DeQ, in the picture below you have the insert cover cap (or whatever it is called) installed -just above the blue cover-but no "European" cover around it. I thought that was left out. please advise- thanks
hi peter i left the insert cover cap cos i wanted to spread/share the presure
i do not see this, the CN do not make the coupe to look stock
at least at the front the CN make the car lower than the original stock
You are right DQ the front and rear are lower than stock.
Thanks DeQ, I thought maybe you put them back there in case you ever wanted to use the original covers- then you would know where to find them .
It's pretty easy for me to change out springs, especially the CN ones as you barely need a compressor to get the fronts off and the rears are a 20 minute job, so I'll probably put the CN's in and if it's not looking right I'll swap them out.
I appreciate all the quick replies- thanks
.It's pretty easy for me to change out springs, especially the CN ones as you barely need a compressor to get the fronts off and the rears are a 20 minute job, so I'll probably put the CN's in and if it's not looking right I'll swap them out.
I appreciate all the quick replies- thanks
hi, CN do not look like stock, but they look fabulous !
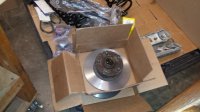
Well, no where near as exciting as the club car build but I thought I would post what little I got done today in between work ..and..work. Also, thanks again to everyone for the information and suggestions. I got the rear wheel cylinders and rubber brake hoses today so I put those in. The steel brake lines back there looked pretty bad so I cleaned them up and coated them with some polyurethane spray, I don't think it will last that long but just wasn't motivated to build new ones though I will probably have to at some point. As a side note, I was unable to rotate the 11mm brake nut at one end of the steel line-wheel cylinder side- so I'm glad it was in a fairly good spot when it came tight. I put 1 strut together with the Bilstein insert and the CN spring and also put that piece in per deQ. I find it interesting that the spring can be collapsed by hand and the upper "cup" rotated even though the insert nut is tight. I does not appear to be problematic when under load though I worry a little if I go over a good bump or high speed rise in the road; any thoughts on this welcome! The hardware under there looked pretty good once all the 3rd party under-goop was removed so I tried to preserve the "German Army Green" color as best I could and only treated areas that had rusty bits. The old strut bearings were completely rusted, quite strange i thought, it was practically frozen.
Other than that just collecting and cleaning parts for re-assembly, got the rotors cut but still have to bang out the races and pop in the new ones, bearings and seal and then I have the 2 frozen front calipers to rebuild, man, this thing really needs allot of stuff done, but I guess that's the nature of the beast, actually it's kind of interesting, if you find a low milage car that has sat for a while there are very few things that don't have to be re-worked to some degree, and if you buy a high milage car that's used allot, there are very few things that don't have to be re-worked... Hmmm, as my momma would say; six of one, half dozen of another.
Well anyhow, some shots for reference and if anyone sees something I put in upside down please shout.
Thanks,
Attachments
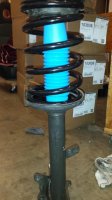
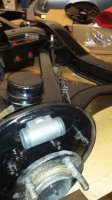
Well, no where near as exciting as the club car build but I thought I would post what little I got done today in between work ..and..work. Also, thanks again to everyone for the information and suggestions. I got the rear wheel cylinders and rubber brake hoses today so I put those in. The steel brake lines back there looked pretty bad so I cleaned them up and coated them with some polyurethane spray, I don't think it will last that long but just wasn't motivated to build new ones though I will probably have to at some point. As a side note, I was unable to rotate the 11mm brake nut at one end of the steel line-wheel cylinder side- so I'm glad it was in a fairly good spot when it came tight. I put 1 strut together with the Bilstein insert and the CN spring and also put that piece in per deQ. I find it interesting that the spring can be collapsed by hand and the upper "cup" rotated even though the insert nut is tight. I does not appear to be problematic when under load though I worry a little if I go over a good bump or high speed rise in the road; any thoughts on this welcome! The hardware under there looked pretty good once all the 3rd party under-goop was removed so I tried to preserve the "German Army Green" color as best I could and only treated areas that had rusty bits. The old strut bearings were completely rusted, quite strange i thought, it was practically frozen.
Other than that just collecting and cleaning parts for re-assembly, got the rotors cut but still have to bang out the races and pop in the new ones, bearings and seal and then I have the 2 frozen front calipers to rebuild, man, this thing really needs allot of stuff done, but I guess that's the nature of the beast, actually it's kind of interesting, if you find a low milage car that has sat for a while there are very few things that don't have to be re-worked to some degree, and if you buy a high milage car that's used allot, there are very few things that don't have to be re-worked... Hmmm, as my momma would say; six of one, half dozen of another.
Well anyhow, some shots for reference and if anyone sees something I put in upside down please shout.
Thanks,
it looks very nice, peter
an advice you may like to follow,
put a black plastic tie, or strap at the bottom of the blue cover so it becomes fixed to the black steel tube
i do not know if i have explained myself well
this procedure helps avoiding dirt from entering inside from below
Well, no where near as exciting as the club car build but I thought I would post what little I got done today in between work ..and..work. Also, thanks again to everyone for the information and suggestions. I got the rear wheel cylinders and rubber brake hoses today so I put those in. The steel brake lines back there looked pretty bad so I cleaned them up and coated them with some polyurethane spray, I don't think it will last that long but just wasn't motivated to build new ones though I will probably have to at some point. As a side note, I was unable to rotate the 11mm brake nut at one end of the steel line-wheel cylinder side- so I'm glad it was in a fairly good spot when it came tight. I put 1 strut together with the Bilstein insert and the CN spring and also put that piece in per deQ. I find it interesting that the spring can be collapsed by hand and the upper "cup" rotated even though the insert nut is tight. I does not appear to be problematic when under load though I worry a little if I go over a good bump or high speed rise in the road; any thoughts on this welcome! The hardware under there looked pretty good once all the 3rd party under-goop was removed so I tried to preserve the "German Army Green" color as best I could and only treated areas that had rusty bits. The old strut bearings were completely rusted, quite strange i thought, it was practically frozen.
Other than that just collecting and cleaning parts for re-assembly, got the rotors cut but still have to bang out the races and pop in the new ones, bearings and seal and then I have the 2 frozen front calipers to rebuild, man, this thing really needs allot of stuff done, but I guess that's the nature of the beast, actually it's kind of interesting, if you find a low milage car that has sat for a while there are very few things that don't have to be re-worked to some degree, and if you buy a high milage car that's used allot, there are very few things that don't have to be re-worked... Hmmm, as my momma would say; six of one, half dozen of another.
Well anyhow, some shots for reference and if anyone sees something I put in upside down please shout.
Thanks,
Peter
all Coupe project's are exciting !
keep it up
BD