Will have to start somewhere

adawil2002

Well-Known Member
Site Donor $$
Messages
5,187
Reaction score
3,050
Location
Brunswick, Maine
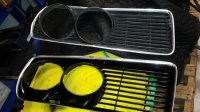
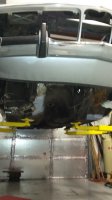
Well, now that 99% of the welding is out of the way and the mold has mostly dissipated I'm doing some general clean up and detailing. In one of the pictures below behind the headlamp buckets (which are removed) it seems as though there was some "undercoating" applied there- Should that be removed?


I'd leave it there. For the aged paint in the engine bay I'd try to match.
 

Peter Coomaraswamy

Well-Known Member
Site Donor $$
Messages
3,787
Reaction score
896
Location
Austin, TX
I was thinking that Chris but there is a medium texture to the black stuff sprayed on there; was there any texture on the original paint in that area? If so, it would make sense, if not I would not want to make it harder for someone else to scrape off if ever they wanted to.

Thanks
 

HB Chris

Well-Known Member
Site Donor $$
Messages
19,418
Reaction score
8,759
Location
Huntington Beach, CA
There is texture behind the buckets on mine too. Paint the engine bay and here as well. I used a Finish gun on a 2002, you mix paint more frequently but it gets in tight spaces. Just rough up the existing paint, shoot rattle can etching primer on any bare spots and go from there.
 

Peter Coomaraswamy

Well-Known Member
Site Donor $$
Messages
3,787
Reaction score
896
Location
Austin, TX
Excellent! that's where I'm headed then. This will be my first time shooting paint so I'll be sure to set up a practice area. I will also try to have an experienced "co-sprayer" on hand in case I chicken out.

On another note, I had a new headliner put in the blue coupe today. It is not stock, but I had to do something as the noise coming from up top was quite a bother and nothing else in that car is stock. I'll post some pictures when I pick it up tomorrow, along with some other console pieces that were recovered for another forum member.

Thanks
 

HB Chris

Well-Known Member
Site Donor $$
Messages
19,418
Reaction score
8,759
Location
Huntington Beach, CA
Prep with a scuff pad, wipe down with Semsolve or equivalent, shoot horizontally, then vertically, gets lots of paint on so everything is covered. And hang plastic everywhere!
 

Peter Coomaraswamy

Well-Known Member
Site Donor $$
Messages
3,787
Reaction score
896
Location
Austin, TX
the mess keeps growing

It's not all bad at all but I guess I'm a little OCD when it comes to cleaning things. I think if it's just cleaning and then minor refreshing, say a few cans of paint to detail things and stop/prevent rust then it should get done- problem is when do you stop? So now the CV's have to be re-packed, new booties, new diff fluid. new mount, new bushings of course, new rubber brake lines of course, new hardware-of course!!!! New brakes, cut drums. I am reflecting on my decision and ask myself just one question; what the heck was I thinking?
 

Attachments

  • front grill clean up.jpg
    front grill clean up.jpg
    84.2 KB · Views: 238
  • dirty rear end.jpg
    dirty rear end.jpg
    76 KB · Views: 255
  • underbelly.jpg
    underbelly.jpg
    87.6 KB · Views: 251

Stevehose

Well-Known Member
Site Donor $$
Messages
13,019
Reaction score
5,693
Location
Sarasota, FL
You are moving at a very impressive pace. But what about rear bearings while you have the CV's off?


It's not all bad at all but I guess I'm a little OCD when it comes to cleaning things. I think if it's just cleaning and then minor refreshing, say a few cans of paint to detail things and stop/prevent rust then it should get done- problem is when do you stop? So now the CV's have to be re-packed, new booties, new diff fluid. new mount, new bushings of course, new rubber brake lines of course, new hardware-of course!!!! New brakes, cut drums. I am reflecting on my decision and ask myself just one question; what the heck was I thinking?
 

Peter Coomaraswamy

Well-Known Member
Site Donor $$
Messages
3,787
Reaction score
896
Location
Austin, TX
See what I mean Steve!

I think I'll be OK if I slow down- normally holidays are the time to work on little projects, maybe I'll spend a little more time with the family and move a little slower on the car.

Of course when I'm "done" with this one, my wife's 71 Torino GT conv. needs all new suspension and then my purchasing manager is counting on me helping him with his '70 P1800 ES, and a friend with a Baur Targa is trying to talk me into doing a full resto on that.

Almost forgot that I have a "regular" job as well.

Might just run away and leave 5 unfinished projects... that would be cool!
 

Peter Coomaraswamy

Well-Known Member
Site Donor $$
Messages
3,787
Reaction score
896
Location
Austin, TX
When I was younger (much) I used to love Warren Zevon and he had a song "I'll sleep when I'm dead", well of course he's sleeping now but my OCD coupled with ADD, PTSD etc,. without going into lots of "off topic" details, compels me to keep busy. Truthfully, I have an incredible crew at work who, to some degree share my enthusiasm for these cars and enjoys watching the boss work on these things during lunch break since my "shop" is attached to the warehouse. They also benefit from the fact that I work on all their cars (mostly brakes and non functioning lights)- girls you know! The wife complains allot but she knows what I'm doing- and more importantly- what I'm not doing and she has a hidden love for older cars as well. My son approached me last night and since he's 15 was wondering if "we" could build an old Mustang "together", Nothing would make me happier except the "we" and "together" usually turns into "me" and "alone". So, yes, I do actually have a full time job + but no, I do not sleep :)
 

Peter Coomaraswamy

Well-Known Member
Site Donor $$
Messages
3,787
Reaction score
896
Location
Austin, TX
Rear end removal

along with the pictures, I thought I would share something I learned just in case anyone else wants to remove the rear end with the parking brake cables attached; remove the interior brake handle, squirt some WD up the brake tube if possible, with a pair of vice grips twist the bottom of the tube where the cable exits (it's a fitting) last 3/4 inch piece, then the cable ends will come out pretty easily. -others may have better tips-

Also, if you don't have a lift, which may be an advantage for this operation, be sure to get those cables free before dropping the rear end.

My CV joint bolts were covered in some kind of caked on grease/dirt, I have heard that some people have allot of trouble with those bolts. They are torqued pretty tight so I took some time and cleaned the allen sockets with a pic & vacuum and then used WD and to make things easier I used an extension tube on the wrench. Next it's just inspecting, scraping, cleaning and painting. BTW, the color of the sub frame looks like an extremely dark olive green so I'll try to match that when I paint it. Outside CV's have a yellow dab, inboard have white (not sure if that's a standard). Good time to inspect brake lines and will replace rubber hoses as a maintenance item. Bushings for swing arms will be replaced, nothing fancy. Drums will be cut next week and I hope to have the rear end back up with the bottom side cleaned and touched up with the Wurth spray by the end of the week. If I didn't run out of Argon the welding would be done, but still, that's 2 hours at the most. I still have interior rail rustproofing to do but then she should start to go back together.

Messy job though-

Mecum auction this weekend in Austin so a great excuse for a day off from work and a little time with my punk kids looking at cars :)
 

Attachments

  • dirty rear.jpg
    dirty rear.jpg
    54.5 KB · Views: 277
  • dirty rear1.jpg
    dirty rear1.jpg
    80.6 KB · Views: 251
  • dirty rear2.jpg
    dirty rear2.jpg
    97.4 KB · Views: 247
  • dirty rear3.jpg
    dirty rear3.jpg
    52.6 KB · Views: 255

Stevehose

Well-Known Member
Site Donor $$
Messages
13,019
Reaction score
5,693
Location
Sarasota, FL
Mine was dark green also, I couldn't find an exact match in a rattle can but got close enough.

Also when reinstalling the e-brake cables, whith the car still up on jacks I tightened each nut until it affected each wheel the same as the handle is pulled up by rotating each wheel by hand. It may not be the same amount of turns of the nut to make them engage the same. Then equal turns when testing for final engagement on a slope.

Good time to put new brake hoses on :)
 

Peter Coomaraswamy

Well-Known Member
Site Donor $$
Messages
3,787
Reaction score
896
Location
Austin, TX
Thanks Steve, I have not asked LJI yet but are the e-brake cables readily available? I kind of buggered one up when removing.
 

Peter Coomaraswamy

Well-Known Member
Site Donor $$
Messages
3,787
Reaction score
896
Location
Austin, TX
Wheel question

The wheels that came with the Polaris coupe were the standard 14 inch with the chrome hubcaps (I'm not sure what the proper name for that style is). Although they seem to be the least desirable style they are what came on the car so I want to use them however they were actually painted "polaris" somewhere along the line and they show the 79K worth of road duty. I would like to know the proper process for reconditioning the wheels; I likely won't do it myself but I would like to know the basics so I can be sure whoever does them knows what they are doing. Any help would appreciated.
 

Stevehose

Well-Known Member
Site Donor $$
Messages
13,019
Reaction score
5,693
Location
Sarasota, FL
Polaris is correct color. Here's an old thread I did, Krylon Dull Aluminum is good (might have to special order it) but I did my Alpinas with Wurth Silver and Clear and now prefer that.

http://www.e9coupe.com/forum/showthread.php?t=8467


The wheels that came with the Polaris coupe were the standard 14 inch with the chrome hubcaps (I'm not sure what the proper name for that style is). Although they seem to be the least desirable style they are what came on the car so I want to use them however they were actually painted "polaris" somewhere along the line and they show the 79K worth of road duty. I would like to know the proper process for reconditioning the wheels; I likely won't do it myself but I would like to know the basics so I can be sure whoever does them knows what they are doing. Any help would appreciated.
 

adawil2002

Well-Known Member
Site Donor $$
Messages
5,187
Reaction score
3,050
Location
Brunswick, Maine
I think the proper name is stock. Look for a Kwiksilver wheel refinisher, they'll strip and powder coat BMW silver. The stock silver on the wheels is close to Polaris.
 

Nicad

Well-Known Member
Site Donor
Messages
3,525
Reaction score
545
Location
Toronto
I think you would get great results by Plastic or glass beading them, followed by an acid etch, alodine treatment, zinc Chromate rattle can primer and then Wurth Wheel paint. Or you could sand them down by hand to scuff the paint and go straight to the Wurth wheel paint.
 
Top