The second one is a muffler, not needed, it has no sight glass either.
You are using an out of date browser. It may not display this or other websites correctly.
You should upgrade or use an alternative browser.
You should upgrade or use an alternative browser.
Will have to start somewhere
- Thread starter Peter Coomaraswamy
- Start date
-
- Tags
- restoration list
Yes I removed mine but in doing so you will be buying more hoses...slippery slope, just depends on how far you want to go ")
The second one is a muffler, not needed, it has no sight glass either.
Hi Steve, from your earlier post;
Not including the vacuum pump and gauge set (about $160):
compressor and bracket - $190 "Sanden style" 709 compressor (could also use 508 style) and York mounting bracket from Johnjoysyl eBay seller. He can sell you a custom kit like this per your spec, just contact him:
http://www.ebay.com/itm/SANDEN-STYL...r_Truck_Parts_Accessories&hash=item5d51fcc885
condensor- $90 16"x18" parallel flow version from nostalgicairparts.com
hoses and fittings - $120 local hydraulic shop and NAPA for fittings
dryer - $30 various sources on ebay or RMEuropean/AZAuto
machine shop work - $30 local shop-same one that resurfaced my flywheel
misc brackets and bolts - $15
Make sure you read the part about flare vs o-ring fittings!
Bwana
Well-Known Member
Try these guys for the Sanden compressor. I'm pretty sure this is where I got mine plus the bracket
http://iceautoair.com/index-3.html
http://iceautoair.com/index-3.html
Thanks Steve & Bwana, I will start collecting parts. I have another question- unrelated though-
The tar mat that lines the inner floorboards I think adds a significant amount of sound deadening to the car and was wondering if there is a place to get the original style stuff, conversely is there a recommended substitute.
Thanks,
Rear end coming out this afternoon and just getting refreshed- no major modifications, just new bushings, shocks springs and perches as well as the diff mount. I'll also take this opportunity to put in the new steel fuel line I made and hope fits
The tar mat that lines the inner floorboards I think adds a significant amount of sound deadening to the car and was wondering if there is a place to get the original style stuff, conversely is there a recommended substitute.
Dynamat is the recommended equivalent.
Shop class 101
Ordering the Dynamat tomorrow. That stuff is not cheap, luckily I only need a little.
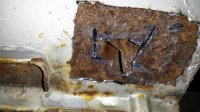
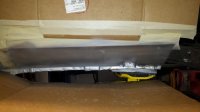
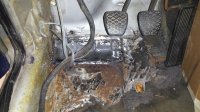
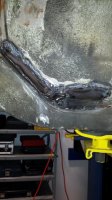
I'm not much with body work but I thought I would take my time and patch the rear inner/outer rocker. I was able to weld a piece onto the inner rocker and then applied Por-15 liberally. Then I fashioned a patch for the outer and did my best to make everything look stock. I think it turned out OK but glad it will be covered by the rocker cover. I also have not had much luck finding pieces for the floor so I made some that should work. It's no wonder metal workers get paid so much! Anyhow, here goes-
Ordering the Dynamat tomorrow. That stuff is not cheap, luckily I only need a little.
I'm not much with body work but I thought I would take my time and patch the rear inner/outer rocker. I was able to weld a piece onto the inner rocker and then applied Por-15 liberally. Then I fashioned a patch for the outer and did my best to make everything look stock. I think it turned out OK but glad it will be covered by the rocker cover. I also have not had much luck finding pieces for the floor so I made some that should work. It's no wonder metal workers get paid so much! Anyhow, here goes-
Attachments
jamesw
Well-Known Member
Lizard skin is a good substitute for Dynamat.
HTH
James
HTH
James
Chris, the "accoustimat" is pretty good but it's thinner than the stock stuff so I wanted to get something closer to the original since I'm just replacing select pieces and I would like to match the thickness. I do like the "accoustimat" though and it's really easy to use and mold around corners plus it does not get soft with heat and ooze black spooge everywhere as I have heard the Eastwood product does- (no complaints on the Dyna-Mat though)
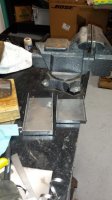
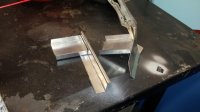
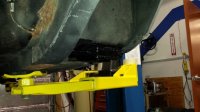
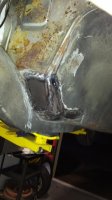
First part of the floor patch is in but not completely welded all the way around. The structural pieces are a bear though. These still need some fine tuning but I hope when I'm done they look "stock". They are the correct thickness and very difficult to shape.
I do not enjoy welding in tight places :-(
I do not enjoy welding in tight places :-(
Attachments
Last edited:
two down 2 to go
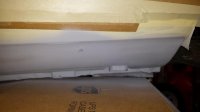
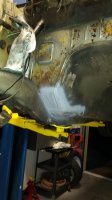
finished the patch on the drivers floor, it all fit pretty well and I think once I have it seam sealed and undercoated it will be difficult to tell unless some one has to rip into it, but I'll be long dead by that time so if they curse me I won't care. Pic is not so good because the por-15 is really shiny but I'll move over to the passenger side soon then I can start putting the interior back in.
finished the patch on the drivers floor, it all fit pretty well and I think once I have it seam sealed and undercoated it will be difficult to tell unless some one has to rip into it, but I'll be long dead by that time so if they curse me I won't care. Pic is not so good because the por-15 is really shiny but I'll move over to the passenger side soon then I can start putting the interior back in.
Attachments
If you want any hope of having paint stick to the POR 15 you need to use their topcoat first, been there done that.
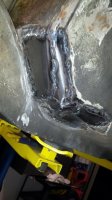
Well, another peaceful sunday after spending over 8 hours Saturday playing "Griswald" with the holiday lights, the penguins, Santa and even a pink pig on skis I was able to sneak away to the shop for some welding practice. As you can see I have still a bit of grinding to do but I actually got the curves correct so now one more hole on the passengers floor and she can start going back together on the inside, but there is plenty left to do...
Chris, I ordered the Wurth undercoating in spray cans so I'll post the results- thanks for the info.
after spending over 8 hours Saturday playing "Griswald" with the holiday lights, the penguins, Santa and even a pink pig on skis I was able to sneak away to the shop for some welding practice. As you can see I have still a bit of grinding to do but I actually got the curves correct so now one more hole on the passengers floor and she can start going back together on the inside, but there is plenty left to do... Chris, I ordered the Wurth undercoating in spray cans so I'll post the results- thanks for the info.
Attachments
looks very professional peter
congratulations
BTW, griswald, eh ? uuuhhh !
congratulations
BTW, griswald, eh ? uuuhhh !
national lampoon vacation - movie w/ chevy chase playing clark griswald.BTW, griswald, eh ? uuuhhh !

Peter, I deleted the incorrect VIN for you just now from the Registry, just doing some housekeeping. Your 2800CS had only two VINs assigned after yours, it may be be one of the last ones built. Ask BMW for the build date, link is on bottom left of the Registry page. 2270641 was built 3/26/71.
Chris
Chris
Thanks Chris, I will check that out tomorrow- I appreciate the effort. I did get the last floor piece started, actually it's welded in but need to attach the little box and flap. I'm kind of not liking welding very much, it's very messy, smelly and I'm not very good at it...well, I guess I could say that about lots of stuff we do on these cars but I would rather do mechanical work than something that makes me pretend to have some artistic skill, I truly believe I grind off more metal than I leave on:-(
I'm going to build a little "welding tent" so I can fix the back parcel shelf and I'll probably use some filler, it won't be perfect but WTF was someone thinking.
Next on my list is to do something really stupid and buy a paint gun so I can spray the engine compartment. I will go to a friends body shop and volunteer for the day so I can get some tips. Just another thing I'll end up doing at least twice
question/opinion(s)
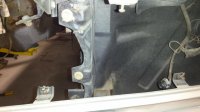
Well, now that 99% of the welding is out of the way and the mold has mostly dissipated I'm doing some general clean up and detailing. In one of the pictures below behind the headlamp buckets (which are removed) it seems as though there was some "undercoating" applied there- Should that be removed?
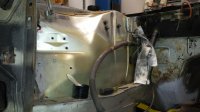
Next, as you can see the side of the engine bay has yellowed significantly, then it was over-sprayed; I would clean off the new paint and leave the original baked silver but the battery side of the bay is pretty much stripped of paint, so I will have to re-paint the bay; semi-colon again-would you mix the paint to bring back the "baked" look or would you paint it the correct color and let it just get old. The engine will not be "dressed up" at all, just really clean. In the scheme of things I guess either would work but I thought I would ask.
Thanks
Well, now that 99% of the welding is out of the way and the mold has mostly dissipated I'm doing some general clean up and detailing. In one of the pictures below behind the headlamp buckets (which are removed) it seems as though there was some "undercoating" applied there- Should that be removed?
Next, as you can see the side of the engine bay has yellowed significantly, then it was over-sprayed; I would clean off the new paint and leave the original baked silver but the battery side of the bay is pretty much stripped of paint, so I will have to re-paint the bay; semi-colon again-would you mix the paint to bring back the "baked" look or would you paint it the correct color and let it just get old. The engine will not be "dressed up" at all, just really clean. In the scheme of things I guess either would work but I thought I would ask.
Thanks