Sweet. I like the period Craig stereo! Probably purchased at a truck stop along with a Cobra cb radio back in the day
You are using an out of date browser. It may not display this or other websites correctly.
You should upgrade or use an alternative browser.
You should upgrade or use an alternative browser.
Bringing a '74 back up to her intended glory.
- Thread starter Bmachine
- Start date
-
- Tags
- restoration list
Sweet. I like the period Craig stereo! Probably purchased at a truck stop along with a Cobra cb radio back in the day
Haha. It's yours for the price of shipping if you want it! Otherwise it's heading for the trash bin. Or metal recycling if they take that.
Last edited:
Time to remove the slushbox
Attachments
hopefully not to return to your coupeTime to remove the slushbox
hopefully not to return to your coupe
Going straight to the metal recycling plant!
Unless somebody needs it or any part of it. Speak soon bc I can't wait to get that thing out of my sight.
Update: No metal recycling outfit wanted an part of it. So I put an ad on CL for a FREE TRANSMISSION. I did mention that it was probably of no good use. But finally some super shady bogans came over in some beat up pickup truck and they were happy as clams. Teethless clams of course.
Last edited:
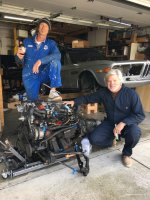
Great job Bo, glad Gavin was there to help.
Great job Bo, glad Gavin was there to help.
Thanks Chris. When doing something like this, four hands are MUCH better than two.
Bo,
You can fill those small holes where the gear shift lights were with 'liquid leather'. Carefully done, it will almost be imperceptible unless the area is brightly lit. Had a similar set of small holes in mine, as the man who had it restored in '87 also had an altimeter in a wooden box (to match the dash wood) installed on the dash!!
You can fill those small holes where the gear shift lights were with 'liquid leather'. Carefully done, it will almost be imperceptible unless the area is brightly lit. Had a similar set of small holes in mine, as the man who had it restored in '87 also had an altimeter in a wooden box (to match the dash wood) installed on the dash!!
I found small rubber plugs, probably at Ace.
More (slow) progress today. Cleaning the engine bay so I can repaint it.
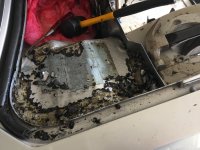
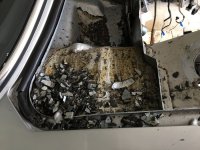
Removing the sound deadening on right fender. Everything looks pretty clean underneath which is what I wanted to make sure of.
Removing the sound deadening on right fender. Everything looks pretty clean underneath which is what I wanted to make sure of.
Attachments
The scene of the crime with my buddy John doing most of the dirty work.
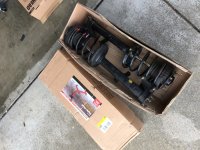
I discovered that the box for the HF engine stand is the perfect size to house the front strut assemblies.
I discovered that the box for the HF engine stand is the perfect size to house the front strut assemblies.
Attachments

Cool!
Bo,
You can fill those small holes where the gear shift lights were with 'liquid leather'. Carefully done, it will almost be imperceptible unless the area is brightly lit. Had a similar set of small holes in mine, as the man who had it restored in '87 also had an altimeter in a wooden box (to match the dash wood) installed on the dash!!
Great tip. Thanks Gary!
February was a busy car month as I had a few weeks respite from work. But progress was severely hampered by the fact that I messed my back up while doing some work under the car first and then by the highly unusual amount of rain we have been having in California. It's hard to work on a rust sensitive car when it pours every other day.
But by skillfully dodging the raindrops, I got a few things done. I'd like to say that I can cross items off the list but most of the things I ended up doing were never on the list to begin with...
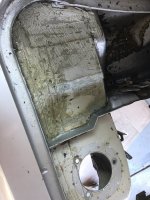
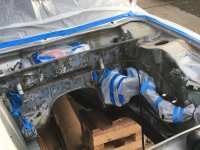
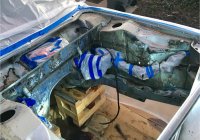
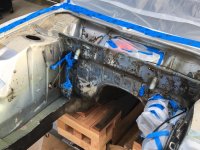
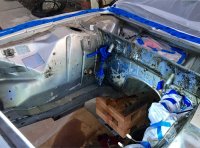
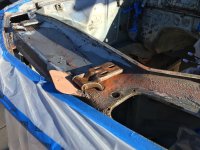
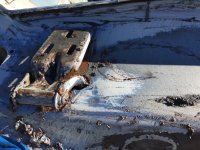
First I spent a good deal of highly unpleasant time cleaning grease, dirt and seemingly tons of road wear off the engine bay, primarily with mineral spirits.
Most visible is at the bottom on the frame rails and transmission tunnel in these before and after pics.
In the last photo you can see the original Fjord color where a sticker was removed. That is where I am taking it back to.
But by skillfully dodging the raindrops, I got a few things done. I'd like to say that I can cross items off the list but most of the things I ended up doing were never on the list to begin with...
First I spent a good deal of highly unpleasant time cleaning grease, dirt and seemingly tons of road wear off the engine bay, primarily with mineral spirits.
Most visible is at the bottom on the frame rails and transmission tunnel in these before and after pics.
In the last photo you can see the original Fjord color where a sticker was removed. That is where I am taking it back to.
Attachments
-
 file-80AA22F9-C222-4740-90E1-A863711A196D-6400-000005EC4F9CE468.jpg242.5 KB · Views: 516
 -
 file-CA1BBB2C-C089-47D0-B4C0-865D3E005CC3-6400-000005EC5107C6F6.jpg251.3 KB · Views: 483
 -
 file-3FEF4D40-7BD0-4DDE-86F9-9771DDB41F20-6400-000005EC50254CAA.jpg244.7 KB · Views: 471
 -
 file-96FD6F06-A769-4282-9C00-7A0489FFCB7B-6400-000005EC5173C96C.jpg250.2 KB · Views: 501
Last edited:
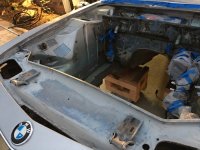
Next was the cleaning of the top. I did part with paint remover and part with a drill using either a wire brush or a 3M abrasive "rubber" disk. The plan is to at least remove anything that was added on top of the original paint so I can repaint the whole thing.
Choosing between the two, at the end of the day I like the "dry method" better bc using the chemical way, you really should hose the whole thing down afterwards which is not practical in my case. Last thing I would want is to have all that mess wash down to the ocean.
My buddy John was tremendously helpful there again.
Attachments
Last edited:
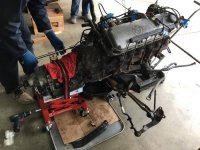
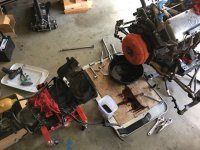
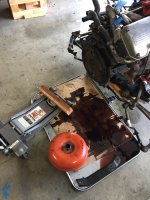
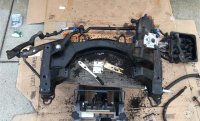
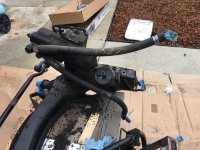
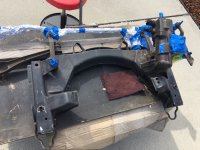
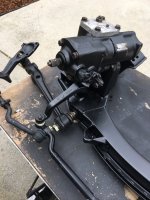
Next was separating the subframe from the motor. That was a bit of a sketchy adventure but Gavin and I somewhat miraculously managed to lift the engine on a stand by itself.
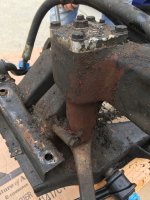
It was then time to clean and refurbish the subframe.
It was then time to clean and refurbish the subframe.
Attachments
Last edited:
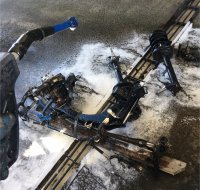
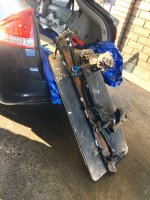
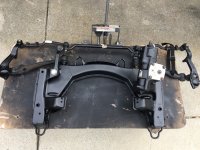
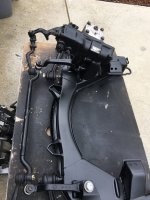
After doing a first pass at it in the driveway (and hating every minute of it) I decided to take the whole thing to a local self car wash.
First, I had to build a platform that I could use to slide the whole unwieldy thing in and out of the car by myself for transport with a really sore back.
Even though it took some time to set up and drive there, doing the cleaning this way was definitely a better idea than attempting to do it in front of the house without forever making the driveway look like a junk yard used to store cars here.
Once finally clean and dry, I painted it with VHT epoxy paint.
Attachments
-
 file-F95F890D-F320-476A-AE8F-8818CBCF7D87-6400-000005EC538F8583.jpg134.8 KB · Views: 486
 -
 file-1BA05968-9661-4B7A-8CD3-53FDB2712B4A-6436-000005F74A8247FF.jpg279.2 KB · Views: 494
 -
 file-D4DAA30F-C706-40AB-9076-FB3E139118AD-6436-000005F746134C7B.jpg385.6 KB · Views: 472
 -
 file-ABB15D22-3811-4FA6-8227-8F2A5432E4B0-6436-000005F7456586B3.jpg306.8 KB · Views: 480
 -
 file-D3318A72-736F-4595-8E6D-3BBC783B04CD-6436-000005F7441E0E3F.jpg260.9 KB · Views: 490
 -
 file-736B4215-D509-4CC7-8282-E8BA1D01346F-6436-000005F742CFE60F.jpg265.6 KB · Views: 487
 -
 file-787AE360-9C32-49EB-8575-DC6EFDE6CE5E-6436-000005F7425BCE9E.jpg139.7 KB · Views: 494
 -
 file-1D0C5CAC-BC6B-452E-9664-B6BB9E6F69DB-6436-000005F740FCC2DD.jpg130.3 KB · Views: 485
Last edited:
Bo,
Awesome, you are doing it the right way and will appreciate all of your hard work later when it is all done. I also hate the cleaning part when it is that dirty.
Awesome, you are doing it the right way and will appreciate all of your hard work later when it is all done. I also hate the cleaning part when it is that dirty.
Very nice progress, Bo!
Are you removing the hood hinges before painting? If you do, drill two small holes through the hinge and the metal behind it (where it is bolted to the car), to easily get it back into the correct position again later.
This is also a good trick to do on the hood-side of the hinge, drill two small holes through hinge + hood before removing the hood, so you can put some small drill bits in those holes later when installing the hood.
This is of course only if the hood is aligned and sits perfect before you remove it, I did this in the bodywork stage of my car, aligned the hood, drilled, removed the hood and hinges for paint. It helped tremendously when we installed it later, took us about 10 minutes to install, no alignment required.
Yes, it's a bit late for that in this stage with the hood already removed... But I just came to think of it, might be useful later down the road!
Keep it up!")
Are you removing the hood hinges before painting? If you do, drill two small holes through the hinge and the metal behind it (where it is bolted to the car), to easily get it back into the correct position again later.
This is also a good trick to do on the hood-side of the hinge, drill two small holes through hinge + hood before removing the hood, so you can put some small drill bits in those holes later when installing the hood.
This is of course only if the hood is aligned and sits perfect before you remove it, I did this in the bodywork stage of my car, aligned the hood, drilled, removed the hood and hinges for paint. It helped tremendously when we installed it later, took us about 10 minutes to install, no alignment required.
Yes, it's a bit late for that in this stage with the hood already removed... But I just came to think of it, might be useful later down the road!
Keep it up!