My Alpina B2 powered 3.0CS

Ohmess

I wanna DRIVE!
Site Donor $
Messages
4,835
Reaction score
2,639
Location
Aiken, SC
Honestly I couldn’t say with any real authority as I’m not doing the metalwork myself, but as the floors all need to be aligned and welded to the rocker structure, I would say it’s save to assume it would make sense to do the rockers first. Especially on my car where they were so far gone already.


Funny I was just looking at that upgrade just the other day. Unfortunately the Bosch SR441X which everyone seems to use appears to only be available in America. Can’t find one anywhere in Europe...

I think generally speaking oem replacement parts are not considered aftermarket upgrades as they already have some form of oem certification. Certainly something like a starter motor is never going to be noticed by any inspection.

Quoting Chris Macha: "SR71x, SR440x, SR441x, they all work, be sure they have the small case and permanent magnet."
 

eriknetherlands

Moderator
Site Donor
Messages
2,698
Reaction score
1,929
Location
Netherlands, Eindhoven area
Do you recommend floors or rockers first? I plan to do the floors before I strip the car. There are three other e9’s in WA that I could use as a potentially better start, but I would need floors to sell mine.

Markos,
If your floors are really bad, your sill (rocker) is usually bad as well, and the other way around. So it normally makes sense to do both. (i'm not taking about (dry) cars with floors that just have small holes that can be patched)

Doing the floors first works better; after you finish the floors, you open up the sill , asses it's state, replace or fix, and then weld the new floor to the fixed sill, treating the welds on both sides: grinding, clean and paint 'em.
Doing the sill first, keeping the old floor in, and closing the sill up completely before your weld in the floor gives you the problem that once you do the floor, that you'll end up with untreated welds inside your fresh sill. Wax won't prevent rust, it'll just delay it.

So in my view, the floor is replaced first, and the weld to the inner sill is made after the inner sill is opened up and replaced or fixed-up.

The question that defines the amount of work is however not what order to choose but: Do I replace the inner sill, or fix it up? .

If i'd (ever again..) tackle another E9, I'd first check the condition of the inner sill and decide to renew or freshen-up. Once it is solid again, i'd build up the other sill layers only after the floor is in, welded to the inner sill, cleaned the welds up inside, and then continue with the intermediate sills, the A/B/C pillars, the outer layer and lastly the skins.

- If a little rust, you can leave the inner sill in place, perhaps replacing only some rusty sections (usually front, back and/or some bottom edge). Just drill some location holes for Cleco's /screws prior to dissecting the spot welds, clean up/patch the rough edges of the parts, and tack it all back together in the right place. Doing so, you have the advantage that you can keep alignment of subsequent layers perfect as the location of the A, B and C pillar reinforcements and the under-seat reinforcements will not change. You don't want to weld them in 2 mm off in X/Y/Z.
Second advantage is that with the sill reduced to only the inner layer + the floor out, you can access both sides of that sill to clean it up or replace. Then weld in the floor; still having the ability to clean the welds and coat both sides of the welds. Once finished, there will be no rust left in the seam where the panels meet. It is what I choose on my car.

- If your inner rocker is gone beyond saving, as in the case of James above, then no solid alternative exists other then to replace the complete inner rocker. Keeping the old floor in for a while helps to locate the new inner rocker using the position of the old floor. I'd stiffen up the old floor with an additional temporary welded bar prior to removing the last sill layer to keep the floor's shape (front to rear); prevent it from sagging. Once the new inner sill is in, you can mark the height of the old floor to the fresh sill, and then proceed to cut& replace the floor sections and tack / spot weld them to the inner sill. Once finished, there will be no rust left in the seam where the panels meet. Disadvantage is that you have lost the reference for your A/B/C pillar locations, so you must engineer other ways to relocate them.

regards, Erik.
 
Last edited:

JamesE30

Well-Known Member
Messages
345
Reaction score
413
Location
Germany
Got a few more parts back from zinc plating so finally can continue assembly of the engine/axles

2ED43F17-2516-4549-BBDA-4B10B72333CF.jpeg
AE944425-B6EC-43A5-9632-30C652CE3439.jpeg
 

JamesE30

Well-Known Member
Messages
345
Reaction score
413
Location
Germany
Complete disassembly, renew and rebuild of cv joints making sure every bearings is Togo back in the exact place was removed form, as per the very helpful thread on this forum :)

04FCBB50-A52E-4B55-AD11-DB23DDFA9DA2.jpeg
3CC34C68-C19F-4A78-BB1F-808B5ED90B08.jpeg
C7ACE36D-D9EF-4339-BFA7-C3ED57BB05AC.jpeg
 

JamesE30

Well-Known Member
Messages
345
Reaction score
413
Location
Germany
Little bit of brake caliper rebuilding. Fromt pistons were in good condition, but all four tears had to be replaced. 2 had to be welded and threaded out of the calipers they were so stuck.. and if nding he correct m7 screws for the rear caliper a was a nightmare. But I have 4 and the other 4 should’ve arriving soon! Fingers crossed.

BA662FEE-C1EA-42D6-9E47-5DC859644EAA.jpeg
0291DEED-A05E-41EF-8445-38AADFC1696C.jpeg
FD7CA988-7B01-4AC6-BB68-2C2D088B9E44.jpeg
5CEA88B2-C245-4AEE-BD91-697C02E0EECE.jpeg
 

Peter Coomaraswamy

Well-Known Member
Site Donor $$
Messages
3,787
Reaction score
896
Location
Austin, TX
I'm not impressed with those shiny gold pieces
 

JamesE30

Well-Known Member
Messages
345
Reaction score
413
Location
Germany
Frightening how much this table load of tiny parts baggies cost me :(

Lots of little missing pieces to finish a few puzzles though!

C0B68DEB-654E-49DC-8A6D-740E6575FCA6.jpeg
 

gazzol

Well-Known Member
Messages
466
Reaction score
113
Location
Preston, England
"I look forward to watching as you peel back the layers of former restoration. And what a nice find regarding the engine! :) This will be good."

Thanks, It's certainly an adventure...


Alpina were not very helpful in providing any exact details on the engine other than the build year, but besides the obvious carbs and airbox, if you search the internet you can find information such as the following:

"The 230 PS and 270 Nm of torque were achieved through an Alpina gas flowed hemispherical cylinder head, larger inlet and exhaust valves, 300 degree Alpina camshaft, Alpina crankshaft, conrods and pistons giving an increased compression ratio of 10.0:1. This increase in power gave impressive performance figures. 0 – 100 km/h in just 7.3 seconds and a top speed of 146 mph. Alpina believe that only 192 of these B2 engine were ever built."

My engine is currently completely disassembled with various bits at the workshop and a load more parts in my garage, here you can see here the nice polished conrods:

View attachment 53047

and then the triple solex DDHT carbs, here are mine removed from the engine and in the process of being rebuilt.

View attachment 53048
View attachment 53050

You can see the porting on the intake side of the cylinder head here, there is also no provision for the mechanical fuel pump as the original 3.0CS had.

View attachment 53049

If anyone notices anything interesting or different in my pictures or info please let me know, Im still learning a lot about this car!

I am surprised that a 300 degree cam, ported head and triple cars only netted a 30 hp increase from stock. I would have thought a bit more???
 

JamesE30

Well-Known Member
Messages
345
Reaction score
413
Location
Germany
I am surprised that a 300 degree cam, ported head and triple cars only netted a 30 hp increase from stock. I would have thought a bit more???

The head in my car has clearly been replaced, build date is 1980, it appears everything else has been kept together with the b2 block. Will hope for around 230, but won’t have a clue how much power it’s making until it eventually hits the dyno for tuning.
 

2275xxx

Well-Known Member
Messages
186
Reaction score
79
Location
Lake Geneva
Regarding the specs of the B2 and B2S here is an answer I got from Alpina some time ago :

"...
B2 and B2 S both had a compression 10.0 :1.

The piston of the B2 is the standard piston of the 3,0 CSI.
The B2 S had a special ALPINA piston (with valve pockets), which is unfortunately not available anymore, since many years.

The cylinder head of the B2 is the standard BMW cylinder head and the cylinder head of the B2 S is a special ALPINA cylinder head.
... "

When they say a standard BMW cylinder head for the B2, they mean that it was not hemispherical like in a B2S.
But it was ported, I believe. This is why the period documents mention a "special Alpina cylinder head".

My B2 from 1974 had CSi pistons, but they were modified with valve pockets.


Attached :
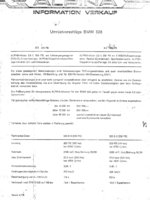
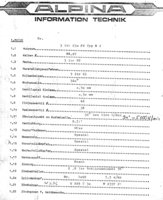
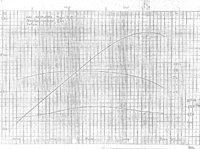
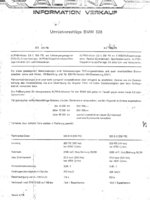
- general specs for the B6 and B2 in the E12
- data sheet for a B2 engine in a 1977 E12
- power and torque curves

C1137EDC-9004-4D0B-8064-D2F35A2F77B3.jpeg


425DA8D9-46E9-429C-8849-9BDE702C9B4F.jpeg


EC917222-976F-4B86-93FE-BF5A95769641.jpeg
 

Attachments

  • 693F60D5-7BB5-4426-B8F9-83B69C9770EF.jpeg
    693F60D5-7BB5-4426-B8F9-83B69C9770EF.jpeg
    242.4 KB · Views: 230
Last edited:

gazzol

Well-Known Member
Messages
466
Reaction score
113
Location
Preston, England
Regarding the specs of the B2 and B2S here is an answer I got from Alpina some time ago :

"...
B2 and B2 S both had a compression 10.0 :1.

The piston of the B2 is the standard piston of the 3,0 CSI.
The B2 S had a special ALPINA piston (with valve pockets), which is unfortunately not available anymore, since many years.

The cylinder head of the B2 is the standard BMW cylinder head and the cylinder head of the B2 S is a special ALPINA cylinder head.
... "

When they say a standard BMW cylinder head for the B2, they mean that it was not hemispherical like in a B2S.
But it was ported, I believe. This is why the period documents mention a "special Alpina cylinder head".

My B2 from 1974 had CSi pistons, but they were modified with valve pockets.


Attached :
- general specs for the B6 and B2 in the E12
- data sheet for a B2 engine in a 1977 E12
- power and torque curves


View attachment 64412

View attachment 64413

View attachment 64415

Thanks for the info.....thinking about it it wasn't a 30 hp increase because the carburettor cars only made 180 hp from the factory so that makes it a 50 hp increase which isn't an insignificant increase. I wonder how much a fuel injected car on itbs would make with a 300 degree cam? Have any members gone down this route?
Any way keep up the good work and keep the pictures coming. I also did a roof swap when I did my car in 2006/2007 the build is on here somewhere
 

JamesE30

Well-Known Member
Messages
345
Reaction score
413
Location
Germany
Thanks for the info.....thinking about it it wasn't a 30 hp increase because the carburettor cars only made 180 hp from the factory so that makes it a 50 hp increase which isn't an insignificant increase. I wonder how much a fuel injected car on itbs would make with a 300 degree cam? Have any members gone down this route?
Any way keep up the good work and keep the pictures coming. I also did a roof swap when I did my car in 2006/2007 the build is on here somewhere

Thanks mate, your roof swap documentation was actually a great help and motivation for mine! nice work.
 
Top