1974 BMW CSE

JetDexter

Well-Known Member
Site Donor
Messages
321
Reaction score
529
Location
Newport Beach, CA
Another good week of progress for the CSE! It is officially coming home next Thursday! Well, that is if our drives and testing continue to go well. Here's what I got done this week:

First, Brett handled the carpeting in the trunk. He shaped a piece of plywood to hide the Tesla battery modules on the upper shelf. Then he carpeted the whole place. I know it's not original, but it creates a nice clean and very usable trunk for this daily driver. Notice the tabs for lifting the lower section for access to the wiring and such below (no spare tire here). The 12V disconnect is peeking through as well.
Trunk.png


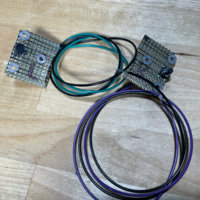
Tyler went back to his crafting table and whipped up this beautiful box for our charging port.
Fuel Fill 1.JPG
Fuel Fill 1b.jpg


We then painted it to give it the stealth look...
Fuel Fill 2.JPG


...And the car took its first charge through the proper connector. Up until now I had a MacGyver setup for charging which was safe but ugly.
Charging.JPG


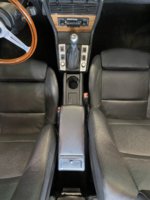
I went back to work on the console. I cut a piece of mahogany for our stereo. Since our computers are on the shelf behind I had to design a bit of a hybrid approach to the console where I don't use the non-AC parcel shelf running under the stereo. I have a small "phone tray" section which covers the wiring between the shifter and the computers.
Console Wood.JPG


I then cut in the Blaupunkt unit. This wood is not yet fully stained in this shot.

The real point of this shot was to show the CSE emblem on the shifter. I am especially proud of this. I measured the Audi Sport emblem and had a company print an epoxy raised sticker on foil with my logo, to my shape. It isn't perfect but it is much better than looking at the Audi logo.
CSE Shifter.jpg


Then Tyler and I pulled the cracked old windshield out and swapped for my new (though not final) clean glass.
Windshield 1.jpg
Windshield done.jpg


The dash got put back together and things are looking very suitable inside. I did get my horn connected.
Dash Complete.JPG


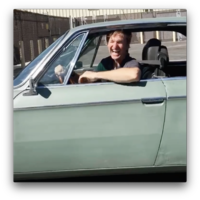
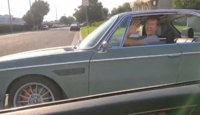
Now that the car was all back together it was time to take her for a drive. It had been six weeks or more since my last drive. She'd been so "couped" up that she really wanted to run free.
BMW Drive.gif


Apparently I couldn't contain my enthusiasm.
Happy Drive.png


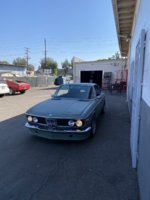
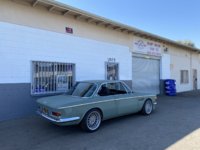
I took a couple of photos before putting her away for the weekend. Notice I am halfway done swapping the headlights out for Hella Halogens. I wasn't going to bother and I liked the old lights. But a connector was broken on one of the low beams so I had to replace it with something, so I went this route.
Coupe Front.jpg


I'm still on the fence about my 17" wheels. I love the grip with all the power i've got, but I keep watching listings for 16" sets and will probably pick some up at some point to at least try them on the car before settling one way or the other.
Coupe Side.jpg


So it's been a great week. Next week is just a few last things on my list. I've got to get an alignment as the front end is completely custom and we just set it where it looks pretty straight:) I've got to do a bit more moulding work. I'm going to wire up the sunroof, get my windshield wipers on and such. Every day next week I will drive it further and further with a follow-car so that I can get back to the amount of comfort I had with its reliability before ripping out all the temporary wiring these last several weeks.

Cheers!

Paul
 

Attachments

  • Fuel Fill 1b.jpg
    Fuel Fill 1b.jpg
    192.2 KB · Views: 119
  • Happy Drive.png
    Happy Drive.png
    1.5 MB · Views: 129
  • Coupe Front.jpg
    Coupe Front.jpg
    275.1 KB · Views: 110
  • Coupe Side.jpg
    Coupe Side.jpg
    271.2 KB · Views: 124

tferrer

Well-Known Member
Site Donor
Messages
2,153
Reaction score
2,336
Location
San Francisco, CA
Wow, well done. Great to see the project getting close to those final yards! What's the timeline for disassembly and paint?
 

JetDexter

Well-Known Member
Site Donor
Messages
321
Reaction score
529
Location
Newport Beach, CA
Wow, well done. Great to see the project getting close to those final yards! What's the timeline for disassembly and paint?

Thanks a bunch. I think it will be 9-12 months before disassembly and paint. I have more to do on the EV side that involves a good amount of road testing. Every time I add something we're welding to the car again, so I'm pretty settled to just keep her like this for that long. I wanted to paint before all the assembly I've done and it took a lot of convincing to keep me from doing it, but I'm really glad I waited now with all the continued modifications and welding we keep doing. We weld, touch up primer, repeat!

So I just pretend the primer is actually an expensive option: "Ice Green Finish" and it makes me feel better.

Thanks again!
 

tferrer

Well-Known Member
Site Donor
Messages
2,153
Reaction score
2,336
Location
San Francisco, CA
Thanks a bunch. I think it will be 9-12 months before disassembly and paint. I have more to do on the EV side that involves a good amount of road testing. Every time I add something we're welding to the car again, so I'm pretty settled to just keep her like this for that long. I wanted to paint before all the assembly I've done and it took a lot of convincing to keep me from doing it, but I'm really glad I waited now with all the continued modifications and welding we keep doing. We weld, touch up primer, repeat!

So I just pretend the primer is actually an expensive option: "Ice Green Finish" and it makes me feel better.

Thanks again!

I like that approach! Plus, restored cars are overrated. At least that's what I keep telling myself...
 

JetDexter

Well-Known Member
Site Donor
Messages
321
Reaction score
529
Location
Newport Beach, CA
I finally drove the car home! After 26 months in the shop it was the greatest feeling of accomplishment that I've ever felt (other than marrying out of my league).

IMG_3517.jpg


IMG_3518.jpg


In case you forgot exactly how far this car has come:

In July of 2018 I bought what my ignorance thought was a decent car. Fair interior, fair steel with some known rust here and there. $11,000 because it was barely running with no clutch and the owner didn't want to fix things up to maximize the value. In the end I learned that $100 would have been too much for this car. Had I paid $40k for a better car I could have put $10k or so in my pocket:)

The car had apparently been stored underwater when not in use. I have since seen just a few cars with more rust. My media blaster even stopped blasting early because he was afraid that the car wouldn't hold itself up. He was upset with the project and drove it back angry. I didn't really understand this at the time, since his job was just to blast- I wasn't asking him to repair the steel...

Since Brett and I were only prepared for basic bodywork we were left not knowing what we could do with this car. I considered dumping it and buying a painted and ready to go shell that Coupe King had for $40k or so. But since they didn't actually do the work or see it done in this case, and couldn't prove that there wasn't rebar and Bondo galore, I didn't feel comfortable enough - not after what I'd seen could be covered up. I called a couple of metal guys on Craigslist, which led me to Tyler who's become a good friend. Working at a respected shop he had properly restored metal for countless Porsches for check-writing clients such as Seinfeld. Tyler gave me a rate I stomach to come to my shop with some tools and start cutting out rusty bits and fabricating in new ones.

This is some of the stuff we saw:

Rebar and fiberglass holding together the inner fenders/strut towers.
Rebar-Method.gif


Swiss Cheese like this on just about every single panel you could imagine. This thread has photos of so many of the custom fabricated new pieces that Tyler replaced with.
Trunk+Rust+Repair+1.JPG


Frame Rails that looked like this.
Old-Frame-Rail-Square.gif


Sunroof that looked like this from inside- which required 2 months of fabricating from scratch an all new frame and a new top opening.
Sunroof-Roof.gif


Frame-Work.gif


New-Roof-Placed.gif


Then we put a Tesla Motor and a Battery Box in:
Tesla-in-the-Coupe-2.gif


Box-Complete-in-Car.jpg


And for the last year I've been dealing with Brakes, Steering, Suspension, Interior, etc. All so that I could begin to enjoy this car on a daily basis.

If you've followed this thread you know that I am holding off of paint for 6-12 months because I still have to engineer and fabricate air conditioning and much more. I also still need to implement my battery management system, 220 charging, and other Tesla bits. We continue to weld to this car almost every day. Friday we welded a stud on for my hood release handle. We can't afford to damage our paint with all this fabrication to still commence. Every time we weld now, we grab the green primer and fog it in!

For months I have been saying that I am 2 weeks away from bringing this car home. But this time it finally happened. Friday afternoon the car left the shop under Tesla power and drove into my garage. It looks comfortable in its new home while receiving a midnight snack.

Car Sleeping.jpg


I've got a buddy who's a globe-trotting nature and commercial photographer (you can tell how serious he is by the beard and tattoos). He came down and we took some photos and video of the car in Laguna Beach. The photo session was fun, but the drive was FANTASTIC. (And the pilot car was my buddy in his Alfa, so it was a great time for all)

IMG_3485.jpeg


Drone Shoot.jpeg


So while there are still many projects to do on this car, this closes the chapter on a 2 year long story of creating a reliable daily driving Tesla-powered E9. I'll take the kids to school in it tomorrow morning then go to the office where I will spend most of my time daydreaming of how the AC will function.

Thanks again guys for (most of you) accepting my alternate version of your beloved coupe.

Cheers,

Paul
 

Attachments

  • Sunroof-Roof.gif
    Sunroof-Roof.gif
    417.6 KB · Views: 139
  • IMG_3518.jpg
    IMG_3518.jpg
    167 KB · Views: 158
Last edited:

JetDexter

Well-Known Member
Site Donor
Messages
321
Reaction score
529
Location
Newport Beach, CA
Since I have no hand brake I figured I might as well install a lower console and armrest.
No Console.jpg


I thought that BMW would have made theirs out of plywood in the early 70's:
Wood Console.jpg


Then I shaped it some:
Shaped Console.jpg


Then I temporarily wrapped it in black Vinyl (I will have my guy stitch leather for it like the upper dash in the future). I put in a 90's BMW cupholder and ashtray (That cupholder is universally hated, but this unit was the perfect fit and look for me to line up with the shifter section).

I picked up an armrest on eBay with unwanted red stitching. I sharpied it black for now, but I'll wrap that in leather soon.

Then I loaded it up for a proper drive.
Proper Console.JPG


Cheers,

Paul
 

Attachments

  • Above Console.jpg
    Above Console.jpg
    381.5 KB · Views: 171

JetDexter

Well-Known Member
Site Donor
Messages
321
Reaction score
529
Location
Newport Beach, CA
Haven’t posted for a while as I’ve just been enjoying the car. I’ve been taking the kids to school then driving to work (though I have no windows in and on these frigid SoCal mornings we have to bundle up in our hoodies:).

Since it’s an E9 I get thumbs up on every drive. The crazy green primer seems to have won hearts and I feel like I’ve got no need to even paint the car!

I’m not one for racing, but I’ve racked up a small string of victories against various Mustangs, Chargers, a late M3, an R8 and the like who when seeing my car at a stoplight, feel some sort of obligation to show me how fast their car is. I don’t desire to race, but when they rev up and roar off ahead of me, I go ahead and step on it. There is so much torque and power that a moment later I’m well ahead of them. At some point I’ll have to get that out of my system before I get in trouble.

There are a lot of projects still to be done and we are wrapping one up now. I am installing my BMS (Battery management system). This is the computer that reads the voltages and temperatures of each battery cell group (of which I have 84) so that when charging and when driving it can maintain balance between them. Without this, I have only been using the middle 30% of my battery charge range. Charging higher is dangerous as certain cells may be higher than others, which means I could be overcharging those cells which could be catastrophic. I’ve been charging slowly with plenty of fail-safe measures. But this has only given me 60 miles of range. Once the BMS is in and I can charge full and use the full range, my math tells me that I should see 250 miles of range, which is fantastic.

To install the BMS we have to wire taps into all the battery modules, so the battery pack comes out. The design and system is pretty smooth, so in 60 minutes we had it out and open:

Might require Instagram to view:

http://instagr.am/p/CHwMiPQBhou/
We swapped the Tesla circuit boards with 3rd party boards that we can connect to. We have half of them done in this photo:
0D024DDF-0A03-48D5-A062-500F419BD563.jpeg


We had to run a batch of wires to and fro. Brett loves diving into the work:
471D915C-F04E-4889-B55C-004E03483D5B.jpeg


Tuesday we should be able to button things up and I’ll bring the car back home. It will take a week or so to finish up the programming side and connect the BMS to the charger (so that the BMS tells it when to start and stop). Excited to pass this milestone!

One last interesting photo I took while the battery box was out was this one:

5AC5D69A-38A5-4738-A7AE-991BD2DB9218.jpeg


This thread has documented all of this but this photo captures a lot. It shows “Greg” our pivot bar which takes the brake pedal and sends it to our inverted brake booster in the tunnel. It shows our VW VR6 power steering rack and our VW to BMW Frankenstein steering linkage. It shows out MINI electric power steering pump which powers our hydroboost brake booster and power steering.

All of this was to make way for the battery box.

Lastly I do leave you with this little driving video I took last week. It was a fun little fall drive one morning. A lot of people asked me what the car sounds like, so this gives you an idea. Just the sound of the power steering pump when in the garage, then the wind!

http://instagr.am/p/CHinAcIBGbW/
Cheers!

Paul
 

JetDexter

Well-Known Member
Site Donor
Messages
321
Reaction score
529
Location
Newport Beach, CA
I've been doing so many projects on the car, but I realize I haven't given an update in a long time.

@jefflit and I have been working on the programming of our computers for the Tesla coupes. Well, I design some things, then he spends dozens of hours coding each function up - so I say "we" liberally. Well, we got cruise control going a few weeks back. Cruise control is as controversial to a sports car as putting a Tesla motor in a classic car. But so long as I am going to run up the 405 on occasion, or drive to see my folks out in the desert, I may as well set the car to hold speed on the freeway.

I wanted to do something very special for the cruise control buttons, so I had this idea:

I made a pair of little boards with a small button on them:
2F9D47BD-FCD9-4197-9816-4BD1982B53A0.JPG


Then I epoxied some tee nuts to the back of my Nardi wheel:
IMG_4436.jpg


My boards place behind the wheel near the hub
IMG_4433.jpg


The button pokes through the slot in the wheel near the hub (this is a long grey test cap- later replaced with a short black unit)
IMG_4432.jpg


I printed little housings for the boards:
IMG_4440.jpg


Since I am using a modern steering column, there are a dozen pass-through pins to the wheel. I used a couple more of those (one being used for the horn of course).

In the end I now have a button on the left to activate system, then set cruise. Also, it bumps up speed. The right button cancels, while a second press deactivates the system. Brake pedal cancels as well as you would expect. Since it's a Tesla, when you set it to 65, the car holds 65 regardless of the incline or decline.

This photo shows how you can't even see the buttons in there. Super happy with how it turned out!

Till next time- cheers.
IMG_4499.jpg
 

Attachments

  • 4B35294F-B058-4743-8761-9322282BF24F.JPG
    4B35294F-B058-4743-8761-9322282BF24F.JPG
    694.1 KB · Views: 134

JetDexter

Well-Known Member
Site Donor
Messages
321
Reaction score
529
Location
Newport Beach, CA
I've been working on the car doing all sorts of detail items lately.

For example, the E93 seats I put in require a CAN bus network to function. They operate when first given power but once you stop adjusting them they turn themselves off after 5 seconds if no CAN bus is present. I finally found the CAN codes to give them to tell them that the car is running, etc. I put a tiny little Arduino computer under the seat that sends these commands every second, and my seats now stay alive. Next step is finding the Seat Heat CAN commands (which is harder than you think, but I may have finally found it) and Seat Memory commands. I'll build a little housing for this, but for now it's working.
IMG_4625.jpeg


I also spent some time adding some Bling to the charging connection. I had to add a switch to the door anyway to prevent putting the car in gear when the car is plugged in. So while I was at it I put a few blue LEDs in there on that same switch (at least I think it turns off- one will never know, like our refrigerators :).
IMG_4805.jpeg


Also, I spent a bit of time turning my home garage wall into a proper shop space. It still looks nothing like some of your dream garages, but it is a lot more pleasant to work in. I've got more USB taps than I have tools. I've got air and power both on reels overhead, and I have 12V on tap for easy bench testing. So it's been a lot of fun to work in there the last couple of months.

IMG_4570.jpeg


IMG_4594.jpeg
 

Bmachine

Well-Known Member
Site Donor $
Site Donor $$
Messages
3,525
Reaction score
1,779
Location
Northern California coast
I've been working on the car doing all sorts of detail items lately.

For example, the E93 seats I put in require a CAN bus network to function. They operate when first given power but once you stop adjusting them they turn themselves off after 5 seconds if no CAN bus is present. I finally found the CAN codes to give them to tell them that the car is running, etc. I put a tiny little Arduino computer under the seat that sends these commands every second, and my seats now stay alive. Next step is finding the Seat Heat CAN commands (which is harder than you think, but I may have finally found it) and Seat Memory commands. I'll build a little housing for this, but for now it's working.
I feel your pain, Paul. When I installed my e92 seats I ran into the same issue of course. After doing some research I found that there may be a simple solution:
" If you want the controls to work always, you will need to supply a 5v or TTL signal the the data bus input wires for rx. This will keep it alive."

I was about to set this up myself but then I lucked out on a set of manual sport seats which have worked out perfectly. A fair bit lighter as well without all these damn motors that, unless you let many others drive your car (unlikely for this kind of project) you only use once anyway.

I'm sure you know this but the CAN signal is only necessary for the fore/aft and up/down motion. Probably heater too but I don't have that. The lumbar support and side bolsters run independent of the seat computer.
 
Top