1974 BMW CSE

JetDexter

Well-Known Member
Site Donor
Messages
321
Reaction score
529
Location
Newport Beach, CA
While waiting on some rocker panels to come in we are making progress on some of the bodywork starting in the trunk. It's tedious but rewarding. The only problem is that there are a hundred of these little spots to do, and that doesn't count dealing with inside the fenders. But one thing at a time...

We opted to not have the car primed at the blaster because we just didn't want to prime over quite so much rust. Now that we have worked through and noted all the areas that could potentially come back to haunt us, we will be cleansing it once again then priming it on Saturday. It sure will feel good to get all that metal protected as we keep doing this work.


Trunk 1.JPG
Trunk 2.JPG
Trunk 3.JPG
 

JetDexter

Well-Known Member
Site Donor
Messages
321
Reaction score
529
Location
Newport Beach, CA
Here's another progress update from the blog: (some of it has been already posted here)

Cut, Weld, Smooth, Repeat.

After ordering up a truckload of sheet metal and a 50 gallon drum of perseverance, we dove head-first into rust repair. We started in the rear of the car going spot by spot through the simpler areas. Below are some photos of one spot of the trunk. We cut a section out, weld a fresh section in and smooth it out. Good as new, right? Well yes, after we do this process a hundred or so more times.

Trunk+Rust+Repair+1.JPG
Trunk+Rust+Repair+2.JPG
Trunk+Rust+Repair+3.JPG

Cut out the cancer…Weld in a fresh section…Then smooth it out.

Then there are the floors

While the bodywork is happening up top, we also began work on the floors. The passenger side sub-frame rail underneath was rusted through. We sourced a pair of new replacement rails, but they didn’t really match up to the angle and length at the front. After some debate about fabricating from scratch, we decided to modify these units which wound up working out well. A bit of smoothing will still take place after the floors go back in, and we will move to the driver’s side.
Old-Frame-Rail-Square.gif
New+Frame-Rail-Square.gif

Remember this photo from a few posts back? Looking a lot better now. Now we just need floors:)


Some toys showed up

Our Tesla drive unit, controller, and battery modules have arrived. We have to hand it to HSR Motors/057 Technologies for terrific communication, education, support and packing (thought you wouldn’t know it from these pictures, as it looks a little like Christmas morning just happened).

We chose 057 Technologies after a lot of consideration. We tossed around buying a totaled Tesla at auction, and stripping her ourselves of all her goods. We considered saving a few bucks and buying from any number of cut-rate dismantlers. Lastly, was the idea of buying from a shop that specializes in Tesla and EV conversion support. This world is a bit of the wild west right now, and there are more diverse opinions on these shops. But after visiting some, and chatting with others, I felt like I bought into not only the passion, but the engineering approach that 057 has taken with their controller, but also the drive units themselves.
Tesla-Drive-Unit.gif
Pallet-o-Batteries.gif


We will surely see if we made the right call once we can dive into this gear in the coming weeks. In the meantime, it is back to Cut, Weld, Smooth, Cut, Weld, Smooth, Cut, Weld Smooth…
 
Last edited:

JetDexter

Well-Known Member
Site Donor
Messages
321
Reaction score
529
Location
Newport Beach, CA
As a diversion I just left Munich and couldn't have had a better time at BMW. The Group Classic tour was fascinating. Not only did I see a lot of amazing E9s, I saw Elvis' 507 which they brought back to life, their McLaren F1, and plenty of beer and sausage. The Classics facility is amazing, and they will rent you a lot of the cars for the weekend. A lot of private cars being restored or serviced. The main BMW museum was terrific as well - loved the art cars.
IMG_4113.jpg
IMG_4083.jpg
IMG_4126.JPG
IMG_4222.JPG
 

JetDexter

Well-Known Member
Site Donor
Messages
321
Reaction score
529
Location
Newport Beach, CA
More progress on the sunroof. One has to really appreciate a sunroof to spend this much time, but we are getting close. The frame is now rebuilt and ready for coating. Replaced one of the drain ports, as ours was apparently just for show in it's original state :)

The roof has been fully repaired including a new surround- too much rust to keep any of it. Just a bit more smoothing then finessing of the arcs to get the panel gaps perfect.

My buddies all told me to just fill her in, but who will be the one laughing come summer? Of course it might be summer of 2022 by the time this thing is on the road :)
IMG_4385.JPG
IMG_4392.JPG
IMG_4395.JPG
IMG_4425.JPG
IMG_4417.JPG
IMG_4420.JPG
 

JetDexter

Well-Known Member
Site Donor
Messages
321
Reaction score
529
Location
Newport Beach, CA
We keep plugging away at the roof. The sunroof frame is complete, coated and ready to go back into the car today. The roof has been completely smoothed. We found it very weak, so we strengthened it up so that when a bird lands on it, it won't sink:) Everything is feeling very good now.

This was one part of the car I didn't expect to spend weeks on, but in the end it is very gratifying to have taken this journey. I am merely a set of helping hands on this metal work.

My man Tyler is an artist. He is still young but spent a good few years at a shop restoring long-hood porsches with plenty of rust, so nothing scares him. I just keep handing him tools, cutting where he tells me to cut, sanding where he tells me to stand, buying more steel, holding the other end of an assembly, etc.


Top Smoothed.JPGTop Smoothed 2.JPGSunroof Frame.JPG
 

JetDexter

Well-Known Member
Site Donor
Messages
321
Reaction score
529
Location
Newport Beach, CA
Also yesterday this happened. We need to get the Tesla unit fitted before we can finish the rear lower metal work and the trunk floor as we will be shaping things up and around the unit. We had to cut out most of the upper trunk shelf to make room, but we will be reinforcing that loss by the very structural elements that will hold the motor. We will also be welding in a shock tower brace while we are at it.

Tesla going in.jpg
 

tmason

Well-Known Member
Messages
1,023
Reaction score
72
Location
Reno,Nv
Love the progress! Last Sunday on Sunday Morning they had a special on Classic Cars going electric ,your project should of been on it!
 

JetDexter

Well-Known Member
Site Donor
Messages
321
Reaction score
529
Location
Newport Beach, CA
His guys,

You may remember that I am keeping a blog of this build (BMWCSE.com) and I paste those posts here. I have already posted much of this in this tread, but for anyone staring their rusted sunroof in the face, this post might be of interest. Once again this blog is written to the average Joe, so please excuse the talking below most of you.


HERE COMES THE SUNROOF

You might remember that one of my requirements for the coupe was that it have a sunroof. Of the 60 or so cars I have owned, a majority of them have been convertibles - I simply crave the open air. While this car was not going to be a convertible, it was most certainly going to have a sunroof.

Functioning-Drains.gif

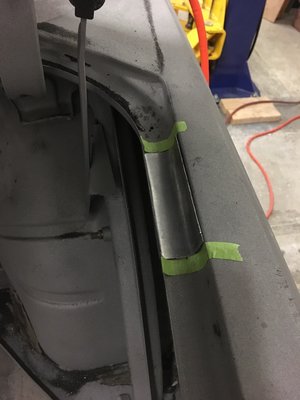
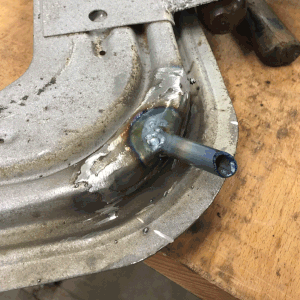
But our story takes a turn with the little tube shown in this photo. The photo shows a new tube, but imagine one just like it that was plugged inside like a clogged drain. This tube, along with 3 comrades, takes the portion of rain water that makes its way through the sunroof seal, and passes it into hoses that run to the bottom of the car. This is a great plan so long as the tubes aren’t clogged, and in our case, the tubes had become very clogged, very long ago. Water would come in and take up permanent residence - turning our roof and the sunroof frame mechanism to rust.

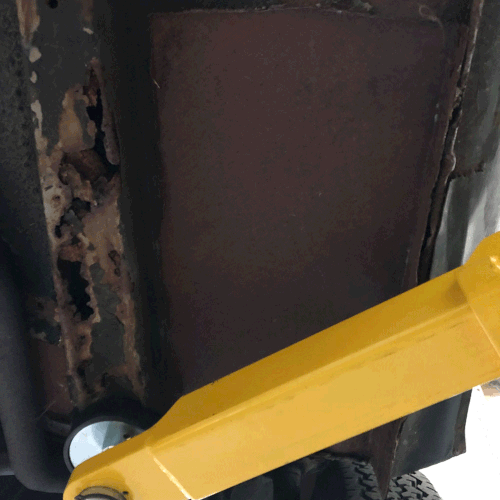
We were unaware of this rust until the car came back from the media blaster. We were then faced with three options: 1, we simply fill in the roof. This is the course that any sane person might take. But since a sunroof was an early requirement, this was not an option. 2, we could fill it in, then install a very nice modern OEM electric sunroof. Our car is a “resto mod” after all, so a blend of modern elements is not out of the question. However, another goal is to retain the classic styling of the car, and the original steel sunroof is an important part of that. So our 3rd option was to painstakingly rebuild the roof and frame. This took a few good weeks to do, and here is the story:
Sunroof-Roof.gif

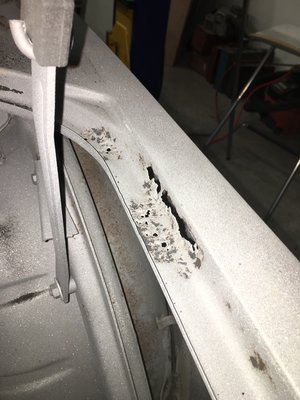
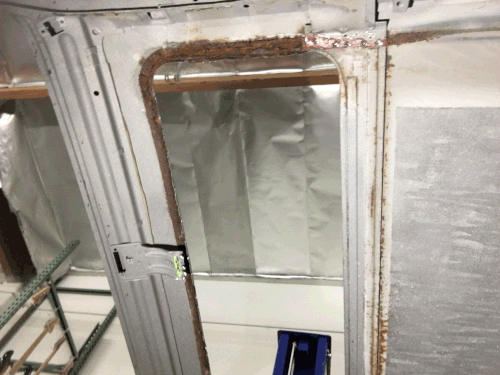
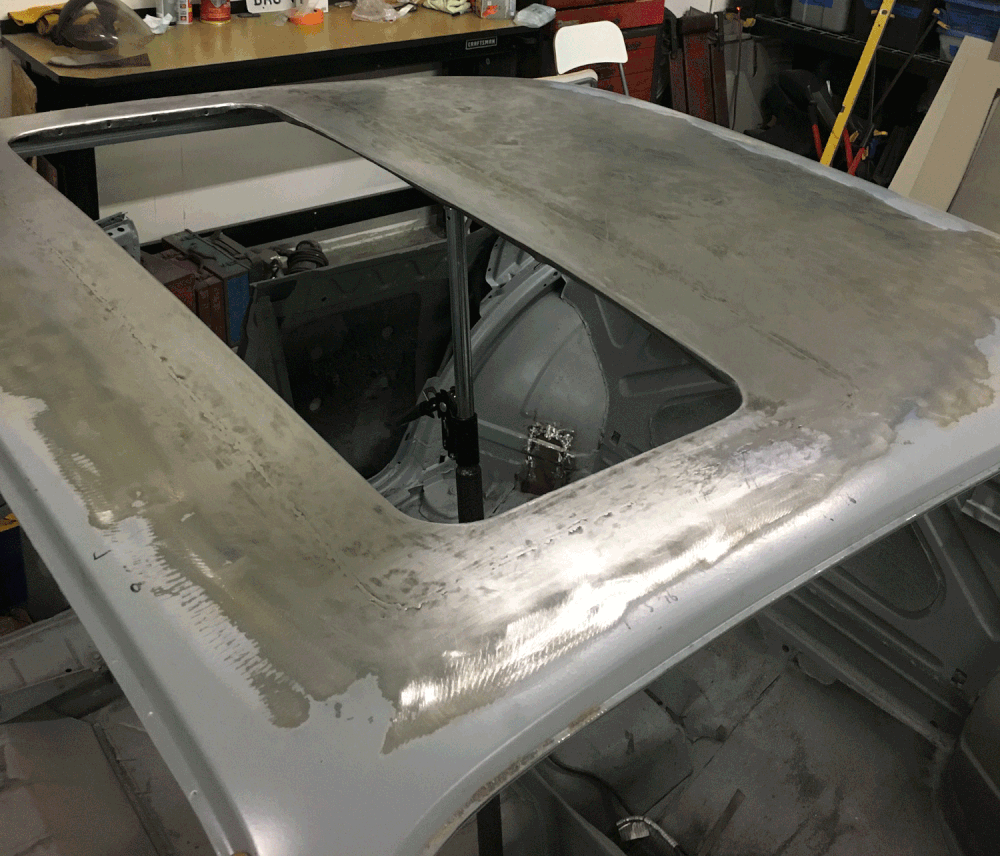
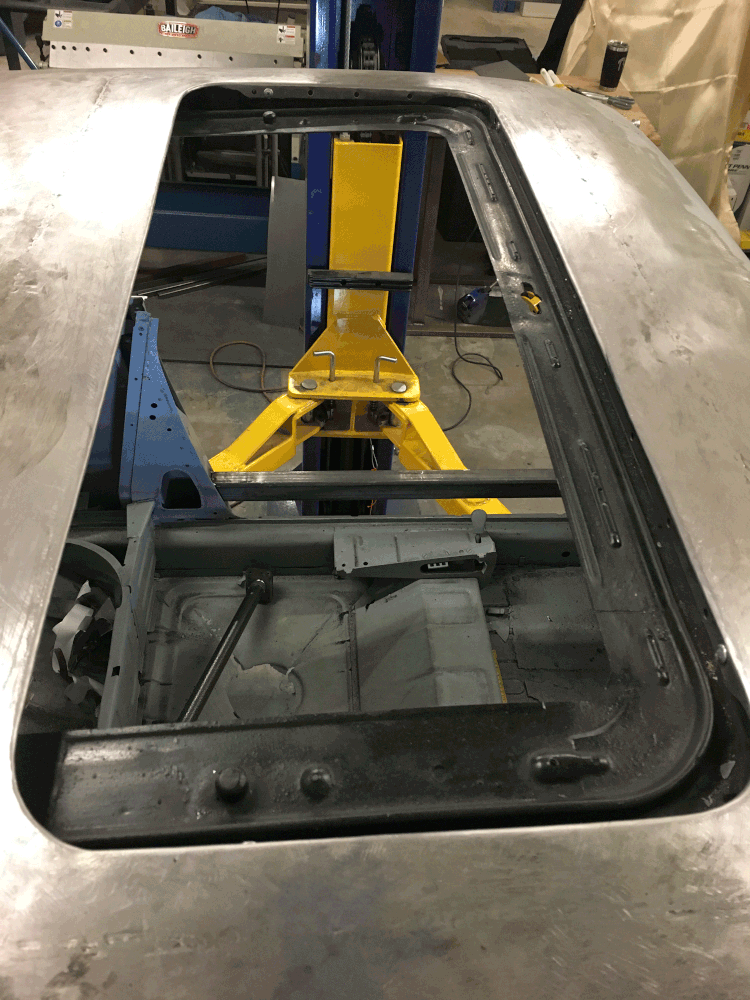
Here is the roof and frame from inside the car. Rust on all four sides.

Sunroof-Frame-Rusted.gif

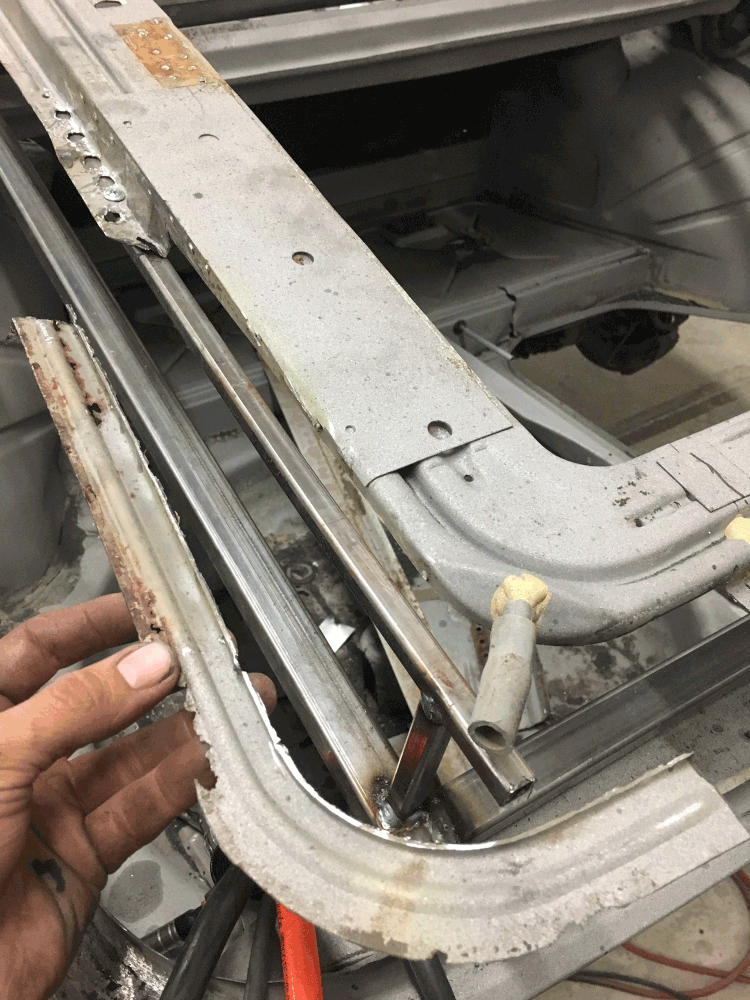
The damage to the frame (the sunroof track) was even worse than the roof itself.

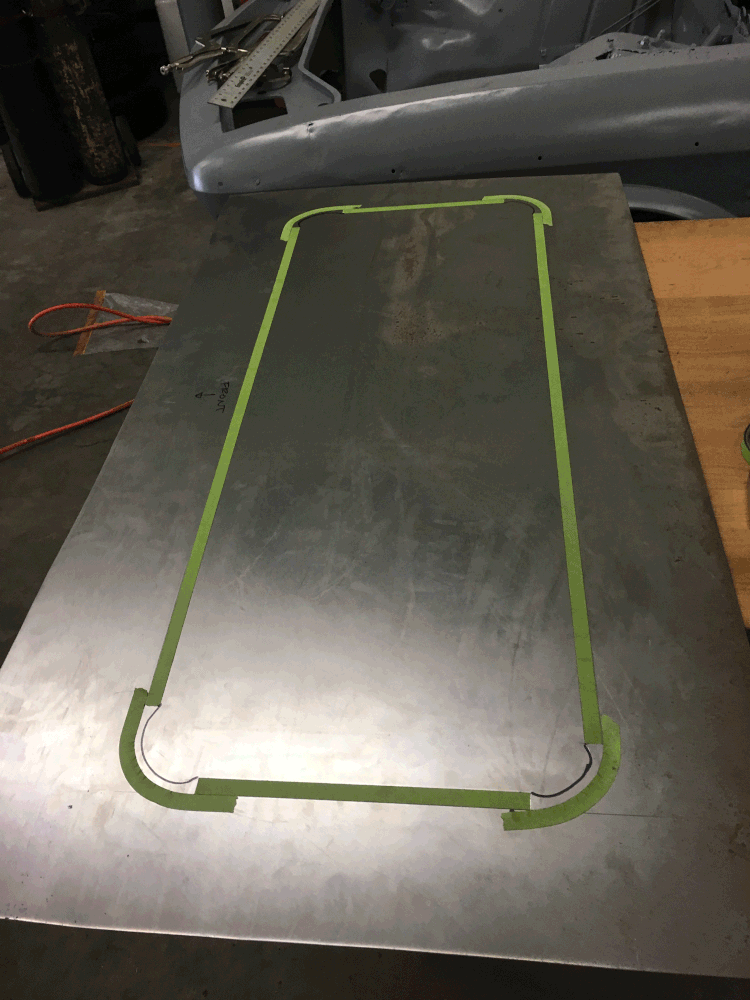
Let’s make a new roof:

New-Roof-1.gif

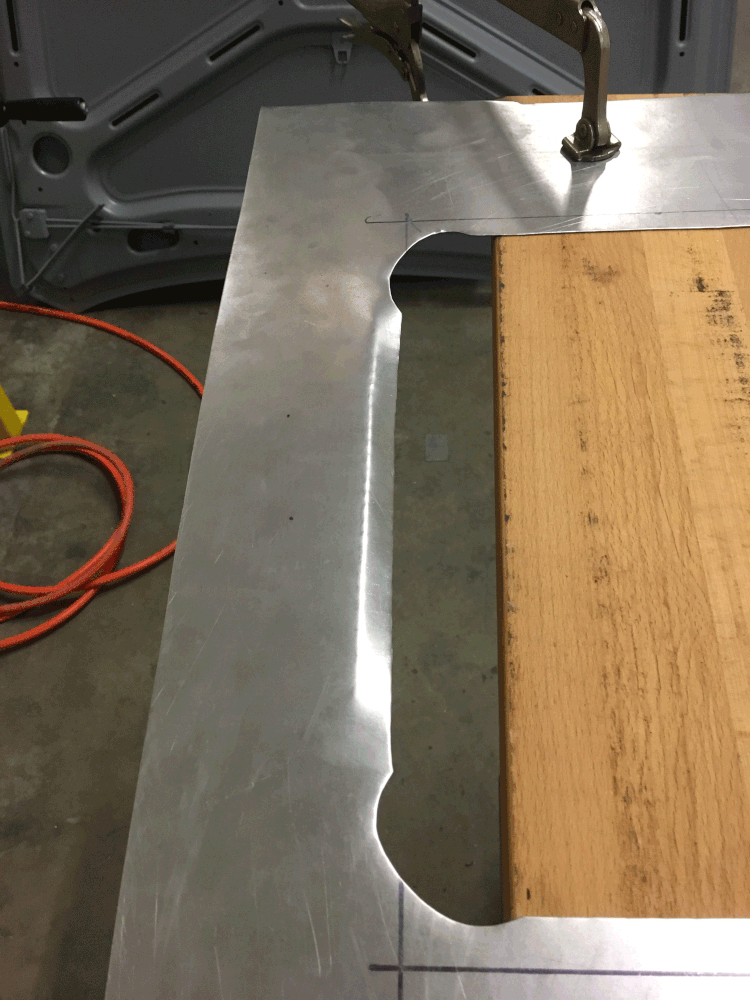
Trace the sunroof hole and prep it for cutting.

New-Roof-Cutting.gif

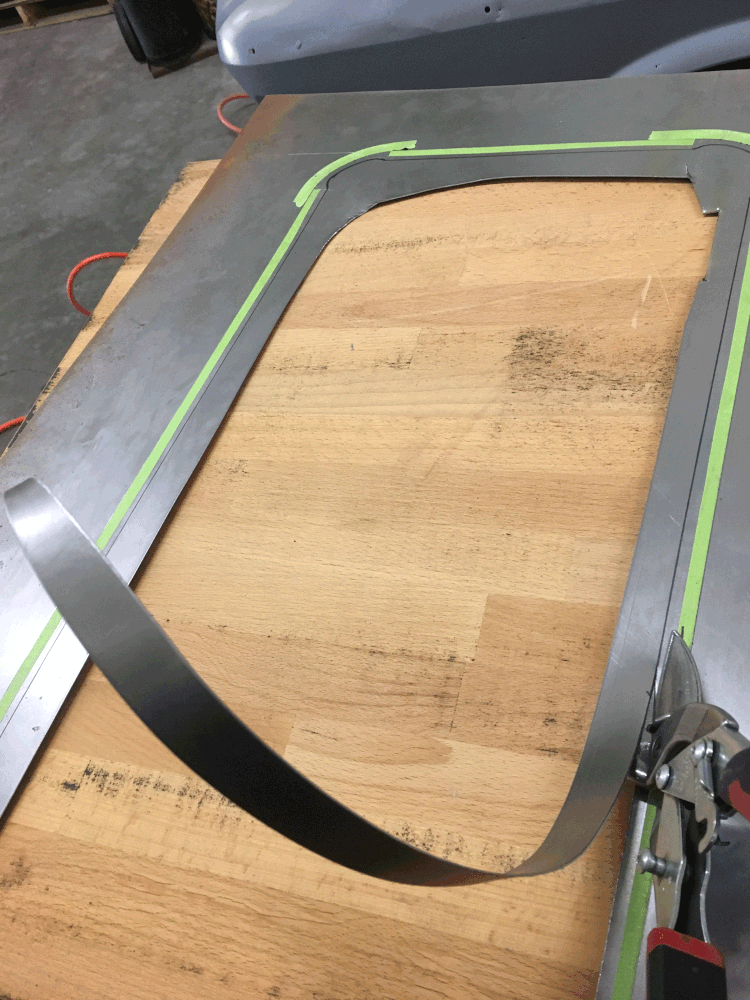
Cut along the line- this part seems a lot like elementary school art class but with steel.

New-Roof-Bending.gif

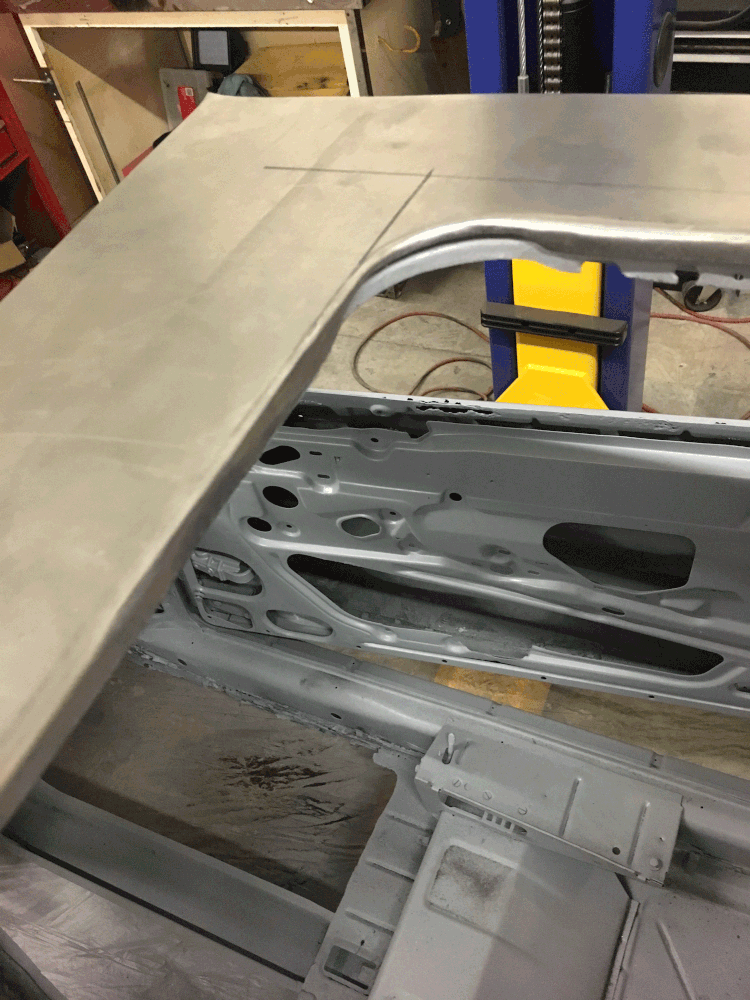
Begin the process of bending the edges to form our thick and smooth final edge.

New-Roof-Bending-Corners.gif

Continue the bending and shaping process with the panel setting on the car.

New-Roof-Placed.gif

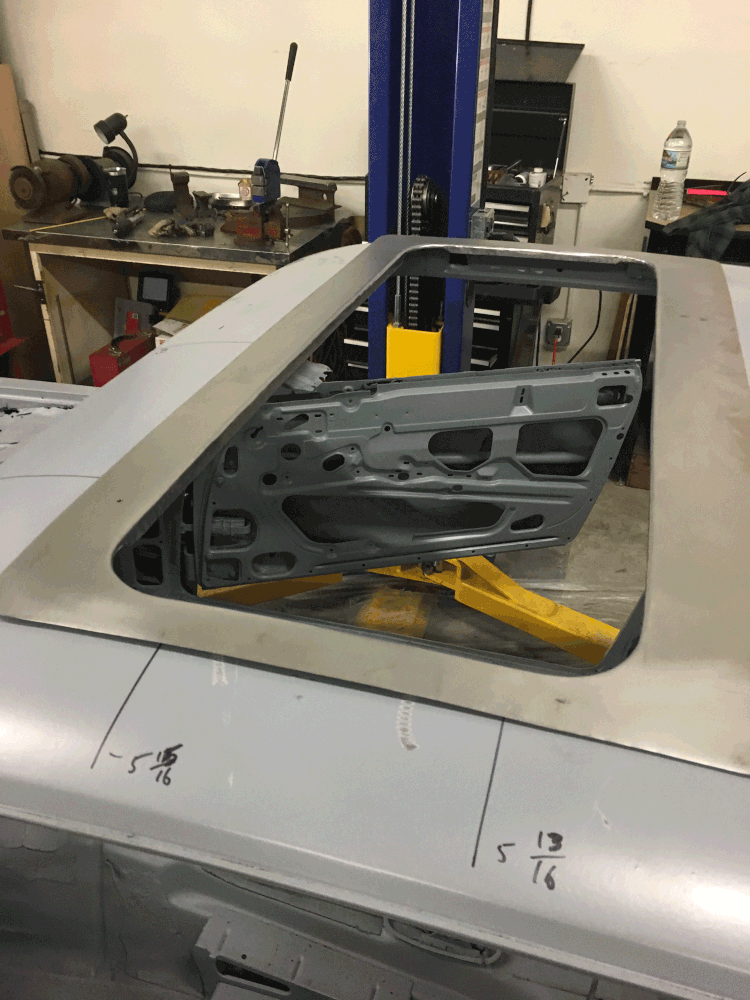
Finally we have a panel which is looking like a final product.

New-Roof-Smoothing.gif

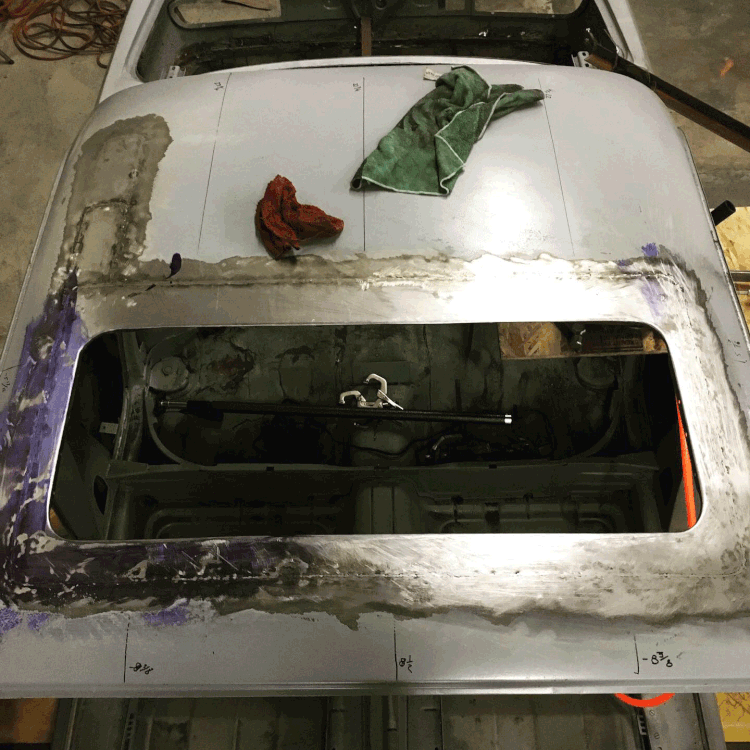
Weld the piece in, then smoothing, smoothing, smoothing.


New-Roof-Done.gif

We also found that we had to strengthen the sagging steel behind the sunroof as well. We then smoothed and smoothed and smoothed some more.

In the end we now have an entire roof that is better than new.


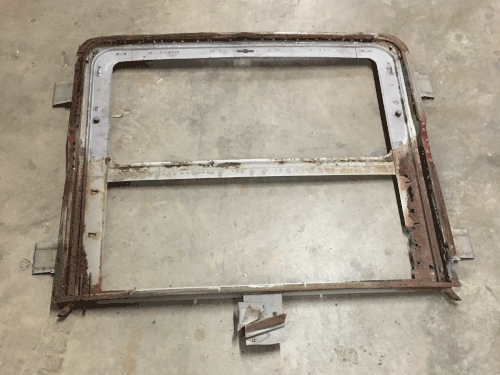
Repairing the Sunroof Frame
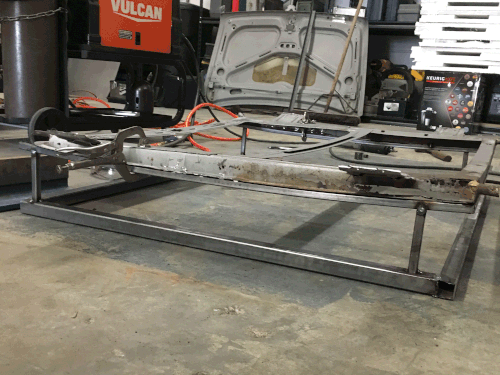
The jig is up. Well, in the photo the jig is on the bottom and the frame is up, but you get the idea.

Sunroof-Frame-Jig.gif

Our frame attached to the jig.

Frame-Work.gif

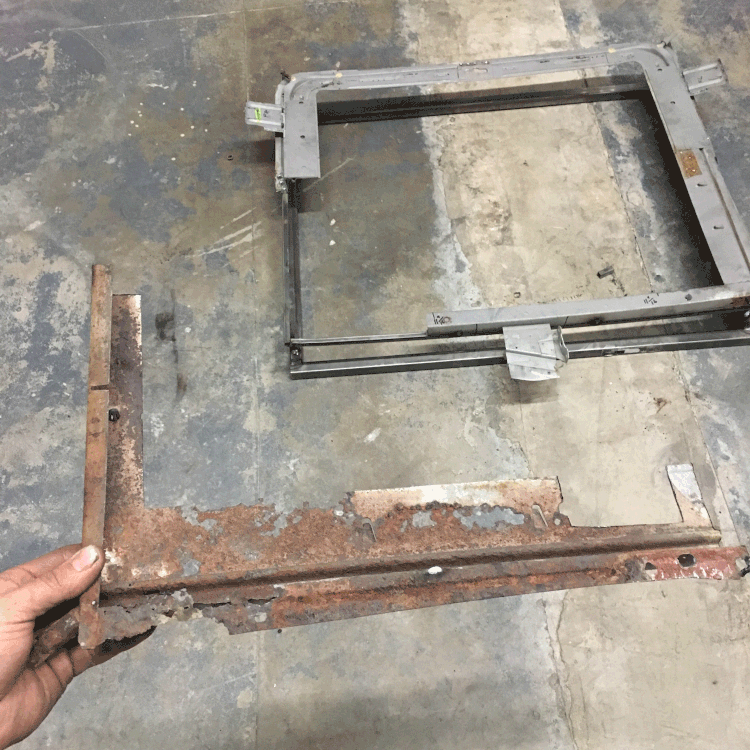
With the frame on the jig we can cut out sections and start replacing them.

Sunroof-Frame-Fabrication.gif

Tyler is a patient craftsman. Give him some steel and some tools and he can turn out just about anything.

Sunroof-Frame-Cutting.gif

Here’s a fun, rusty rounded corner,

Sunroof-Frame-Repair.gif

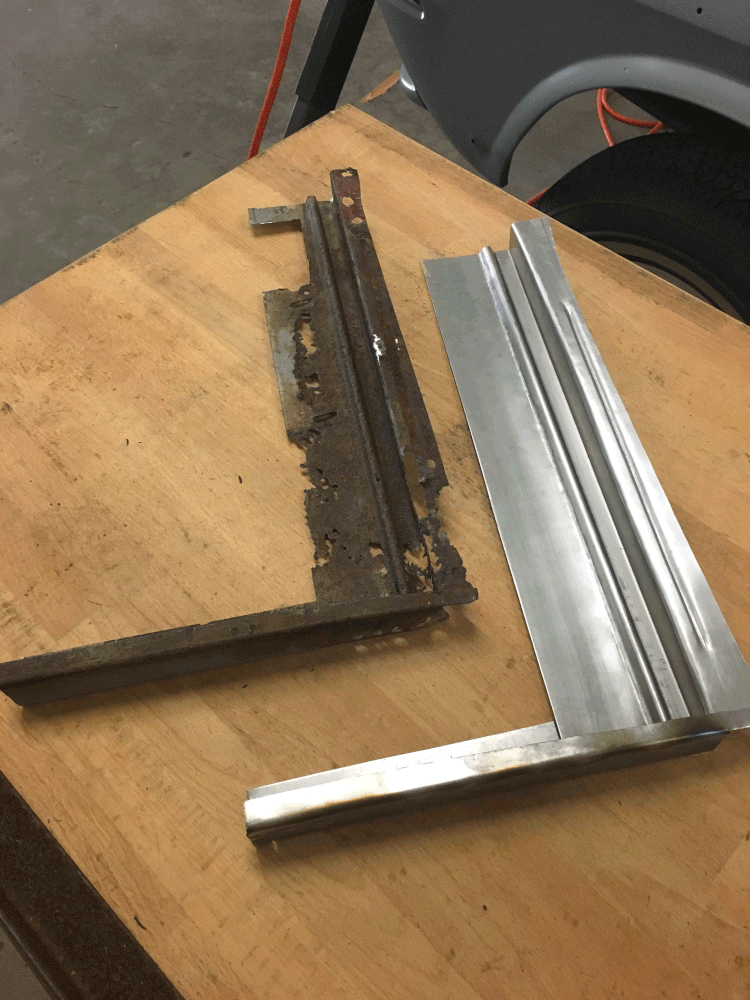
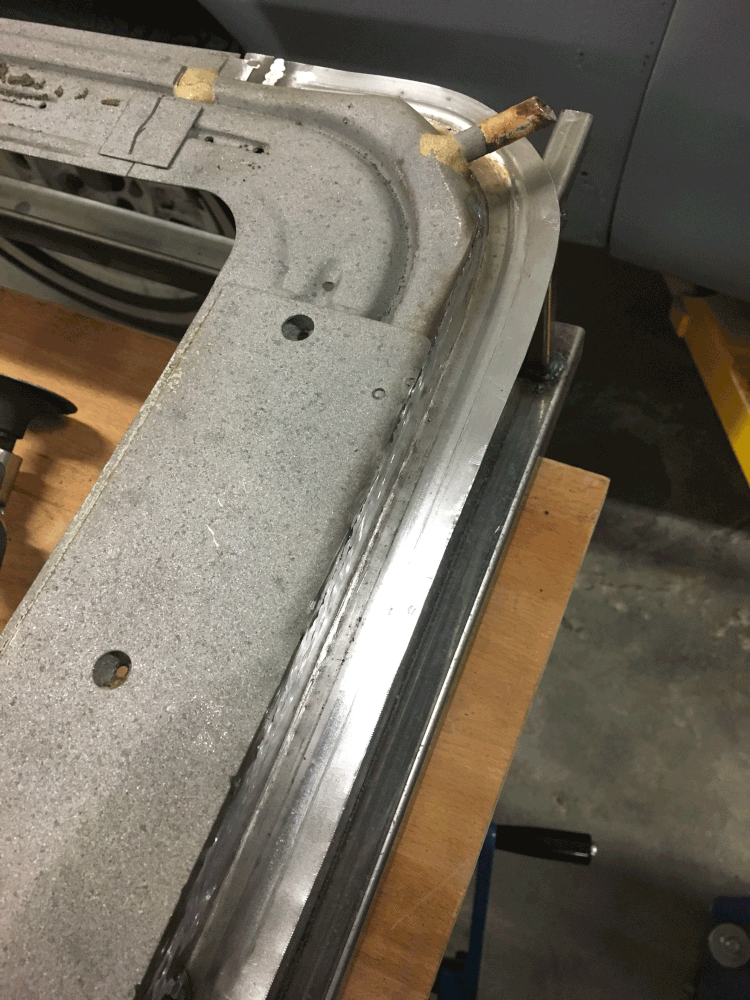
And here’s the new replacement piece all clean and tidy.

Sunroof-New-Frame.gif

All the new sections welded and smoothed into the frame.

Sunroof-Track-Coated.gif

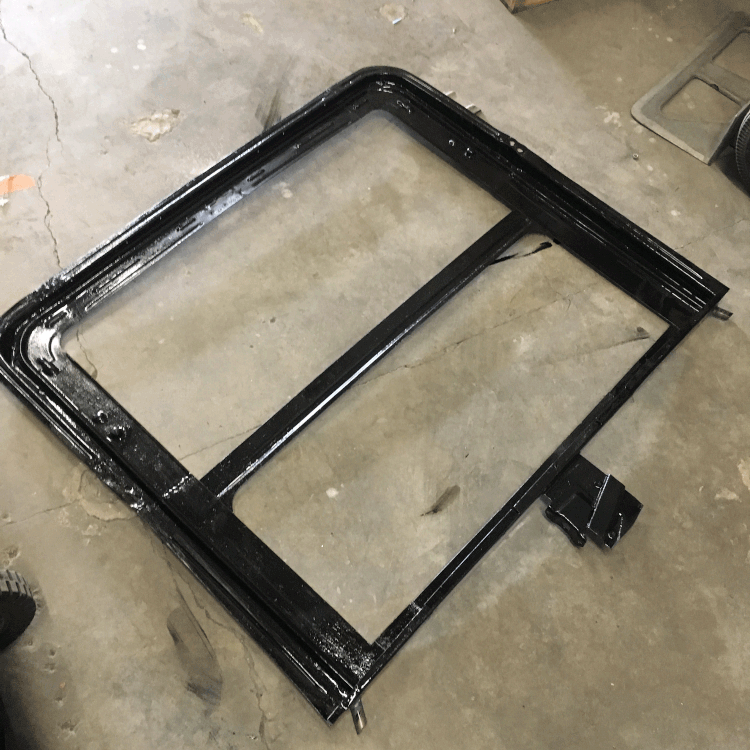
The restored frame receives a fresh black coating.

Tyler-Sunroof.gif

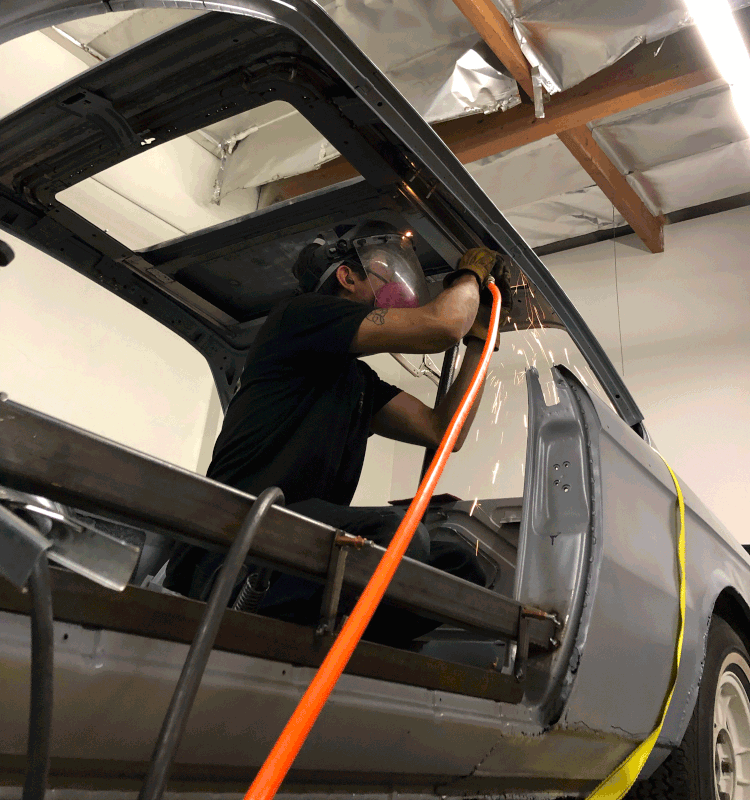
Installing the frame back into the coupe. Tyler loves crawling around grinding things in the car.

Sunroof-Track-In.gif

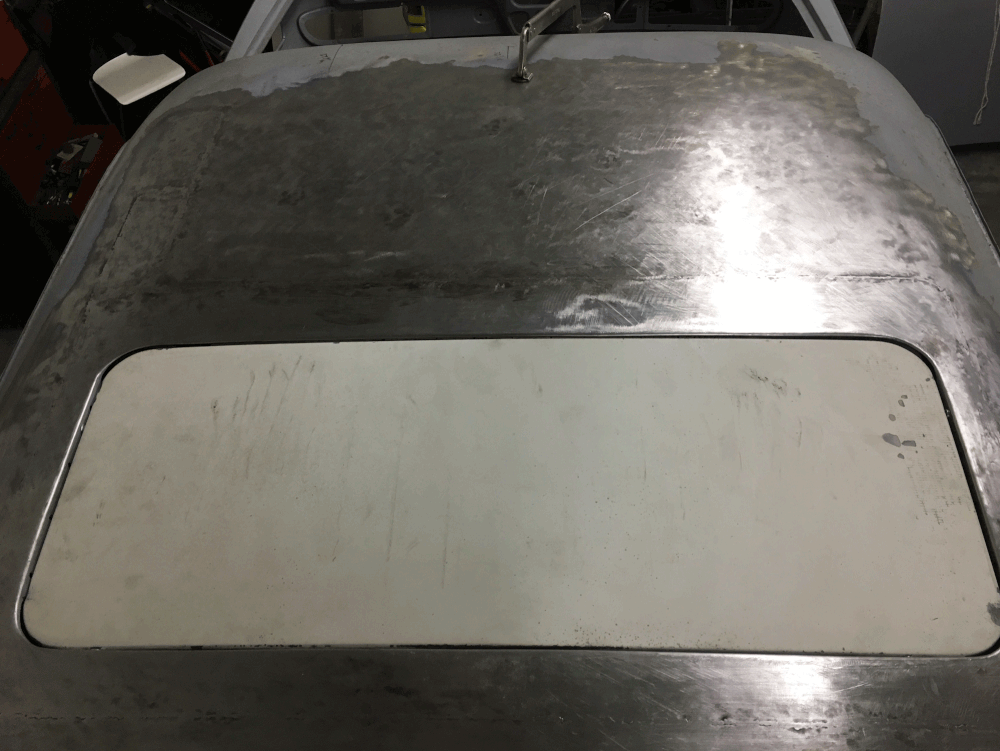
It’s looking good from up above.

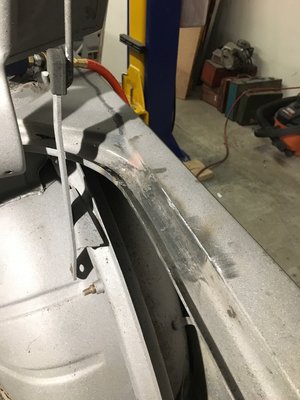
Finally we set the sunroof back in and check the fit. The gaps are cleaner than when we bought the car. With our new drain tubes and fresh hoses, as well as a new seal in place we should be good for another 45 years of open air, rust-free enjoyment.

Sunroof-In.gif

While all this sunroof work was going on, there was a lot of junk going on in the trunk. Next week I’ll post an update on all that.

Cheers!

Paul
 
Last edited:

autokunst

Well-Known Member
Site Donor $$
Messages
3,606
Reaction score
2,618
Location
Milwaukee, WI
Wow! Having seen a few preview shots of the fabricated sunroof frame, I was already impressed. But seeing some of the additional steps really doubles down. Thank you for sharing - you are doing amazing work. I am insanely with you on having a sunroof as a "must have" element. Despite the problematic aspects of their drainage as well as the additional weight, I feel it is absolutely necessary. :cool:
 

jabloomf1230

Well-Known Member
Messages
96
Reaction score
15
Location
Voorheesville, NY
I find this to be one of the most interesting build threads ever. As an owner of a 1972 E9 and a 2019 530 AWD eDrive, I wish that I could merge the best features of both cars. This build is even better.

As an aside, the CSE build blog URL is actually:

https://bmwcse.com/buildblog
 

JetDexter

Well-Known Member
Site Donor
Messages
321
Reaction score
529
Location
Newport Beach, CA
Thanks guys- it is certainly exciting, and if you like solving problems, or doing puzzles, I highly recommend it. Every day there are 20 more technical or mechanical challenges to overcome. Steering and braking parts are on their way- we'll see what you guys think after you see those LOL.

Sorry, I fixed that URL link- thanks for that!
 

JetDexter

Well-Known Member
Site Donor
Messages
321
Reaction score
529
Location
Newport Beach, CA
This week we got the Tesla motor installed. I will share about that this weekend with a full story and photos. Meanwhile the last couple of days we have been working on converting the sunroof to electric (plenty of custom work to get that to happen), fitting wheels and tires, and more metal work.

As you can see, I am going with (for the time being) a staggered style 32 setup. I have ideas of a custom wheel in the long run- and the size would be the same, so I thought I would start with these to get everything setup proper. 17x8 and 17x9. We have been on the fence about a SLIGHT flare of the arches. I have seen one coupe with it done and it looked really great to me.

The 17x9 gives me a lot of rubber on the ground while keeping (what I personally think) is a respectable look. Also, as a daily driver, I opted for a bit more all-weather sport tire. I assume I will change this around down the road, but as a starting point I am happy.

Meanwhile, Tyler was busy working on the rear valance areas - Sans exhaust pipe exit notch :) By tomorrow this area should be all smoothed out, and pop the bumper on to make sure everything looks right.

Later for now!

Paul


Rear-Work.gif
Rear-Work-2.gif
 

Markos

Well-Known Member
Site Donor
Messages
13,369
Reaction score
7,502
Location
Seattle, WA
As you can see, I am going with (for the time being) a staggered style 32 setup. I have ideas of a custom wheel in the long run- and the size would be the same, so I thought I would start with these to get everything setup proper. 17x8 and 17x9. We have been on the fence about a SLIGHT flare of the arches. I have seen one coupe with it done and it looked really great to me.

Was it this coupe?
6739122723_6d8996c4f2_b.jpg
 
Top