you just need the intermediate lifts so you can raise all 4 tires above the rails ... so you can put radiused chocks for the tires ... so you don't flat spot them.I am thinking of a 4 post lift for my garage.
It does not require drilling into the floor.
For my purposes, the lift will be more for winter storage than for projects but I do like the idea of lifting the car up about 4 feet to wax the lower panels!
So, for 4 - 5 months of storage, I have been told the 4 post with drive on ramps is a better choice than a 2 post where the wheels are left dangling.
You are using an out of date browser. It may not display this or other websites correctly.
You should upgrade or use an alternative browser.
You should upgrade or use an alternative browser.
74 3.0 CS Mild Restoration
- Thread starter eludvigs
- Start date
-
- Tags
- restoration list
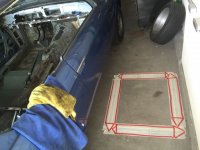
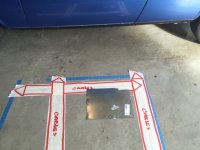
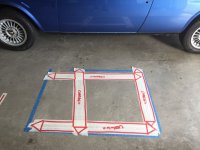
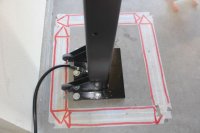
Just had the concrete scanned ($500 since I isolated the locations needed. Took less than an hour. Pictures attached and high def pics at the link below. I used Digital Concrete here in the Bay Area. Guy was great and located everything quickly. I asked him to be real about what can happen if a cable is hit ... he said depending on the slope of the cable they can go straight up in the air like a whip. Yeeeesh. His eyes told me all I needed to know about the danger here.
Looks like the home builder hooked me up with proper locations of the cables. They are about 24" spacing on center. Can drill down to the 5.5" depth and stay around 1" away from the red marker lines. One of the pics has my drill location template. Looks like maxjax is going to happen.
Off to Spain tomorrow morning.
Attachments
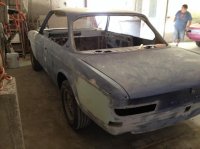
From the look of the car, which is very cool you will definitely need the 2-post ") . It looks like the roof has been removed so you'll have to brace up that body before lifting, which I'm sure you know. Have fun in Spain and please report on the coupe population over there if you can!
. It looks like the roof has been removed so you'll have to brace up that body before lifting, which I'm sure you know. Have fun in Spain and please report on the coupe population over there if you can!
. It looks like the roof has been removed so you'll have to brace up that body before lifting, which I'm sure you know. Have fun in Spain and please report on the coupe population over there if you can!you just need the intermediate lifts so you can raise all 4 tires above the rails ... so you can put radiused chocks for the tires ... so you don't flat spot them.
Another way to reduce flat spotting is to over inflate to 40psi for the winter.
What Stan doesn't realize is that once his E9 is 6' up in the air, he'll discover a whole new world of ... cleaning possibilities. You'll want a bridge jack so you can clean the suspension between drives
And ... Most of these storage lifts come with a set of wheels/levers so you can roll them around. As long as your door opening is high enough ... You could move it outside on occasion with the guys (theyre heavy). But i would use some big plywood plinths if your driveway is asphalt.
Last edited:
John,
Plinth, haven't heard that term in a very long time, figures it would come from a Jag owner!
Chris
Plinth, haven't heard that term in a very long time, figures it would come from a Jag owner!
Chris
From the look of the car, which is very cool you will definitely need the 2-post
Roof is still on. Unless I'm missing something.
So how long can this thing stay on proper jack pts without motor/trans and not flex?
Without a motor or trans you should be OK with the doors on for a while but usually you would have a brace in there when you take the roof off. Best if left on the wheels and not on a lift but when you put the roof back on you'll know if there was any flex and can address it then. More importantly it will need to be braced before any major welding is done I think.
Purchased Max Jax from Costco for 1,999. Delivery is 4-6 weeks though. Which sucks. Doesnt really matter much since I am on the road for the next month.
Will take pics once it's all up.
By the way, I was in Barcelona and there is a serious lack of older classic cars. Only until I ran up to the old city of Rupit did I start seeing some good stuff ... mostly Land Rover Defenders. I'm a sucker for the Defender having owned one myself for a while.
Will take pics once it's all up.
By the way, I was in Barcelona and there is a serious lack of older classic cars. Only until I ran up to the old city of Rupit did I start seeing some good stuff ... mostly Land Rover Defenders. I'm a sucker for the Defender having owned one myself for a while.
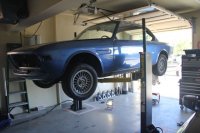
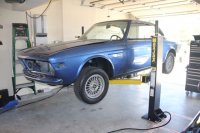
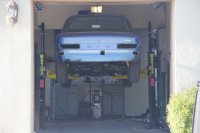
Big weekend at the Lud garage. Got the MaxJax installed in about 5 hours ... into post tension concrete! Xray worked. I didn't die and the drilling of the 10x 7/8" x 6" depth holes went smoothly.
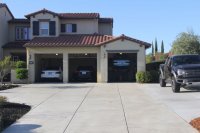
I am frankly amazed that the car fits perfectly at full jack. It clears the garage door opener bracket by about 2". Let this be a lesson, there are 2 post options for people with crappy garage situations.
Some thoughts.
1. Get a powerful hammer drill with GOOD bits. I rented one for about $70 with bits. The provided bits were obviously "used". Anticipating the need for nice holes I purchased two good bits. A 5/8" for the pilots and a 7/8" for the final concrete anchor diameter.
2. The width from the outside of the jack plates is set to 105.5". This is for two reasons ... 1. the E9 has incredibly **** jack points. 2. Prob could've gone a tad wider but the X-ray of the post tension cables said 105.5" is plenty!
3. I will get another 5 anchors for a wider position when I need to use the lift for a wider car. However both of my Mercedes E and GLA class will work on 105.5". The Raptor? Uh no. My buddies 911 ... yes.
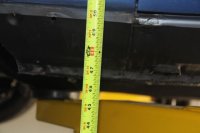
4. Bottom body rail gets up to 46.5" at full lift. This is after setting it down a bit on the safety bars.
5. You aren't going to walk under this, so its all about rolling stools and the like.
Looking forward to dropping the front sub/engine/trans in one shot next weekend.
Thanks to Peter and restart for pushing me to get this done.
I am frankly amazed that the car fits perfectly at full jack. It clears the garage door opener bracket by about 2". Let this be a lesson, there are 2 post options for people with crappy garage situations.
Some thoughts.
1. Get a powerful hammer drill with GOOD bits. I rented one for about $70 with bits. The provided bits were obviously "used". Anticipating the need for nice holes I purchased two good bits. A 5/8" for the pilots and a 7/8" for the final concrete anchor diameter.
2. The width from the outside of the jack plates is set to 105.5". This is for two reasons ... 1. the E9 has incredibly **** jack points. 2. Prob could've gone a tad wider but the X-ray of the post tension cables said 105.5" is plenty!
3. I will get another 5 anchors for a wider position when I need to use the lift for a wider car. However both of my Mercedes E and GLA class will work on 105.5". The Raptor? Uh no. My buddies 911 ... yes.
4. Bottom body rail gets up to 46.5" at full lift. This is after setting it down a bit on the safety bars.
5. You aren't going to walk under this, so its all about rolling stools and the like.
Looking forward to dropping the front sub/engine/trans in one shot next weekend.
Thanks to Peter and restart for pushing me to get this done.
Attachments
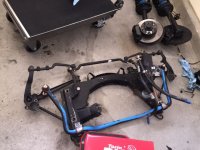
I'm about to drop the front subframe, motor, trans out the bottom ... I have an idea of what tools I need here (beyond lift) but wondering if you all have some tricks.
In the end I want to have the front subframe back on the car (sans engine and trans) so I can keep a rolling chassis when I send off for body/paint.
Figure drop sub, use engine hoist to pull motor and trans off of it, mount engine on engine stand ... screw front sub back on.
In the end I want to have the front subframe back on the car (sans engine and trans) so I can keep a rolling chassis when I send off for body/paint.
Figure drop sub, use engine hoist to pull motor and trans off of it, mount engine on engine stand ... screw front sub back on.
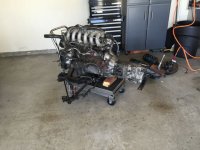
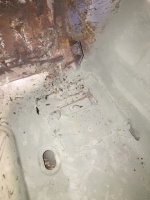
Motor, trans, front sub out. Lots of fun gems reveal themselves fully. Surface rust and paint decay from what looks like brake fluid leaks from the past. The booster had about 1 cup of brake fluid in it so I suppose a new master or seal will be needed ... but thats a long ways out.
Going to pull the glass, clean up the front sub and get it back to a rolling chassis and hopefully get this guy out for body and paint at some pt.
sfdon told me several times to drive in the summer and paint in the winter. Looks like my delayed time schedule missed that guidance!
Going to pull the glass, clean up the front sub and get it back to a rolling chassis and hopefully get this guy out for body and paint at some pt.
sfdon told me several times to drive in the summer and paint in the winter. Looks like my delayed time schedule missed that guidance!
Attachments

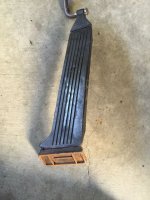
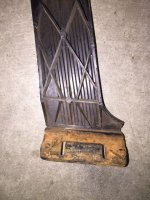
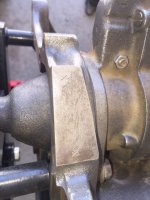
Been meaning to ask this ... whats up with this accelerator pedal set up? I thought it was supposed to be a welded in frame with a couple balls the pedal snapped in to. Clearly there was a patch job on the floor pan area of the pedal and it looks like a non-stock pedal assembly was installed.
Any thoughts?
Any thoughts?
Attachments
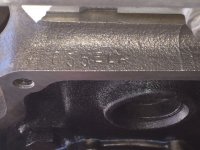
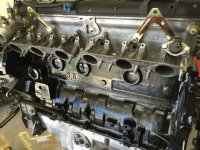
Cleaning up the block and trying to solve the engine mystery.
I have the white L painted on the Left side of the block which is supposed to be a tell tale sign of M90. But not always.
I have no serial number on the block next to the start just two "X".
After cleaning the mess off it I uncovered "635EL A" on the ridge of the block at the very back behind the head.
So 635EL A is a M30 B34 perhttp://www.ge39.com/files/zeigeinfo.pdf
However I have read in several forums that M90 wasnt really ever coded in these manuals. Only way to really know is compression test, and/or crack the head and measure the piston.
I honestly dont care which one it is (M90 or M30 B24) ... just want to know for sure!
Attachments
Been a while since I last updated. Work going SLOW. Wife is preggers again and I'm in full Dad mode these days.
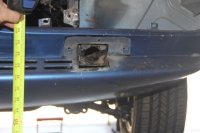
Have been welding up holes to blank out the side markers etc. Planning on welding shut all the massive holes from the big USA bumpers. Any tips on how to do this other than just form sheet steel as best as possible and fill fill fill?
Work on modifying front bumper mount to accept older bumper mounting brackets. Want to shrink the massive hole in the sheet to match up to older spec.
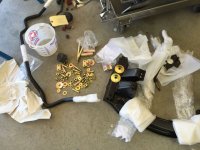
On the side I am cleaning up the engine. New fasteners ... new zinc ... etc etc.
Have been welding up holes to blank out the side markers etc. Planning on welding shut all the massive holes from the big USA bumpers. Any tips on how to do this other than just form sheet steel as best as possible and fill fill fill?
Work on modifying front bumper mount to accept older bumper mounting brackets. Want to shrink the massive hole in the sheet to match up to older spec.
On the side I am cleaning up the engine. New fasteners ... new zinc ... etc etc.
Attachments

coming along nicely!
The accelerator pedal looks OK to me, that is the same style I had in My 74. The type with the 2 studs with round balls on them seems to be from an earlier configuration as my 1970 has that set up. It's so cool that you have that at the house. My cars are at work and after 8 hours here I often feel compelled to go somewhere else
Please keep posting those shots!!
Progress is slow when coaching baseball and working and whatnot.
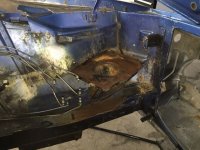
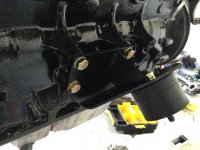
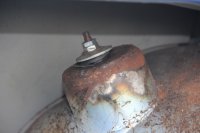
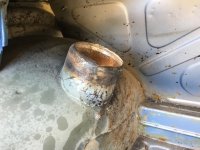
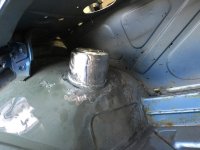
Finally got to those terrible rear shock towers. The metal I cut out was pretty gross. Used a 3 5/8" hole saw through the rear deck (had to cut some access holes).
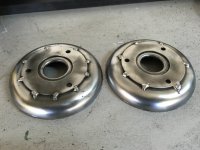
Got some replacement caps from coupeking, cleaned them up and welded them on.
This is a b!tch of a job but glad it is done.
Finally got to those terrible rear shock towers. The metal I cut out was pretty gross. Used a 3 5/8" hole saw through the rear deck (had to cut some access holes).
Got some replacement caps from coupeking, cleaned them up and welded them on.
This is a b!tch of a job but glad it is done.
Attachments
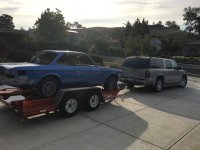
Finally out for body and paint ... the coupe is now in Salt Lake getting the full treatment.
My buddy is restoring a 911 up there so he offered to drag my coupe to the shop.
Looks like a 4-6 week job. Until then I'll be focused on restoring all the bits left behind.
My buddy is restoring a 911 up there so he offered to drag my coupe to the shop.
Looks like a 4-6 week job. Until then I'll be focused on restoring all the bits left behind.