Will they weld up the speaker holes?, adds stiffness and cuts out noise 
You are using an out of date browser. It may not display this or other websites correctly.
You should upgrade or use an alternative browser.
You should upgrade or use an alternative browser.
74 3.0 CS Mild Restoration
- Thread starter eludvigs
- Start date
-
- Tags
- restoration list
so who redid your belt trim? i'm getting ready to do mine and i have a quote from Speedway in Costa Mesa for 380 - stripped, polished and ceramic coated. locally it was closer to 600 ... hence the reason its going to speedway. and both HB Chris and Murray spoke very highly of their work.Body shop getting the body blocked and welding up holes. Should have primer done soon.
Also took all the waist trim in to get stripped polished and cleared. That was more expensive than I expected, but came out looking new.
Peter ... yes going to plug up the speaker holes. The smaller holes were for hole saw access to repair the shock towers. Ran out of time to weld up myself.
rs ... I went to Arnolds since it was right by my office.
http://www.arnoldmetalfinishing.com/
I bet the LA options would be cheaper for same quality work. Bay Area is pricey but convenient for me.
rs ... I went to Arnolds since it was right by my office.
http://www.arnoldmetalfinishing.com/
I bet the LA options would be cheaper for same quality work. Bay Area is pricey but convenient for me.
After going through my exhaust system as it sits in pieces, I think it's all junk.
So to the forum folks, what should I do for a new system? Should I keep the manifolds or move to headers? Just go full coupeking system?
So to the forum folks, what should I do for a new system? Should I keep the manifolds or move to headers? Just go full coupeking system?
i've heard good things about the coupeking system, another option other than stock is the stainless larini system sold by W+N - a bit more affordable than the coupeking system. the question to ask is what kind of engine do you have ... or what you will have in the next couple of years. the W+N system is probably a bit better suited for stock to mild build. the coupeking is probably for a more stout engine.
if you want to go the header route, you might consider finding a used stahl header - they can be found coming off of an e12 or e28 ... then you could use a stock exhaust if stainless isn't an important issue for you
if you want to go the header route, you might consider finding a used stahl header - they can be found coming off of an e12 or e28 ... then you could use a stock exhaust if stainless isn't an important issue for you
Thanks RS.
Running 3.5L/M90 ... makes pretty good power. Based on your comments I guess that leads to a more beefy option to let it breathe.
Running 3.5L/M90 ... makes pretty good power. Based on your comments I guess that leads to a more beefy option to let it breathe.
imho, unless its a fire breathing 3.5L m90, its not beyond the realm of stock exhaust. but somebody else (like SFDon) might have a more scientific opinion. starting question is, do you have more than standard fuel delivery?
scott
scott
Last edited:
Yes, they exist. The rubber inserts are still available too.
So stick w rubber or fill w metal?
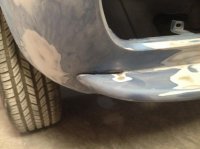
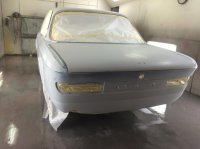
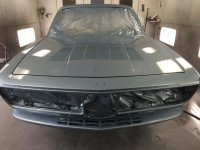
Got some pics from the body shop today. While the guy isnt a great photographer, he seems to have done a good job filling all the holes this car has picked up over its lifetime.
Blanked out the side markers, big bumper holes (front/back), closed up the speaker holes.
Guide coat is on for final block sanding session(s).
Blanked out the side markers, big bumper holes (front/back), closed up the speaker holes.
Guide coat is on for final block sanding session(s).
Attachments
phead82
Well-Known Member
So stick w rubber or fill w metal?
Since you seem to have filled the square bumper attachment holes in the front and consequently moved away from an original look, I'd say fill with metal.
Only thing that makes sense to me from a philosophical POV, IMHO.
Car is looking good btw.!
Since you seem to have filled the square bumper attachment holes in the front and consequently moved away from an original look, I'd say fill with metal.
Only thing that makes sense to me from a philosophical POV, IMHO.
Car is looking good btw.!
Yeah, I agree. Will be all OE on the next one I do. This one is just tuner fun time. Sorry to all the purists out there ... this thread might not be your fav.
It looks great- Have fun!
Hoping to get car back from paint early next week. In the meantime have been taking on projects I've been procrastinating on.
First is the heater core ... cracked it open today and its a damn mess. Will search the forums on how to replace the disintegrating foam, but if anyone has tips, jump in.
Next is cleaning up wiring harness. Fantastic!!!
Final biggie is the A/C system. I was going to just rehab all the old parts but thinking the original is a boat anchor. Might mix and match. Didn't blow cold when I got it, so any improvement will do.
Attachments
Check page 4 of Luis A. post. I believe the foam was from McMaster-Carr.
http://www.e9coupe.com/forum/showthread.php?t=10146&highlight=heater&page=4
http://www.e9coupe.com/forum/showthread.php?t=10146&highlight=heater&page=4
Perfect! Thank you!
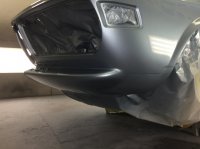
Body guy was sick for a bit, add that to the holidays and we finally have a car in primer ... paint goes on tomorrow. Thought you all would like to see the body work. The big bumper holes are all plugged up now. You'll also note the side gaps have been welded up and blended on the bottom front nose section.
Attachments
Damn that looks good!!! It must be so exciting to get to this point.
What color is that BTW? It looks too dark to be fjord. Unless the artificial lighting throws the color off as always.
What color is that BTW? It looks too dark to be fjord. Unless the artificial lighting throws the color off as always.


