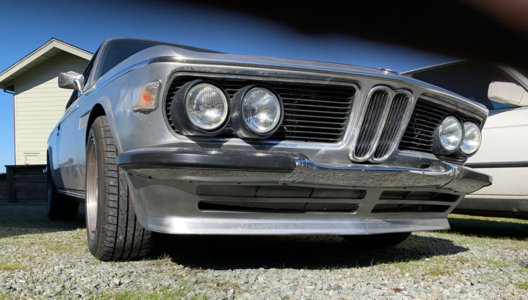
Color! Fresh paint smell! General prettiness!


You are using an out of date browser. It may not display this or other websites correctly.
You should upgrade or use an alternative browser.
You should upgrade or use an alternative browser.
Bringing a '74 back up to her intended glory.
- Thread starter Bmachine
- Start date
-
- Tags
- restoration list
Most excellent!
this is really coming together nicely ... keep it going.
Wow, looks great, Bo!
Thank you guys. I have to say I am really happy with the work this guy did. I came in looking for a driver quality job and I feel like I got much more than that. He is a low key craftsman who would like to do more high end work and he really poured his heart and soul into this.
That is one of the things I love about this vintage restoration hobby. Nearly all aspects of it have to be handled by individual crafts people who have honed their skills the hard way over the years. And the several of them became good friends in the process.
That is one of the things I love about this vintage restoration hobby. Nearly all aspects of it have to be handled by individual crafts people who have honed their skills the hard way over the years. And the several of them became good friends in the process.
Last edited:
Well, it does kinda look like driver quality but I didn't want to say anything. 
Wladek
Well-Known Member
Looks good  Bo, you will be putting trim on the boot lid edge or the holes are for rear spoiler?
Good eye Wladek!!! Wait and see….
Hint: I hate spoilers.
Hint: I hate spoilers.
It's home! After waiting 5 weeks for the clear coat to fully cure, the painter (appropriately named German) did the final wet sanding and buffing. So the car was ready to head on home after 5 months at the body shop.
Luckily, my friend Sean, who races a 911, offered to bring his trailer to transport the patient.


Luckily, my friend Sean, who races a 911, offered to bring his trailer to transport the patient.
The good news is that it is finally back to its glorious original color.
The bad news is that I now need to find all the parts and put it all back together.
The bad news is that I now need to find all the parts and put it all back together.
looking most excellent Bo, i hope to be in a similar position in the coming months.
Looks amazing. Keeping the post 1973 big bumpers?
Definitely not!Looks amazing. Keeping the post 1973 big bumpers?
Attachments
Ok. After two weeks of work r’n’d -ing a new front spoiler, I decided that time was better spent putting the car back together. So my first project was to install Dynamat to tame the noise while driving. I started with the rear just so that I could reinstall the back seats in order to clear up a little bit of room in the garage.

So nice and tidy!
Bo, I hope you spread your parts around like you did your legos when we were kids. It’s looking fantastic, let me know when I can come up to see it.
No major progress on the coupe rebuilding front due to a trip back to the old country to visit family followed by the fact that I need to renovate our kitchen in order to keep the peace on the home front. But llots of little bits here and there
Rear lights, center plate and trunk lock:

Front bumper and turn signals:

Side grilles (still need to paint the vertical posts black…)

Those little rubber spacers for the door handle that @OCCoupe alerted me to. What a pain to install those little buggers. Liberal use of rubber restorer and cutting a slit in the inside ring helped:


Door handle finally in:

Checking the spacers position:

Making molds for the AGM batteries under the rear seat:

Twin Odyssey batteries installed with fuse and kill switch

C pillar emblem drain routed out to the wheel well instead of rocker:

Rear lights, center plate and trunk lock:
Front bumper and turn signals:
Side grilles (still need to paint the vertical posts black…)
Those little rubber spacers for the door handle that @OCCoupe alerted me to. What a pain to install those little buggers. Liberal use of rubber restorer and cutting a slit in the inside ring helped:
Door handle finally in:
Checking the spacers position:
Making molds for the AGM batteries under the rear seat:
Twin Odyssey batteries installed with fuse and kill switch
C pillar emblem drain routed out to the wheel well instead of rocker:
Last edited:
Can't wait to see the kitchen. 
Haha, I must send huge thanks to Stephen Bruns for brilliant design direction and concepts for this renovation. He not only helped us see things we would have never thought about, but brought immense style and taste to our project.Can't wait to see the kitchen.

