Bringing a '74 back up to her intended glory.

Bmachine

Well-Known Member
Site Donor $
Site Donor $$
Messages
3,525
Reaction score
1,779
Location
Northern California coast
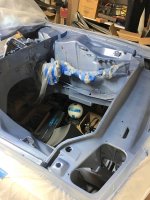
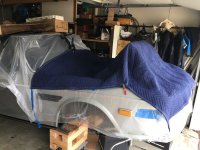
Very nice progress, Bo!

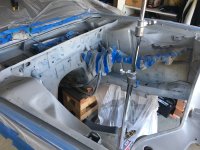
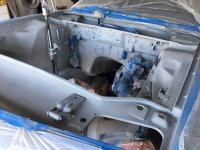
Are you removing the hood hinges before painting? If you do, drill two small holes through the hinge and the metal behind it (where it is bolted to the car), to easily get it back into the correct position again later.
This is also a good trick to do on the hood-side of the hinge, drill two small holes through hinge + hood before removing the hood, so you can put some small drill bits in those holes later when installing the hood.

This is of course only if the hood is aligned and sits perfect before you remove it, I did this in the bodywork stage of my car, aligned the hood, drilled, removed the hood and hinges for paint. It helped tremendously when we installed it later, took us about 10 minutes to install, no alignment required.

Yes, it's a bit late for that in this stage with the hood already removed... But I just came to think of it, might be useful later down the road!

Keep it up!:)

That is a great tip Robert! I did not remove the hinges from the body specifically for that reason. I wanted to minimize later alignment problems. But with your trick I will totally do it.

I had scribed the position of the hinges on the hood part prior to removing it. I will try use your trick and remove the hinges from the body first. Then if I can still see my marks I will put them back on the hood and drill those pilot holes.

Thank you.
 
Last edited:

Bmachine

Well-Known Member
Site Donor $
Site Donor $$
Messages
3,525
Reaction score
1,779
Location
Northern California coast
Next was paint prep. Went over everything with the 3M red sanding pads. Those things are awesome. Soooo much easier to use on uneven surfaces than sand paper...

Then everything was cleaned with Duplicolor PaintPrep. And then came the final masking. There are sooo many little things to mask when you just want that paint to stay in the engine bay!!!
 

Attachments

  • file-6D096724-5A45-4F1E-84D7-240E3EF1D735-6436-000006086C408938.jpg
    file-6D096724-5A45-4F1E-84D7-240E3EF1D735-6436-000006086C408938.jpg
    246.1 KB · Views: 261
  • file-788F8582-D739-4B02-8570-B3DADC3176D6-6436-000006086BD2DD0C.jpg
    file-788F8582-D739-4B02-8570-B3DADC3176D6-6436-000006086BD2DD0C.jpg
    166.8 KB · Views: 258
Last edited:

Bmachine

Well-Known Member
Site Donor $
Site Donor $$
Messages
3,525
Reaction score
1,779
Location
Northern California coast
I was now ready to paint. Except for one little detail.... AutomotiveTouchUp, the site from which I bought the paint, specifies that it needs to be applied between 70 and 90 degrees temp. It was barely creeping to 54 for the last few weeks! Damn. Now what? With a lot of bare metal showing up, I could not afford to risk waiting for warmer weather.

So I got a little oil space heater and placed it inside the engine bay. Then, using a lighting tripod I had as a tent pole, I placed one of those Harbor Freight moving blankets on top of the whole thing and fired the heater up. It took about 2 hours until the thermometer read above 70 for most panels.
 

Attachments

  • file-CF02AADD-3A88-4156-BCD9-BF9FE3894D1B-6436-000006086D7A4026.jpg
    file-CF02AADD-3A88-4156-BCD9-BF9FE3894D1B-6436-000006086D7A4026.jpg
    139.8 KB · Views: 250
  • file-F0F65D18-0E53-44BF-A411-0FBD67D9C09A-6436-000006086CC6B5BF.jpg
    file-F0F65D18-0E53-44BF-A411-0FBD67D9C09A-6436-000006086CC6B5BF.jpg
    215.1 KB · Views: 245
  • file-A08E6441-9C54-43D5-800B-4C66DAD5DCE2-6436-0000060AFE75A1A6.jpg
    file-A08E6441-9C54-43D5-800B-4C66DAD5DCE2-6436-0000060AFE75A1A6.jpg
    55.2 KB · Views: 255
Last edited:

Bmachine

Well-Known Member
Site Donor $
Site Donor $$
Messages
3,525
Reaction score
1,779
Location
Northern California coast
But this meant that once ready to spray, I would have to remove the heater so I could jump in there and have only a few minutes before the metal would get too cold again. That was primarily because I had to open the garage door so the noxious fumes would not bring a most premature end to my adventure with this car and on this earth. On top of that, I had to build a tent around the whole thing so that the overspray would not coat everything around it in the garage.

This was a complete pain in the neck to be honest. But I eventually got two coats of primer on there so at least we are protected from rust until warmer weather allows me to shoot the color without having to jump through all of these hoops.

Note that in those photos some areas are not coated evenly. That is because 1) I will shoot a third coat later and 2) the firewall area will be mostly covered by the sound deadening foam.
 

Attachments

  • file-C5452FEA-95F6-462E-96D1-6A65FF9BC705-6436-000006086DAED336.jpg
    file-C5452FEA-95F6-462E-96D1-6A65FF9BC705-6436-000006086DAED336.jpg
    106.6 KB · Views: 259
  • file-06E25F28-AE2D-420E-8519-809409217EC0-6436-000006086E216932.jpg
    file-06E25F28-AE2D-420E-8519-809409217EC0-6436-000006086E216932.jpg
    220.4 KB · Views: 276
  • file-C6111796-2E55-4AE1-9E6D-A7A3921644FE-6436-000006086E64B241.jpg
    file-C6111796-2E55-4AE1-9E6D-A7A3921644FE-6436-000006086E64B241.jpg
    197.7 KB · Views: 272
Last edited:

Bmachine

Well-Known Member
Site Donor $
Site Donor $$
Messages
3,525
Reaction score
1,779
Location
Northern California coast
All is much too quite on this western front due to an intense project at work. That will keep me MIA until June.

But I did manage to acquire a nice 265 transmission from my old racing buddy Rob at least. I also got a 320i shifter to get a slightly shorter throw.
 

Attachments

  • file-9BC5F323-EE8B-4B81-89A9-620D0D19E467-3105-000003CE5314EE5E.jpg
    file-9BC5F323-EE8B-4B81-89A9-620D0D19E467-3105-000003CE5314EE5E.jpg
    159.7 KB · Views: 243
Last edited:

Bmachine

Well-Known Member
Site Donor $
Site Donor $$
Messages
3,525
Reaction score
1,779
Location
Northern California coast
One thing that can be done when you only have a few hours a week available is to modify the gear shift surround from auto to manual. Master deQuincey had written an excellent tutorial on the subject a while ago so I followed his footsteps to do mine.
http://www.e9coupe.com/forum/thread...ormation-from-auto-to-manual-is-doable.20350/

There is a cutout under the auto one but it is fairly useless because it is off a bit on nearly each of its sides. First thing I did was to detach the front and rear vertical panels in order to have easier access to the center portion.

One of the challenges of this job is that the wood is actually shaped in a compound curve. Meaning that it is curve front and back as well as side to side.

To get a good guide, my friend Gavin loaned me the one from his Art Symonds CSL. If you're going to copy, might as well copy from the best.
 

Attachments

  • file-F9A27E66-FCB3-4BEF-8210-9181111DCC72-9703-00000B5ABE6B93E2.jpg
    file-F9A27E66-FCB3-4BEF-8210-9181111DCC72-9703-00000B5ABE6B93E2.jpg
    252.2 KB · Views: 249
  • file-6B798694-B514-4F59-A565-E28028CA0E6A-9703-00000B5ABEDE487A.jpg
    file-6B798694-B514-4F59-A565-E28028CA0E6A-9703-00000B5ABEDE487A.jpg
    113.1 KB · Views: 231
  • file-04CD74A3-091A-4D27-88F6-56F845114CA7-9703-00000B5AC0450F9F.jpg
    file-04CD74A3-091A-4D27-88F6-56F845114CA7-9703-00000B5AC0450F9F.jpg
    272.8 KB · Views: 234
  • file-941C77FF-EFFC-45A4-B800-43CAAFD5BBBE-9703-00000B5AC10B5A5B.jpg
    file-941C77FF-EFFC-45A4-B800-43CAAFD5BBBE-9703-00000B5AC10B5A5B.jpg
    251.1 KB · Views: 230
  • file-E26FB6D6-F83F-44A5-B597-73D67761B22A-9703-00000B5AC1441692.jpg
    file-E26FB6D6-F83F-44A5-B597-73D67761B22A-9703-00000B5AC1441692.jpg
    159.7 KB · Views: 228
  • file-A90CAF37-0508-45A7-BEA3-F3A759F8AD45-9703-00000B5AC1BC52D2.jpg
    file-A90CAF37-0508-45A7-BEA3-F3A759F8AD45-9703-00000B5AC1BC52D2.jpg
    132.3 KB · Views: 234
Last edited:

Bmachine

Well-Known Member
Site Donor $
Site Donor $$
Messages
3,525
Reaction score
1,779
Location
Northern California coast
Let's start by cutting out that center portion along the precut lines.

Because of the compound curves, I decided to fill the hole with solid pine. This will make it make better for carving then the original plywood.
I traced the cutout from the manual tranny and cut it out on the bandsaw. Then time to glue that in its new home.

Next is using the router to carve the depression into which the securing ring will be lodged.
 

Attachments

  • file-C69A0837-B448-4866-9688-534EDAFE6749-9703-00000B5E98ECF923.jpg
    file-C69A0837-B448-4866-9688-534EDAFE6749-9703-00000B5E98ECF923.jpg
    122.3 KB · Views: 222
  • file-69702F24-2AA3-42B6-83E7-F4CBDAADE8F0-9703-00000B5E9B14A987.jpg
    file-69702F24-2AA3-42B6-83E7-F4CBDAADE8F0-9703-00000B5E9B14A987.jpg
    132.4 KB · Views: 217
  • file-913D58DA-B051-43F8-ADC5-E0B0FA78F0DA-9703-00000B5E9C27F7EF.jpg
    file-913D58DA-B051-43F8-ADC5-E0B0FA78F0DA-9703-00000B5E9C27F7EF.jpg
    197.4 KB · Views: 219
  • file-E69DDB81-1CAF-465F-9BE3-AA75647FDBD9-9703-00000B5E9CFD32DA.jpg
    file-E69DDB81-1CAF-465F-9BE3-AA75647FDBD9-9703-00000B5E9CFD32DA.jpg
    119.8 KB · Views: 230
  • file-C1D37A74-A4A7-49DD-BA2F-B77B2476FE21-9703-00000B5E9D5CBB66.jpg
    file-C1D37A74-A4A7-49DD-BA2F-B77B2476FE21-9703-00000B5E9D5CBB66.jpg
    131.7 KB · Views: 229
  • file-F2A021AC-3121-4602-B48A-FFF1BA53534A-9703-00000B5E9DCCA1E5.jpg
    file-F2A021AC-3121-4602-B48A-FFF1BA53534A-9703-00000B5E9DCCA1E5.jpg
    123.9 KB · Views: 215
  • file-EF088C9D-7692-41C5-8A20-AF5EBD3B0928-9703-00000B5E9F2D7246.jpg
    file-EF088C9D-7692-41C5-8A20-AF5EBD3B0928-9703-00000B5E9F2D7246.jpg
    110 KB · Views: 215

Bmachine

Well-Known Member
Site Donor $
Site Donor $$
Messages
3,525
Reaction score
1,779
Location
Northern California coast
Next is carving, shaping, filling gaps with wood filler and sanding.
 

Attachments

  • file-BC90270A-3FB8-4145-A7EB-3A99ACF7FB91-9703-00000B5E9E4C85AB.jpg
    file-BC90270A-3FB8-4145-A7EB-3A99ACF7FB91-9703-00000B5E9E4C85AB.jpg
    132.4 KB · Views: 222
  • file-6D682585-4CC0-4DF0-897E-665A716FB1B5-9703-00000B60D3D5CE16.jpg
    file-6D682585-4CC0-4DF0-897E-665A716FB1B5-9703-00000B60D3D5CE16.jpg
    302.8 KB · Views: 226
  • file-3FAD2405-BDD4-4BAC-A70F-22F06E7DD5D9-9703-00000B60D463B507.jpg
    file-3FAD2405-BDD4-4BAC-A70F-22F06E7DD5D9-9703-00000B60D463B507.jpg
    84.7 KB · Views: 208
  • file-93FE9FAE-E93B-4FE9-94E4-6A79F2DFBA0F-9703-00000B60D5FE52AB.jpg
    file-93FE9FAE-E93B-4FE9-94E4-6A79F2DFBA0F-9703-00000B60D5FE52AB.jpg
    222.9 KB · Views: 216

Bmachine

Well-Known Member
Site Donor $
Site Donor $$
Messages
3,525
Reaction score
1,779
Location
Northern California coast
After that, I tried to remove as much of the old glue as possible. I did not want to use chemicals because I did not want them to seep into the wood. So I scraped most of it out with a razor blade.

Then I glued and restapled the front and rear panels back on.
 

Attachments

  • file-0D03B7FC-E710-45BB-ACCC-9F488E421F8F-9703-00000B60D64B007E.jpg
    file-0D03B7FC-E710-45BB-ACCC-9F488E421F8F-9703-00000B60D64B007E.jpg
    153 KB · Views: 211
  • file-5074024A-28F1-4E51-BFC3-5F42FCF92D4F-9703-00000B63BE64DFD1.jpg
    file-5074024A-28F1-4E51-BFC3-5F42FCF92D4F-9703-00000B63BE64DFD1.jpg
    156.3 KB · Views: 219

Bmachine

Well-Known Member
Site Donor $
Site Donor $$
Messages
3,525
Reaction score
1,779
Location
Northern California coast
Next was leather time. I found this great piece of black leather with a grain that matched very close to the rest of the interior. This is a bit tricky to do. One thing I did was to create some wooden plates that matched the aluminium ones to press the leather into the corresponding the ridges.
 

Attachments

  • file-DCEEFF42-BD56-4D65-BC37-5707B33B32AA-9703-00000B63BFDA2469.jpg
    file-DCEEFF42-BD56-4D65-BC37-5707B33B32AA-9703-00000B63BFDA2469.jpg
    110.6 KB · Views: 209
  • file-305C2142-6CAC-4DE0-A845-0334B4BF7A66-9703-00000B63C19A46E7.jpg
    file-305C2142-6CAC-4DE0-A845-0334B4BF7A66-9703-00000B63C19A46E7.jpg
    113.9 KB · Views: 233
  • file-CD78C6FC-84AC-45D1-83DA-3A76A830C7D1-9703-00000B63C1DE7A96.jpg
    file-CD78C6FC-84AC-45D1-83DA-3A76A830C7D1-9703-00000B63C1DE7A96.jpg
    103.4 KB · Views: 228
  • file-A1D9E1BE-18DA-46F7-9C3A-CB7561EFD985-9703-00000B63C32CB90D.jpg
    file-A1D9E1BE-18DA-46F7-9C3A-CB7561EFD985-9703-00000B63C32CB90D.jpg
    135.2 KB · Views: 220
  • file-FC15F22C-61A6-4CF2-97A1-0531BBA9DA2C-9703-00000B63C2A4381A.jpg
    file-FC15F22C-61A6-4CF2-97A1-0531BBA9DA2C-9703-00000B63C2A4381A.jpg
    124.1 KB · Views: 233

Bmachine

Well-Known Member
Site Donor $
Site Donor $$
Messages
3,525
Reaction score
1,779
Location
Northern California coast
Now time to build the ring that will hold the shift boot in place. Some half inch aluminium is perfect.

And the shift boot is installed!
 

Attachments

  • file-9B4D09AC-7D98-4529-B4A6-13F8AF13D740-9703-00000B66E1DCA2E7.jpg
    file-9B4D09AC-7D98-4529-B4A6-13F8AF13D740-9703-00000B66E1DCA2E7.jpg
    207.3 KB · Views: 223
  • file-9B306465-20D8-4C3D-B6F1-21C0DC155F5B-9703-00000B66E4066B33.jpg
    file-9B306465-20D8-4C3D-B6F1-21C0DC155F5B-9703-00000B66E4066B33.jpg
    226.2 KB · Views: 211
  • file-185D0A93-F57E-4439-9035-15F3F5FA4212-9703-00000B66E4B03FB6.jpg
    file-185D0A93-F57E-4439-9035-15F3F5FA4212-9703-00000B66E4B03FB6.jpg
    240 KB · Views: 245
  • file-4D61B347-E0AE-4B5A-931A-5C01BD123D20-9703-00000B66E56288E6.jpg
    file-4D61B347-E0AE-4B5A-931A-5C01BD123D20-9703-00000B66E56288E6.jpg
    100.8 KB · Views: 248
  • file-688E9E39-9427-46F7-AD3F-5796E23E3EA7-9703-00000B66E6258110.jpg
    file-688E9E39-9427-46F7-AD3F-5796E23E3EA7-9703-00000B66E6258110.jpg
    107.5 KB · Views: 234

Bmachine

Well-Known Member
Site Donor $
Site Donor $$
Messages
3,525
Reaction score
1,779
Location
Northern California coast
Finally, cleaning and refinishing the aluminium plates under the light switches. And of course, just because DQ did it, threading the posts so that nuts can be used instead of the press on clips.

And voila!
 

Attachments

  • file-49541920-7135-4376-AD98-ACED2D7B961E-9703-00000B66E6EEC838.jpg
    file-49541920-7135-4376-AD98-ACED2D7B961E-9703-00000B66E6EEC838.jpg
    252 KB · Views: 219
  • file-90079556-EF71-440B-8987-DA946500E137-9703-00000B66E79B233B.jpg
    file-90079556-EF71-440B-8987-DA946500E137-9703-00000B66E79B233B.jpg
    164.9 KB · Views: 233
  • file-E2733C53-8095-4B59-90E5-DC05EFF16111-9703-00000B66E7ECF51E.jpg
    file-E2733C53-8095-4B59-90E5-DC05EFF16111-9703-00000B66E7ECF51E.jpg
    87.1 KB · Views: 230
  • file-1A68DE72-FA49-43B3-A7F9-ACE73B60153E-9703-00000B66E97B7DF2.jpg
    file-1A68DE72-FA49-43B3-A7F9-ACE73B60153E-9703-00000B66E97B7DF2.jpg
    155.2 KB · Views: 244
  • file-7D8FDB0D-0DC0-46BC-B2BD-F16EB1B1FE4C-9703-00000B66EA02EA08.jpg
    file-7D8FDB0D-0DC0-46BC-B2BD-F16EB1B1FE4C-9703-00000B66EA02EA08.jpg
    153.4 KB · Views: 231
  • file-DDA92833-835F-4B33-A74C-C7C771366749-9703-00000B66EA9C0543.jpg
    file-DDA92833-835F-4B33-A74C-C7C771366749-9703-00000B66EA9C0543.jpg
    127.5 KB · Views: 217
  • file-037B330C-2602-48CE-A1EC-B641A00E5731-9703-00000B688B22DF31.jpg
    file-037B330C-2602-48CE-A1EC-B641A00E5731-9703-00000B688B22DF31.jpg
    136 KB · Views: 205
  • file-1434FF7C-DF9C-427F-83EF-C871159E062B-9703-00000B688BE6DA4E.jpg
    file-1434FF7C-DF9C-427F-83EF-C871159E062B-9703-00000B688BE6DA4E.jpg
    129.7 KB · Views: 229

JMinPDX

Well-Known Member
Site Donor
Site Donor $
Messages
1,254
Reaction score
1,273
Location
Portland OR
Well Done! Wish I had your pictures when in did my conversion 6 years ago. Mine looks good but I re-used my vinyl and even though I filled in the groves in the wood with filler I could not get the old vinyl to lay completely flat at the very top on the shifter opening. Hard to see, but I know its there. Threading the post on the trim pieces is a great idea.
 

Bmachine

Well-Known Member
Site Donor $
Site Donor $$
Messages
3,525
Reaction score
1,779
Location
Northern California coast
Well Done! Wish I had your pictures when in did my conversion 6 years ago. Mine looks good but I re-used my vinyl and even though I filled in the groves in the wood with filler I could not get the old vinyl to lay completely flat at the very top on the shifter opening. Hard to see, but I know its there. Threading the post on the trim pieces is a great idea.
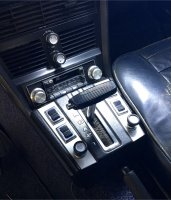
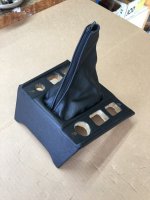
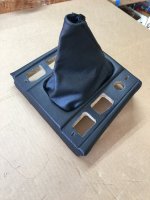
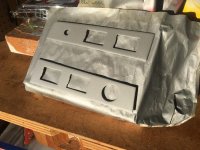
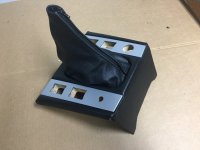
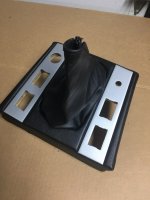
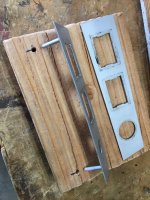
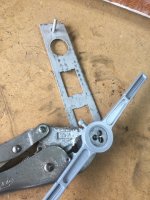
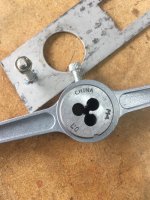
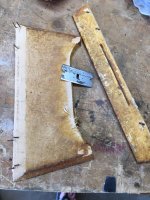
Thank you. As I mentioned at the beginning much of these ideas came from Señor DeQuincey.
 
Last edited:

Bmachine

Well-Known Member
Site Donor $
Site Donor $$
Messages
3,525
Reaction score
1,779
Location
Northern California coast
After many months of auto hibernation due to insane work schedule I finally have a few days off.
My first priority is to finish the engine bay prep and paint while the weather is right for that.
I did a lot of internet research to figure out how I could do the best possible paint job on the engine bay in a home garage situation. Keeping in mind that I need to keep our second car space clean at night for my wife’s car I came up with this solution:
I will wait for a warm but windless day. I will purchase one of those 10ft by 10ft canopies with mesh sides. This will allow me to roll the car in the driveway, paint it without needing a fan for the fumes and have basic protection against dust or leaves while keeping overspray at minimum.
Here is the setup but without the sides since I just did sanding today:
 

Attachments

  • E66AFE55-2A83-4234-9B56-5B238D084126.jpeg
    E66AFE55-2A83-4234-9B56-5B238D084126.jpeg
    199.7 KB · Views: 230
  • DC017EE7-FB57-49AA-859C-5D444F56DA1E.jpeg
    DC017EE7-FB57-49AA-859C-5D444F56DA1E.jpeg
    195.2 KB · Views: 214

Bmachine

Well-Known Member
Site Donor $
Site Donor $$
Messages
3,525
Reaction score
1,779
Location
Northern California coast
While waiting for the sun to come back up, I am opening a package aus Deutschland from our friend Herr Bier.
 

Attachments

  • 80E5338A-DF61-4F4B-B452-6475CD80DC25.jpeg
    80E5338A-DF61-4F4B-B452-6475CD80DC25.jpeg
    217.4 KB · Views: 206

Bmachine

Well-Known Member
Site Donor $
Site Donor $$
Messages
3,525
Reaction score
1,779
Location
Northern California coast
Another project I tackled recently was the front suspension. I took the struts apart, cleaned them all up and cut one coils off the spring as a temporary lowering solution.
I also thoroughly cleaned the strut bearings and sucked all the crap from the last 45 years out with solvent and/or a shopvac. I then repainted them with epoxy satin black and repacked them all with fresh grease.
 

Attachments

  • 17AB209F-F430-4C1A-B6D6-3F3F683A1151.jpeg
    17AB209F-F430-4C1A-B6D6-3F3F683A1151.jpeg
    264.9 KB · Views: 212
  • EDE8B981-7909-4565-9B2A-64DF604E8A8D.jpeg
    EDE8B981-7909-4565-9B2A-64DF604E8A8D.jpeg
    216.6 KB · Views: 207
  • 8452C1B2-DB48-4A48-91A6-9677F0CDA164.jpeg
    8452C1B2-DB48-4A48-91A6-9677F0CDA164.jpeg
    247.4 KB · Views: 212
  • 49D56679-2F1C-441E-BBD4-7A7EC53CF066.jpeg
    49D56679-2F1C-441E-BBD4-7A7EC53CF066.jpeg
    173.4 KB · Views: 201
  • 35DDB071-6950-4FD7-A77F-706DBD00ACD1.jpeg
    35DDB071-6950-4FD7-A77F-706DBD00ACD1.jpeg
    237.7 KB · Views: 207
  • 985AD71A-9725-4FD4-A90C-A76EA0FAFBEC.jpeg
    985AD71A-9725-4FD4-A90C-A76EA0FAFBEC.jpeg
    300.6 KB · Views: 202
Last edited:

Bmachine

Well-Known Member
Site Donor $
Site Donor $$
Messages
3,525
Reaction score
1,779
Location
Northern California coast
I really HAD to finish this engine bay paint before the weather started to get too uncooperative. As a reminder, I am returning the car to its original fjord color. I am painting the engine area myself prior to installing the new motor. I will then have the outside of the car painted professionally later. Painting at home is a real pain in the ass because if you don't have a paint booth, there are a million things that conspire against you. Temperature, wind, dust, fumes, overspray, light, humidity, etc... On top of that with an intense work schedule I had very little time flexibility. But I took a few days off this past week and set up my portable "paint tent" (see 2 posts above) and kept my fingers crossed for no wind.

I had purchased the 037 paint from AutomotiveTouchUp and, although it was a ton of work, pushing the car in and out of the garage, setting the "booth" up several times over 3 days, jumping through all kinds of logistical hoops, etc... it turned out decent enough.

I don't know if I was just lucky or if it actually worked, but the mesh sides of that canopy did a pretty good job at keeping dust and bugs out while still providing plenty of fresh air to avoid creating a breathing death trap. Because there was definitely more breeze than I would have liked on Sunday.
 

Attachments

  • 1349CE97-4555-47F6-A37B-F0C36FDD5A25.jpeg
    1349CE97-4555-47F6-A37B-F0C36FDD5A25.jpeg
    232.2 KB · Views: 218
  • F2E1067E-18CC-484E-9C9C-E2C64BF75582.jpeg
    F2E1067E-18CC-484E-9C9C-E2C64BF75582.jpeg
    191.1 KB · Views: 234
  • 392EFE72-8E5C-4465-B2B0-113B7C8F34AA.jpeg
    392EFE72-8E5C-4465-B2B0-113B7C8F34AA.jpeg
    179.7 KB · Views: 222
  • E498B17E-46E4-4A5C-96D9-C0F74164AD65.jpeg
    E498B17E-46E4-4A5C-96D9-C0F74164AD65.jpeg
    322 KB · Views: 226
  • 0BD6D981-F8FF-4C07-8393-84661F205B47.jpeg
    0BD6D981-F8FF-4C07-8393-84661F205B47.jpeg
    203 KB · Views: 250
  • D30DA8E5-C51E-446D-9F36-5FA3A9648317.jpeg
    D30DA8E5-C51E-446D-9F36-5FA3A9648317.jpeg
    221.6 KB · Views: 233
Last edited:
Top