Bringing a '74 back up to her intended glory.

Bmachine

Well-Known Member
Site Donor $
Site Donor $$
Messages
3,533
Reaction score
1,790
Location
Northern California coast
Speaking of avoiding the rain, I had purchased replacement outer squeegee pieces for the rear windows from Coupeking. These one piece bits replace the original two part pieces that are between the chrome trim and the glass itself.

https://e9coupe.com/forum/threads/r...-piece-on-the-rear-window-outside-trim.34052/

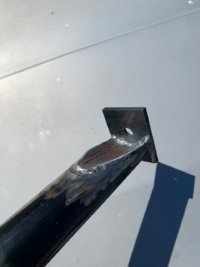
First you have to drill out of the old rivets that hold the old parts in place. Then you do you do usual cleanup of the chrome while you have good access to it. Then using the smallest size aluminum or copper rivet you can, (i used 1/8 inch or 4 mm), You drill holes in the new rubber piece and carefully rivet it onto the chrome. The Coupeking units are a bit larger than needed so you have to trim them with a razor blade.

After reinstallation it looks much cleaner obviously and will definitely not let much or any water through that area.

IMG_1575.jpg IMG_1576.jpg IMG_1578.jpg IMG_2175.jpg IMG_2177.jpg
 
Last edited:

Bmachine

Well-Known Member
Site Donor $
Site Donor $$
Messages
3,533
Reaction score
1,790
Location
Northern California coast
It is finally time to get back to work. After many months of searching I have found a promising local place to repaint my car. Now it is time to prep it.

And since it’s going to the body shop I figured I would take advantage to also strip the interior so I can do 3 things:
  1. double check for any possible rust in the footwell areas,
  2. do the stitch welding that we discussed in the chassis reinforcement thread.
  3. Add Dynamat soundproofing all over the interior
I was concerned that some water may have leaked through the windshield gasket and found its way down to the floor. That did prove to be the case. Fortunately the rust seems pretty superficial. After a bit of clean up, I will put some rust converter in the areas affected and then have the body shop cover it with their primer. I will also have them remove the rest of the tar and original sound proofing.

IMG_4619.jpg

Note: In the above photo, a lot of that rust colored stuff in the passenger and rear footwell areas are the original dried contact cement over the sound proofing.
Below is where part of the actual sheet metal is showing.

IMG_4620.jpg
 

Bmachine

Well-Known Member
Site Donor $
Site Donor $$
Messages
3,533
Reaction score
1,790
Location
Northern California coast
Oh, and just in case someone missed class that day, a quick reminder that the sunroof is a great place for an LED light bar when you work on the inside of the car.
 

Attachments

  • EE009534-537D-4A3C-9BA6-E14453549675.jpeg
    EE009534-537D-4A3C-9BA6-E14453549675.jpeg
    176.2 KB · Views: 203

Bmachine

Well-Known Member
Site Donor $
Site Donor $$
Messages
3,533
Reaction score
1,790
Location
Northern California coast
And, while we’re at it, as I’ve mentioned before, those foam camping mattresses make great protection for your knees or back side when you have to crawl on the interior of the car. Note also the indispensable iPad for checking previous threads on this board detailing how to do certain tasks.
 

Attachments

  • DA2AFC2F-DF6F-48C5-AD37-334836883A71.jpeg
    DA2AFC2F-DF6F-48C5-AD37-334836883A71.jpeg
    395.1 KB · Views: 197

Bmachine

Well-Known Member
Site Donor $
Site Donor $$
Messages
3,533
Reaction score
1,790
Location
Northern California coast
No turning back now. The car is at the body shop. Yesterday, they removed the windshield. I was a little concerned that there might be some rust around the lower corners of the frame because it was clear that some water had gotten in there. The dash corner wood was quite swollen. Luckily no problem! The window frame Is all clean.
After inspecting that, I proceeded to remove the dashboard. The plan of course is to refinish it while the car is being painted. I can easily see why everybody says that it is near impossible to do with the windshield in place. Without it it was relatively straightforward.
I did find a little bit of surface rust on the left Side under the horizontal portion of the wood. Fortunately nothing that a little cleaning and POR-15 can’t handle.

265C4A1E-D78C-4A75-8DCD-1DD5EEA06F1F.jpeg52A3AC3D-BE06-4580-BE82-C9247EB7E682.jpeg
 

Bmachine

Well-Known Member
Site Donor $
Site Donor $$
Messages
3,533
Reaction score
1,790
Location
Northern California coast
The painter also shot some swatches. One with the stock Fjord 037 formula which turned out to be almost a perfect match for the original paint that was still showing under the trunk panels, then one with medium flakes and one with heavier flakes. Not surprisingly, under ambient lighting there’s not that much difference between each. But as soon as you bring it out in the sun the difference is significant.
He is using Spies Hecker paint.

E9B33436-0FEB-4086-9C70-FD7DDC02B14D.jpeg
 

Tim M

Active Member
Messages
72
Reaction score
26
Even in primer they look cool! Question on the bumper mounts,are you welding up the holes on the front and going with slots?
 

Bmachine

Well-Known Member
Site Donor $
Site Donor $$
Messages
3,533
Reaction score
1,790
Location
Northern California coast
Even in primer they look cool! Question on the bumper mounts,are you welding up the holes on the front and going with slots?
Nope. I know this goes against the grain on this forum but even though I reverted to the '72 bumpers, I actually like the tube based brackets better. I had some custom ones made based on a concept from @pamp a while back. Much stronger in my opinion. They will be near invisible.
 
Last edited:

Bmachine

Well-Known Member
Site Donor $
Site Donor $$
Messages
3,533
Reaction score
1,790
Location
Northern California coast
There are a million little details to follow up on these restorations. One of them was to have the ignition lock rekeyed to the original combination and a new key cut so they all sing off the same song sheet. Great job of cleaning the door locks while we were at it. All at Santa Monica Lock n Key.
 

Attachments

  • C7942536-B691-4781-84AD-D1DA2103D7F6.jpeg
    C7942536-B691-4781-84AD-D1DA2103D7F6.jpeg
    328.7 KB · Views: 155

Erik

Well-Known Member
Site Donor
Messages
418
Reaction score
163
Location
NorCal, CA
Nope. I know this goes against the grain on this forum but even though I reverted to the '72 bumpers, I actually like the tube based brackets better. I had some custom ones made based on a concept from @pamp a while back. Much stronger in my opinion. They will be near invisible.
Just curious, - what changes did you make to the "pamp" design and what do they look like?

Since you're keeping the original '74 tube style mounting, it will be interesting to see how the space around the tube looks where it meets the body in front.

This is a great thread. Thanks for documenting all your work.
 

Bmachine

Well-Known Member
Site Donor $
Site Donor $$
Messages
3,533
Reaction score
1,790
Location
Northern California coast
The distance between the two mounting bolts that join the outer bumpers with the center one is 73cm. The distance between the center of the tubes inside the front frame rails is 74cm (or vice versa, I don't remember exactly - but they were off by a cm). So it made it hard to slide the bumper assembly in and out. On top of that, because the nut that would go onto that center bolt had to be blindly inserted through a 40 or 50cm tube, it was really hard to do repeatedly. SO with a friend of mine who is a metal worker we came up with this idea that solves both issues. It is a little weaker than a straight tube but, to me, a happy medium between ease of installation and strength.The scalloped part is hidden. My bumper is very close to the body and the space around the tube does not bother me.

NOTE: This really is only important if you need to take this bumper on and off many times. If you're only going to do it once and forget it, then it is probably way overkill.
 

Attachments

  • IMG_4149.jpg
    IMG_4149.jpg
    132.8 KB · Views: 169

Erik

Well-Known Member
Site Donor
Messages
418
Reaction score
163
Location
NorCal, CA
Ingenious...

I'm assuming the on/off nature of the design is for fitting, or are you planning to run with/without according to where you're going?
 

Bmachine

Well-Known Member
Site Donor $
Site Donor $$
Messages
3,533
Reaction score
1,790
Location
Northern California coast
Progress. Slow progress but progress.

First, the interior was spot welded in all the areas discussed in the chassis reinforcement thread. I am really curious to find out if this will make a noticeable difference or not. But this was the perfect time to do it with little if any downsides.
 

Attachments

  • 076F993D-01E3-466A-A8C6-B5F8BADA909C.jpeg
    076F993D-01E3-466A-A8C6-B5F8BADA909C.jpeg
    322.8 KB · Views: 144
  • 8C278805-216F-4EC0-B8A9-459ED7984874.jpeg
    8C278805-216F-4EC0-B8A9-459ED7984874.jpeg
    370.3 KB · Views: 134
  • 257F07FB-E55B-4660-B32B-4F7B45B6C3B1.jpeg
    257F07FB-E55B-4660-B32B-4F7B45B6C3B1.jpeg
    310.1 KB · Views: 139
  • 95ECFA6E-6C6B-400E-BA42-CF8DF81DC849.jpeg
    95ECFA6E-6C6B-400E-BA42-CF8DF81DC849.jpeg
    288.7 KB · Views: 141

Bmachine

Well-Known Member
Site Donor $
Site Donor $$
Messages
3,533
Reaction score
1,790
Location
Northern California coast
Then, all skimming was sanded for a smooth finish everywhere and primer coat was applied.
 

Attachments

  • 3FE6B252-1C00-4A23-9986-3F199CE41D53.jpeg
    3FE6B252-1C00-4A23-9986-3F199CE41D53.jpeg
    180.5 KB · Views: 143
  • B2E1E0B8-3555-4E5C-A396-2C1C7E9B0DE7.jpeg
    B2E1E0B8-3555-4E5C-A396-2C1C7E9B0DE7.jpeg
    161.3 KB · Views: 142
  • CED6E591-5F66-43E6-ACF0-1B92FBDCD808.jpeg
    CED6E591-5F66-43E6-ACF0-1B92FBDCD808.jpeg
    157.4 KB · Views: 143
  • 27C61C8A-556C-4C89-AAE0-EEAD80B4A080.jpeg
    27C61C8A-556C-4C89-AAE0-EEAD80B4A080.jpeg
    172.2 KB · Views: 149
Top