Macho's gracias @autokunst !
You are using an out of date browser. It may not display this or other websites correctly.
You should upgrade or use an alternative browser.
You should upgrade or use an alternative browser.
Fixing that little rust spot...
- Thread starter eriknetherlands
- Start date
-
- Tags
- restoration list
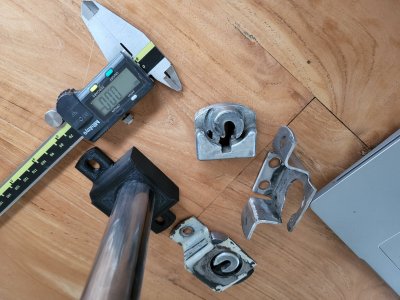
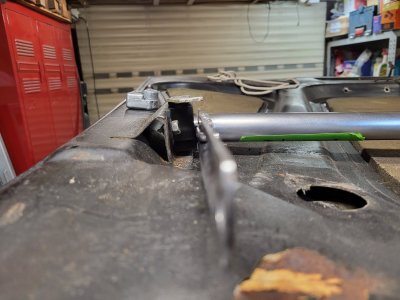
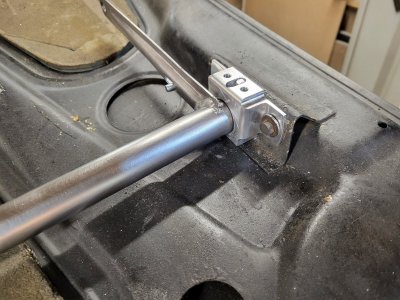
While disassembling the front hood hinge/torsion bar system, I found out that the only parts not damaged were the torsion bars.
It was welded up by the previous owner, but there are more aspects of the system that don't last 50 years.
the rest was in need of repair or replacement:
- one rewelded arm was again separating from the tube. The other arm was successfully rewelded by PO.
- the soft metal parts that hold the short end of the torsion bar deformed under the 50 year constant loading from being closed.
- one bracket around the soft metal part (a cage basically) was damaged in a previous repair attempt; it got some kisses from an angle grinder....


As it turns out, these parts are not readily available, basically due to those design imperfections: most systems have broken tubes, and most soft metal blocks are deformed by now.
So we must come up with a solution:
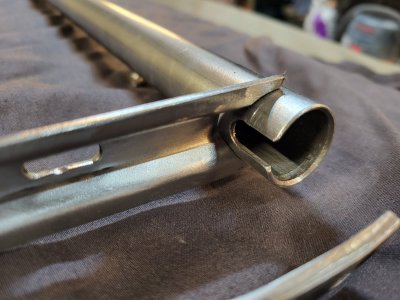
The tube can be replaced by a 2x22x1062 mm tube (just ordered) and the arms are going to be welded to it.
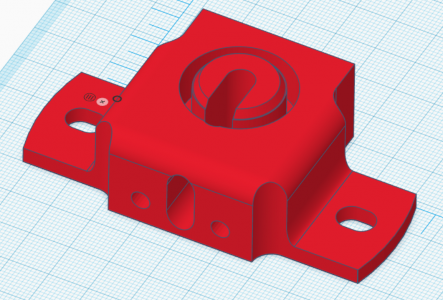
And while looking at the soft metal block and the cage around it, I thought: Can we not remake this as one part?
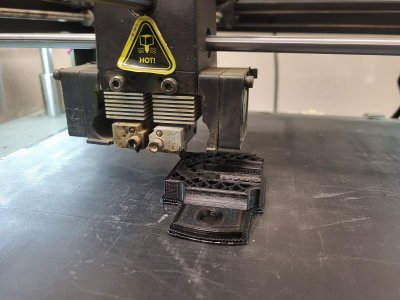
So reading on google that 3D is easy, I gave it a go. Here's the first attempt:
 and Version 4:
V4 was modified so that it now retains the short end of the torsion rod inside (it cannot slide out in axial direction as in my red design). Also it is modified so it can actually be milled.
I'll 3D print it first (in our office....) to do a trial fit.
Let's see how much it costs to get this milled from steel or stainless steel.
It was welded up by the previous owner, but there are more aspects of the system that don't last 50 years.
the rest was in need of repair or replacement:
- one rewelded arm was again separating from the tube. The other arm was successfully rewelded by PO.
- the soft metal parts that hold the short end of the torsion bar deformed under the 50 year constant loading from being closed.
- one bracket around the soft metal part (a cage basically) was damaged in a previous repair attempt; it got some kisses from an angle grinder....
As it turns out, these parts are not readily available, basically due to those design imperfections: most systems have broken tubes, and most soft metal blocks are deformed by now.
So we must come up with a solution:
The tube can be replaced by a 2x22x1062 mm tube (just ordered) and the arms are going to be welded to it.
And while looking at the soft metal block and the cage around it, I thought: Can we not remake this as one part?
So reading on google that 3D is easy, I gave it a go. Here's the first attempt:
and Version 4: V4 was modified so that it now retains the short end of the torsion rod inside (it cannot slide out in axial direction as in my red design). Also it is modified so it can actually be milled.
I'll 3D print it first (in our office....) to do a trial fit.
Let's see how much it costs to get this milled from steel or stainless steel.
Last edited:
While disassembling the front hood hinge/torsion bar system, I found out that the only parts not damaged were the torsion bars.
It was welded up by the previous owner, but there are more aspects of the system that don't last 50 years.
the rest was in need of repair or replacement:
- one rewelded arm was again separating from the tube. The other arm was successfully rewelded by PO.
- the soft metal parts that hold the short end of the torsion bar deformed under the 50 year constant loading from being closed.
- one bracket around the soft metal part (a cage basically) was damaged in a previous repair attempt; it got some kisses from an angle grinder....
View attachment 171360 View attachment 171392
As it turns out, these parts are not readily available, basically due to those design imperfections: most systems have broken tubes, and most soft metal blocks are deformed by now.
So we must come up with a solution:
The tube can be replaced by a 26x22x1062 mm tube (just ordered) and the arms are going to be welded to it. they may get an additional 'ring'around the pipe, not just the half circle that they are today.
And while looking at the soft metal block and the cage around it, I thought: Can we not remake this as one part?
So reading on google that 3D is easy, I gave it a go. Here's the first attempt:
View attachment 171399 and Version 4: View attachment 171398
V4 was modified so that it now retains the short end of the torsion rod inside (it cannot slide out as in my red design). Also it is modified so it can actually be milled.
I'll 3D print it first (in our office....) to do a trial fit.
Let's see how much it costs to get this milled from steel or stainless steel.
excellent idea
It looks like a very nice design,
careful me think that lateral fixing ears might be too thick and I recall the odd screws to be not very long
p.s. Can you add the L shaped Stops to this part ?
@deQuincey ;
Thanks for the compliments!
I will verify the screw lengths once it's printed. I did not think about the length of the std screws installed, so good point. If it turns out to be needed, it can always be adapted in the model.
The oem part is 2,5mm thick there, the model now is 4 mm.
I thought about adding the L- shaped part as integral part of the design, but the aspects of these L - shaped parts is that they are movable relative to their fixing screws, in a way that they allow the torsion arms to rotate a few degrees less or more, so that the exact maximum opening angle of the hood can be set by slding the L-shpaed part to the front or rear of the car.
Adding the L-shaped part would also mean that I would create a left and right unique part, or I'd have make design it as a non-handed part with two 'fingers' on it; which looks a bit stupid (i think)
It would also mean that I'd (further) step away from originality. I've kept all dimensions and the shaped the edges so that it's appearance as close as I can to the original folded steel part.
Last edited:
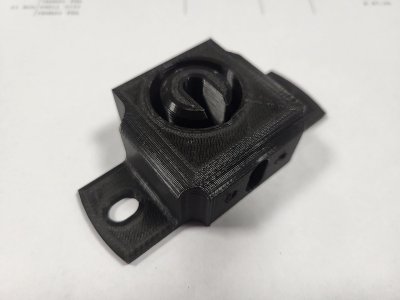
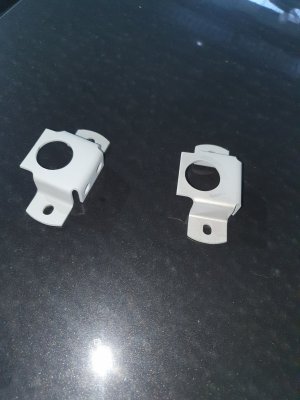
et voila, 3D printed!

And as you can expect, it looks nice, but some details are just not correct yet.
And as you can expect, it looks nice, but some details are just not correct yet.
- V6 update now has the two back corners chopped out;; it now has a radius to match the original shape.
- Side ears of my model were 22mm wide, where original was 28 mm (measuring error), and
- I modified the outer diameter of the circular hole for the tube to 27 mm, so that my freshly arrived new tube (22*26 mm, with paint it'll be >26 mm) should fit...
Attachments
Last edited:
@deQuincey: indeed the flange is to thick with the screws that I have: sheets screws with just 13 mm length of the thread.
They just catch the threads in the last turn.
I will reduce from 4 to 2,5 mm.
Edit: just looked up the part, they are indeed the short steel sheet screw type:
Hex Head Screw
Part number 07119916823
St 6,3 x 13.
They just catch the threads in the last turn.
I will reduce from 4 to 2,5 mm.
Edit: just looked up the part, they are indeed the short steel sheet screw type:
Hex Head Screw
Part number 07119916823
St 6,3 x 13.
Attachments
Last edited:
Hi Eric,
Looks good! I think we should have some kind of library on this forum with all the 3D-drawings.
Do you know these guys? www.shapeways.com
Since you're from the netherlands, they're also based in Eindhoven.
Looks good! I think we should have some kind of library on this forum with all the 3D-drawings.
Do you know these guys? www.shapeways.com
Since you're from the netherlands, they're also based in Eindhoven.
That's actually really close to where I live!Hi Eric,
Looks good! I think we should have some kind of library on this forum with all the 3D-drawings.
Do you know these guys? www.shapeways.com
Since you're from the Netherlands, they're also based in Eindhoven.
I knew their name, knew they are a big player as well.
unfortunately, looking at their website it seems they don't do CNC in steel. Because i guess that's what's needed. I do not even dare to choose aluminum for this.
When i can made a recomandation,
that inner part, that could madefrom 7075 Aluminium by any CNC shop easy.
And that outer part, that can be done by Lasercutting and than bended on a folding bench easy as well.
Much more easy, than CNC milling that from steel.
Breiti
that inner part, that could madefrom 7075 Aluminium by any CNC shop easy.
And that outer part, that can be done by Lasercutting and than bended on a folding bench easy as well.
Much more easy, than CNC milling that from steel.
Breiti
I got some quotes on the part in stainless steel and also Alu 7075, and the delta was 30%, I expected the stainless to be double the price of the alu part but it was cheaper then expected.
I don't trust aluminium to be strong enough. For just +30% I'd rather go for safe.
I've just printed version 7, and will trial fit this evening.
I just need to finish welding the old but now cleaned hinge arms to the new tube.
If it works & fits well, then I am going to have them milled in stainless steel.
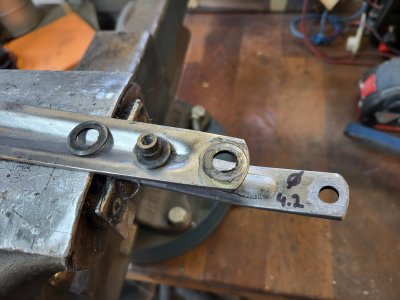
As I am going to electrolytically zinc plated the pipe and hinge system, I wanted to split the hinges also to get the inside surface rust free and coated as well.
I sanded off the head of the rivet, and drilled with a 4.2 mm drill, about 9 mm deep into the solid part of the rivet, leaving enough flesh to tap an internal m5 thread in it. I then want to make an m5 screw with male thread, with an internal hex head so it resembles the original shape of the squashed rivet head closely.
There even is a washer between the parts; I didn't even spot it when it was still covered in old paint layers.
I don't trust aluminium to be strong enough. For just +30% I'd rather go for safe.
I've just printed version 7, and will trial fit this evening.
I just need to finish welding the old but now cleaned hinge arms to the new tube.
If it works & fits well, then I am going to have them milled in stainless steel.
As I am going to electrolytically zinc plated the pipe and hinge system, I wanted to split the hinges also to get the inside surface rust free and coated as well.
I sanded off the head of the rivet, and drilled with a 4.2 mm drill, about 9 mm deep into the solid part of the rivet, leaving enough flesh to tap an internal m5 thread in it. I then want to make an m5 screw with male thread, with an internal hex head so it resembles the original shape of the squashed rivet head closely.
There even is a washer between the parts; I didn't even spot it when it was still covered in old paint layers.
Attachments

Last edited:
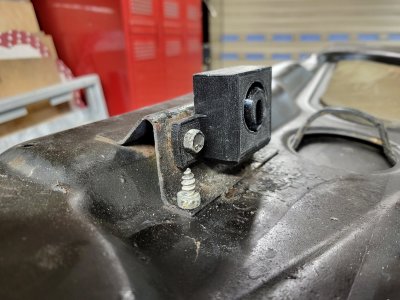
Hm, it needed small tweaks to get it all nicely installed.
Most notably, I spotted the day before that the inside surfaces of the 2 brackets aren't parallel to each other. They are about 5 degrees off. So Version10 also compensates for that; the cilindrical opening for the tube now sits at -5 degrees relative to perpendicular
(=the tube).
Made them also a bit thinner and they were touching the inside of the hood as well. It's version 10 now, and now I'm happy with them; I need to convert my 3d print file into a CNC file format and then I can them send it off for CNC-ing.
They should fit as well on an original hood system. If that proves to be correct, then this may also be a solution for others.
As my original was chopped to pieces to salvage the arms, I will see if I can try the CNC-ed parts on someone's hood to confirm my hopes.
Attachments

Last edited:
But I still wondering, what material is that insert?
It looks like aluminium, but is heavy like steel?
Non magnetic.
Breiti
It looks like aluminium, but is heavy like steel?
Non magnetic.
Breiti
To me it looks like a mix of aluminium and zinc, possibly lead as well. It behaves a bit funny, as it deforms over time, not due to overloading it. Normally this type of material behavior ( "creep" ) is only present in materials like thermoplastics. That's why I think it may have lead in it as well. + they are heavy; it feels like the density is >10* that of water.
Last edited:
I noticed that the density of the block is quite high, it must have a high lead content as well. Perhaps a zinc-lead or lead-alu alloy?
Hi, I too encountered the different handbrake cable end. Actually I think the new style is a big improvement but it does require the block mounts to be bought separately, and they are quite expensive. There is a very useful previous comment about how you can in fact cut the old blocks off and modify them for the new cable, which I attempted with moderate success. It’s a good bit of advice but in the end I copped the cost and bought the new blocks from Jaymic in the UK - about £38 EACH!why is the part from W&N different then what comes out of my car?
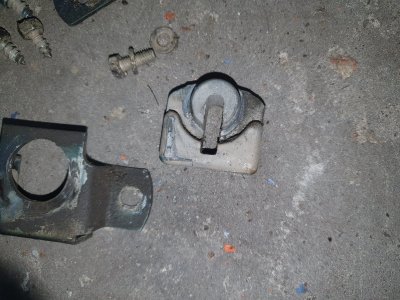
So, side stepping from memory lane.
I am currently rebuilding the rear handbrake as part of the rear axle overhaul.
The part from W&N that i bought however looks significantly different from the one pulled out of my car. (see pic; brown=old, shiny = new....)
The old one has a massive, cast iron block whereas the W&N part looks more, what should i say.. Korean?
I want it to be original, as best as i can.
Does W&N re-engineer to their own liking the parts?
If what i took from my car is original shape, then i do really prefer that over the W&N part.
Does anyone happen to know if BMW still sells the original shaped handbrake cables? and while at it, does BMW also sell the 2 push in type M8 Bolts that hold the end of the cable to the semi-trailing arms?
Otherwise i will consider taking it apart, and having the mounting plate & M8 push bolts replated and used to rebuild the cable by a local cable company.
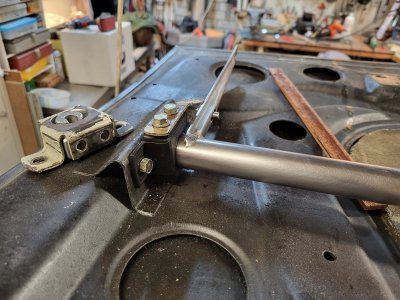
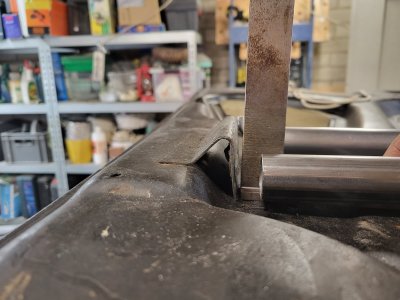
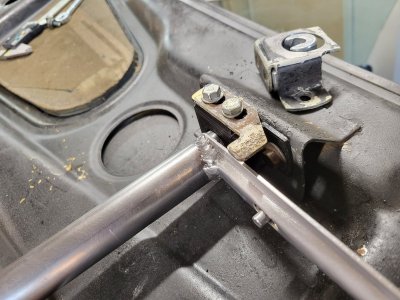
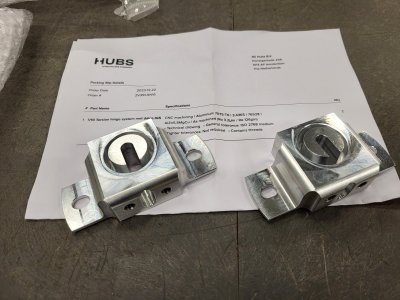
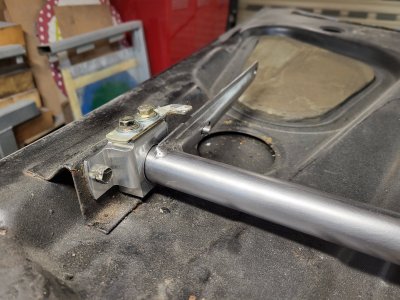
Finally I recieved the hood mechanism mounting parts that I designed.
I took the gamble to make them in a strong Alu alloy; T7075 and it feels strong enough. (Thanks @Breiti for sharing your thoughts on this!)
A minor detail was still needed to get them to fit nicely, but nothing we can't fix ourselves. (Dremel...)
In the pics the hood is ofcourse not mounted, so the spring isn't loaded. It also means the position of the arms is different then what you have in your car.
Will it work? I haven't tested it yet, as by myself I can't install the hood.
Attachments

Last edited:
That is looking great.
Do you plan to produce then also for others?
Not asking for me, mine are good, but...
Breiti
Do you plan to produce then also for others?
Not asking for me, mine are good, but...
Breiti
I can if there is interest. They now were 125 euro each; 250 for the set.That is looking great.
Do you plan to produce then also for others?
Not asking for me, mine are good, but...
Breiti
(Not anywhere sensible, but I wanted to learn something....)
But ofcourse the price will drop significantly when more are made. At 10 sets it will be like 75, max 100 euro's or so per set I guess.
And before doing that, i'd like someone else to try them on a std hinge system. The hinge system I now have is a chopped up and rewelded system which I *think* is quite conforming to the original shape, but a test fit will be the final judgement.
Last edited:
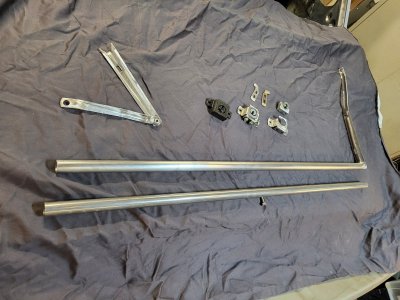
Over the past weeks I removed the internals from the right door, and pulled the skin off. The outer skin bottom part was spliced before by a PO, but it started rusting again. Also the underlying door structure had some rust spot on the top and bottom edge, so I patched in some 6 fresh pieces of steel.
While taking the skin off, i carefully marked where it was pinch welded, as I'd like to reproduce these welds again (though i do not know yet how too, as my spot welder will leave marks on the front of the door skin !) I slowly grinded the folded edge off until i saw the separate layers.
Dismanteling:


Some structure to know which bolts need to go back where: a simple drawing with holes

Doorskin with older patch panel; it had rust issues & needed being peeled off:


some rusty bits underneath:


While taking the skin off, i carefully marked where it was pinch welded, as I'd like to reproduce these welds again (though i do not know yet how too, as my spot welder will leave marks on the front of the door skin !) I slowly grinded the folded edge off until i saw the separate layers.
Dismanteling:
Some structure to know which bolts need to go back where: a simple drawing with holes
Doorskin with older patch panel; it had rust issues & needed being peeled off:
some rusty bits underneath:
Last edited: