Fixing that little rust spot...

eriknetherlands

Moderator
Site Donor
Messages
2,698
Reaction score
1,930
Location
Netherlands, Eindhoven area
the magic machine!

Just watched in amazement the video posted above. Didn't know it before, laserablation i think its called. Googled something and appearently these systems cost around 200.000 euro....
 
Last edited:

eriknetherlands

Moderator
Site Donor
Messages
2,698
Reaction score
1,930
Location
Netherlands, Eindhoven area
part getting welded back in after 4 years....

Sometimes things are rewarding...

I learn along the way; its easy to cut out stuff, but its a 100 times more difficult to put them back in and be satisfied with the endresult.

today was one day to be satisfied, parts are being put back in the car where they belong. En route to ressurection!

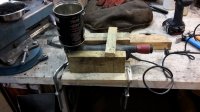
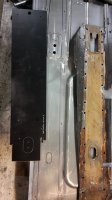
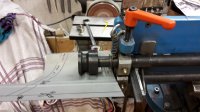
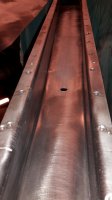
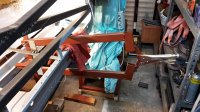
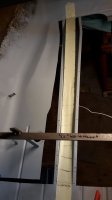
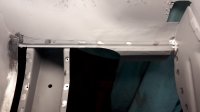
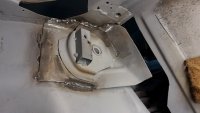
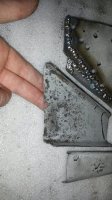
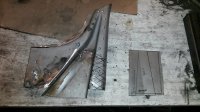
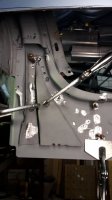
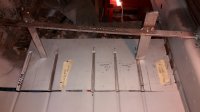
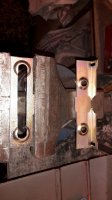
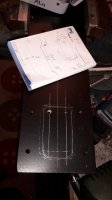
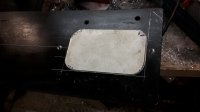
the first pic shows the steel internal frame (jig) that I use to locate the subframe mount exaclty in 3D back in the location where it came from
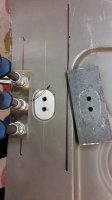
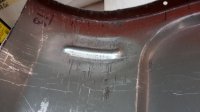
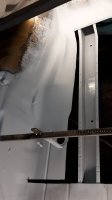
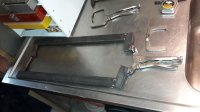
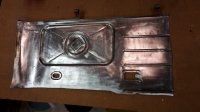
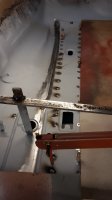
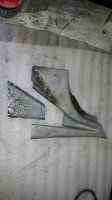
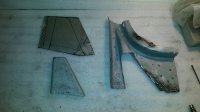
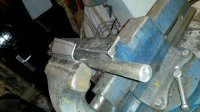
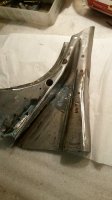
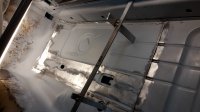
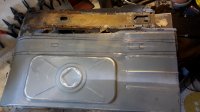
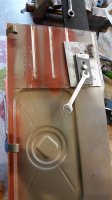
2nd pic shows the preparation, clean the weld area's.
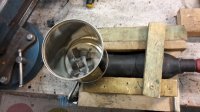
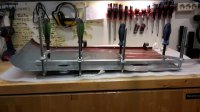
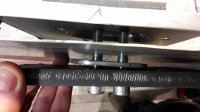
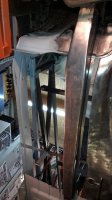
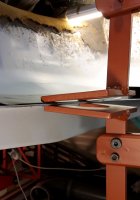
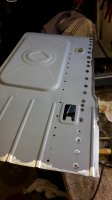
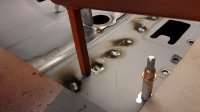
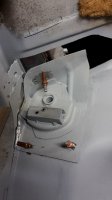
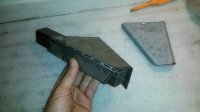
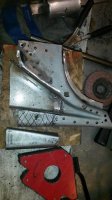
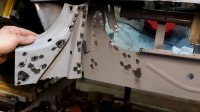
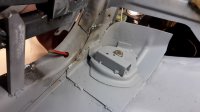
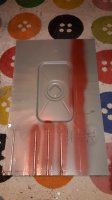
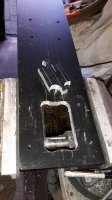
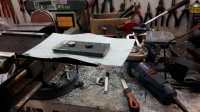
3rd pic shows the part trial fitted with Cleco's. exact alignment during welding was done with the steel frame (jig)
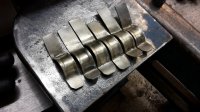
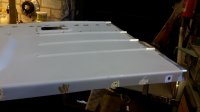
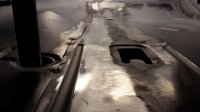
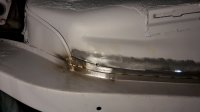
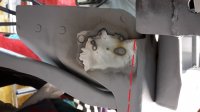
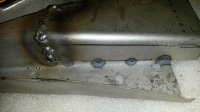
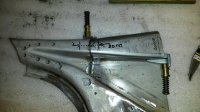
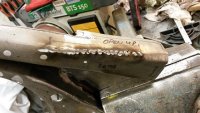
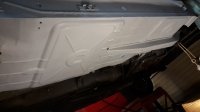
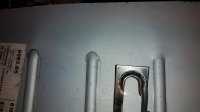
4rth pic shows the welding, wherre I tried to reproduce weld type, size and location from original situation.
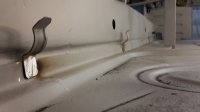
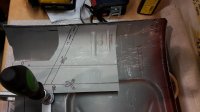
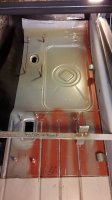
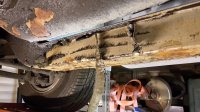
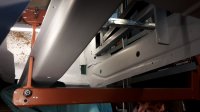
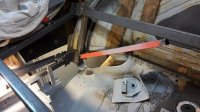
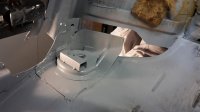
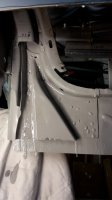
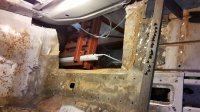
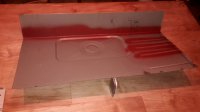
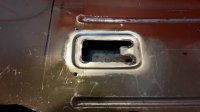
Pic 5 shows the view from inside the rear wheelarch, looking towards the front. here you see one modification that was made by me. Normally the inner Sill ends at the red line. I had to replace that section of the inner sill anyway (2,5 mm steelthickness), and decided to stretch it further around the corner. This allows me to weld the subframe mount to it, instead of welding it only to the 0,8mm thick wheel well sheet as in the original design.
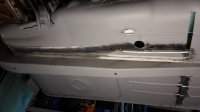
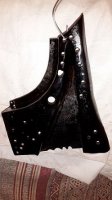
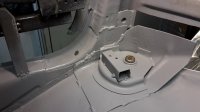
last pic, 6, shows the endresult, welds cleaned where needed, epoxy painted and all.
 

Attachments

  • 20160107_212853-01.jpg
    20160107_212853-01.jpg
    92.2 KB · Views: 352
  • 20160601_133123-01.jpg
    20160601_133123-01.jpg
    96.5 KB · Views: 333
  • 20160601_133318-01.jpg
    20160601_133318-01.jpg
    95.1 KB · Views: 326
  • 20160602_223345-01.jpg
    20160602_223345-01.jpg
    91.8 KB · Views: 322
  • 20160602_224222-01.jpg
    20160602_224222-01.jpg
    89.6 KB · Views: 338
  • 20160602_224644-01.jpg
    20160602_224644-01.jpg
    94.3 KB · Views: 345
Last edited:

eriknetherlands

Moderator
Site Donor
Messages
2,698
Reaction score
1,930
Location
Netherlands, Eindhoven area
and another part welded back; Inner sill to rear wheel well reinforcement

Another part that does not clutter my garage anymore....

the original part was half eaten by spiders, so first task was to recreate sections of it.
2 sections were cut out and welded back in, one after the other. As you can see I used a tube and a round bar in a vise to create the folds; I used 2,5mm thick steel, so it needs some serious hammering. Don't hit the steel directly with steel, Use a copper or aluminiun hammer, or put some wood between your hammer and the steel plate to prevent making hamer marks.

Yesterday I welded it back in, and drowned it in epoxy paint, to try and get the enclosed surfaces coated as well.

Erik.
 

Attachments

  • 20150906_011013-01.jpg
    20150906_011013-01.jpg
    88.6 KB · Views: 336
  • 20151004_123005-01.jpg
    20151004_123005-01.jpg
    37.1 KB · Views: 327
  • 20151004_123023-01.jpg
    20151004_123023-01.jpg
    49.8 KB · Views: 316
  • 20151004_202835-01.jpg
    20151004_202835-01.jpg
    93 KB · Views: 313
  • 20151004_204841-01.jpg
    20151004_204841-01.jpg
    95.2 KB · Views: 306
  • 20151004_213829-01.jpg
    20151004_213829-01.jpg
    85.4 KB · Views: 308
  • 20151007_203235-01.jpg
    20151007_203235-01.jpg
    91.2 KB · Views: 300
  • 20151007_205014-01.jpg
    20151007_205014-01.jpg
    86.3 KB · Views: 306
  • 20151007_210223-01.jpg
    20151007_210223-01.jpg
    53.8 KB · Views: 319
  • 20151007_212949-01.jpg
    20151007_212949-01.jpg
    80.7 KB · Views: 303
Last edited:

eriknetherlands

Moderator
Site Donor
Messages
2,698
Reaction score
1,930
Location
Netherlands, Eindhoven area
pic 1. shows the part in a vise. The radius of the part I replaced was too small, so I had to increase the radius over a length of 10cm (4 inch). I cut a slit in the panel, hit both sides with a hammer untill the 2 sides bent slightly inward and again touched each other, and then welded it shut.
Pic 2. shows the cleaned result.
Pic 3. shows the part after sand blasting and chemical etch painting.
Pic 4. shows the part in grey epoxy, with cleaned spots for welding
5. showing clamps to ensure nice flush fit during welding. (Being heavily welded, the shape is not 100%; the part had the tendency to be too far 'outward', risking that the outer panels will also not align)
6. Welded in place. Also note the extra holes provided (Resto mod) These holes allow me to get cavity wax in this location from the inside of the vehicle. In the original construction this is done via an opening on the underside of the car, in the vertical rear part of the inner sill which is closed of with a cap. However these original holes have almost always contributed to the rust problem in this critical area; Either the plugs fall out allowing water spray from the wheel to enter. Or the caps are pried off to insert cavity wax, and the caps are just pushed back in, and not sealed watertight afterwards with caulk/putty/stonechip. So now the entry point for the wax lies in the cabin. (see post 52 pic 5; An inner sill panel, with the ~20mm (3/4 inch) hole)
7. New entry point for the cavity wax. I need to find a very flexible plug to close it, its a hole through a curved plane. Capping it reduces road/tire noize as well.
8&9. Inside and outside drowned in Epoxy, giving extra attention to get the epoxy into the area's where there are 2 mating surfaces (the parallel surfaces that are almost touching each other)

Next up is the front passenger floor. I needed to improve my metal working skills for that one...
 

Attachments

  • 20151020_212006-01.jpg
    20151020_212006-01.jpg
    88.9 KB · Views: 328
  • 20151020_213727-01.jpg
    20151020_213727-01.jpg
    43.7 KB · Views: 323
  • 20160104_214345-01.jpg
    20160104_214345-01.jpg
    26.9 KB · Views: 302
  • 20160607_213729-01.jpg
    20160607_213729-01.jpg
    89.6 KB · Views: 309
  • 20160607_214101-01.jpg
    20160607_214101-01.jpg
    89.3 KB · Views: 306
  • 20160607_223629-01.jpg
    20160607_223629-01.jpg
    88.1 KB · Views: 308
  • 20160607_223758-01.jpg
    20160607_223758-01.jpg
    89.8 KB · Views: 298
  • 20160607_224820-01.jpg
    20160607_224820-01.jpg
    91.6 KB · Views: 302
  • 20160607_225334-01.jpg
    20160607_225334-01.jpg
    92.9 KB · Views: 291
Last edited:

eriknetherlands

Moderator
Site Donor
Messages
2,698
Reaction score
1,930
Location
Netherlands, Eindhoven area
Tear down & build up; Update

Now i haven't posted for quite some time as i was more into 'action' then 'reporting'. But I do enjoy showing what I made, and getting input from you guys.
So let met take you through the work of my past 4 months. I took the passenger footwell / floor section out and replaced it with fresh steel.
It went from this to that:
 

Attachments

  • 20160310_204112.jpg
    20160310_204112.jpg
    1.1 MB · Views: 282
  • 20160904_225533.jpg
    20160904_225533.jpg
    773.3 KB · Views: 288
  • 20161012_215749.jpg
    20161012_215749.jpg
    1.5 MB · Views: 286
Last edited:

eriknetherlands

Moderator
Site Donor
Messages
2,698
Reaction score
1,930
Location
Netherlands, Eindhoven area
151329 trials with scrap; making the channels.
220734 channels made into W&N part
152137 tool made to press a nice end to the end of the channels
152447 tool used on one channel, the other not yet finished
last pic showing the new floor panel with 90 degree angle to meet up with inner sill. Will be trimmed later.
 

Attachments

  • 20160212_151329.jpg
    20160212_151329.jpg
    1.7 MB · Views: 283
  • 20160214_220734.jpg
    20160214_220734.jpg
    588.3 KB · Views: 285
  • 20160208_152137.jpg
    20160208_152137.jpg
    584.4 KB · Views: 284
  • 20160208_152447.jpg
    20160208_152447.jpg
    1.2 MB · Views: 270
  • 20160218_202331.jpg
    20160218_202331.jpg
    1.5 MB · Views: 281
Last edited:

eriknetherlands

Moderator
Site Donor
Messages
2,698
Reaction score
1,930
Location
Netherlands, Eindhoven area
144951 original depressions in floor panel that are not in W&N part
234512 start of tool to reproduce the large rectangular hole.
102239 rough cut out, Aluminium plate 10mm thick
130900 45 degree angle made with a router, aluminium is soft enough to do this.
220610 Die made to press into the W&N panel, Aluminium 3mm plate thickness
172352 whole set of tools stacked from left to right and result of a trial pressing
225639 trial pressing showing excessive warping-> extra steel plate needed to keep the edges flat.
165158 final pressing into floor panel; only one time to do it right!
110053 contour cutting; I placed the old panel on top of the new panel
231845 final pressed hole
 

Attachments

  • 20160313_144951.jpg
    20160313_144951.jpg
    2 MB · Views: 327
  • 20160223_234512.jpg
    20160223_234512.jpg
    564.6 KB · Views: 296
  • 20160224_102239.jpg
    20160224_102239.jpg
    795.1 KB · Views: 305
  • 20160224_130900.jpg
    20160224_130900.jpg
    786.1 KB · Views: 308
  • 20160226_220610.jpg
    20160226_220610.jpg
    1.5 MB · Views: 297
  • 20160313_172352.jpg
    20160313_172352.jpg
    1.3 MB · Views: 288
  • 20160313_165158.jpg
    20160313_165158.jpg
    663.6 KB · Views: 294
  • 20160226_225639.jpg
    20160226_225639.jpg
    1.8 MB · Views: 298
  • 20160409_231845.jpg
    20160409_231845.jpg
    1.8 MB · Views: 304
  • 20160330_110053.jpg
    20160330_110053.jpg
    1.2 MB · Views: 281
Last edited:

eriknetherlands

Moderator
Site Donor
Messages
2,698
Reaction score
1,930
Location
Netherlands, Eindhoven area
Thanks BMachine. I am getting the feeling that i perhaps like it more to do the resourcefull things over the actual welding and grinding. but hey; that is no punishment either.

you may also like this then; I made my own vibration cleaning device, an old sander with a coffee can and sandblasting grit. It works like a dream, but the excesssive noise prevents my kids from dreaming when i have my evening in the garage :)

The parts in the tumbler are actually reproduction i made of the original harness tabs.
Erik.
 

Attachments

  • 20161105_204107.jpg
    20161105_204107.jpg
    1.9 MB · Views: 273
  • 20161105_204112.jpg
    20161105_204112.jpg
    1.9 MB · Views: 275
  • 20161106_215238.jpg
    20161106_215238.jpg
    838.8 KB · Views: 262
  • 20161105_230512.jpg
    20161105_230512.jpg
    1.3 MB · Views: 284

Bmachine

Well-Known Member
Site Donor $
Site Donor $$
Messages
3,525
Reaction score
1,779
Location
Northern California coast
I made my own vibration cleaning device, an old sander with a coffee can and sandblasting grit. It works like a dream, but the excesssive noise prevents my kids from dreaming when i have my evening in the garage :)

Erik.

That is awesome! Are you going after the "DeQuincey Of The North" trophy?
 

eriknetherlands

Moderator
Site Donor
Messages
2,698
Reaction score
1,930
Location
Netherlands, Eindhoven area
- edited dec 5th to reload some pics that didn't show on my screen. -

Onwards with modification of W&N part to match original shape.

215946 second tool for other hole, an oval one. (which also appears on driver side by the way)
220008 Pressing tool, similar construction as in the previous posts. Installed before doing the actual tightening of the bolts creating the pression.
220855 finished, showing the 3 clamps installed during pressing to keep floor panel from warping
235147 trial fitting again
232219 straightening
214322 next step was making a depression in the floor panel in the right front corner (I have no idea of it's purpose) trial on scrap piece
214352 rolling machine with scrap
221311 rolling final part
 

Attachments

  • 20160318_215946.jpg
    20160318_215946.jpg
    742 KB · Views: 280
  • 20160329_220855.jpg
    20160329_220855.jpg
    575.8 KB · Views: 270
  • 20160409_232219.jpg
    20160409_232219.jpg
    1.7 MB · Views: 280
  • 20160412_214322.jpg
    20160412_214322.jpg
    1.7 MB · Views: 261
  • 20160412_214352.jpg
    20160412_214352.jpg
    1.8 MB · Views: 269
  • 20160412_221311.jpg
    20160412_221311.jpg
    1.7 MB · Views: 251
  • 20160329_220008.jpg
    20160329_220008.jpg
    743.7 KB · Views: 248
  • 20160402_235147.jpg
    20160402_235147.jpg
    477.1 KB · Views: 236
Last edited:

autokunst

Well-Known Member
Site Donor $$
Messages
3,606
Reaction score
2,619
Location
Milwaukee, WI
It is wonderful to follow your dedication to faithfully replicating these details - truly inspiring. Thank you for sharing your process!
 

eriknetherlands

Moderator
Site Donor
Messages
2,698
Reaction score
1,930
Location
Netherlands, Eindhoven area
Welding in the Front passenger floor.

Cleaned the Original panels and frame rails that were left.
Cleaned the internal frame rails.
Nocked out all the dents from the frame rails. (often mistreated by putting jackstands under them; this now must be the most nice looking frame rails around the e9 community)
Applied rust conversion coating to the original sheet metal before cleaning and Eopxy.
Created a custom vise grip to hold the floorpanel to the frame rails before plug welding it.
Painting the inside of the frame rails. Never to be seen again I hope.

Edit- i'm sorry, for some reason (on my screen at least) 2 of the 9 pics do not show a thumbnail, and do not appear on the filmroll. Any hints how I can let them behave like the other 7 ?
EDIT: Jan 9th: resized them; now also the 2 pics do show. Thanks for the tip.
 

Attachments

  • 20160825_231548.jpg
    20160825_231548.jpg
    555.8 KB · Views: 260
  • 20160822_223342.jpg
    20160822_223342.jpg
    711.8 KB · Views: 259
  • 20160822_222532.jpg
    20160822_222532.jpg
    665.1 KB · Views: 250
  • 20160901_192202.jpg
    20160901_192202.jpg
    496.1 KB · Views: 247
  • 20160817_214655.jpg
    20160817_214655.jpg
    493.6 KB · Views: 241
  • 20160828_210956.jpg
    20160828_210956.jpg
    501.6 KB · Views: 235
  • 20160826_225551.jpg
    20160826_225551.jpg
    472.8 KB · Views: 229
  • 20160828_211950.jpg
    20160828_211950.jpg
    326.3 KB · Views: 281
  • 20160830_213855.jpg
    20160830_213855.jpg
    355.9 KB · Views: 230
Last edited:

aearch

Well-Known Member
Site Donor $
Messages
4,106
Reaction score
588
Location
pleasant hill , ca
extremely wonderful stuff.
i know what you mean about the tool thing
being a designer , its very satisfying solving things with your innovating thoughts.
its like you look at something and go
"hey i know"
its the ole 3d mind thing
bunch of fun.
great job.
 

mulberryworks

Mr. Fixity
Site Donor
Messages
1,243
Reaction score
612
Location
Jacksonville FL
Beautiful work. Clearly you are a man of great vision and patience.

As for the photos not behaving, I thought at first it was the file size that was keeping the thumbnail from showing up, but 225551 is also 1.7mb.
All the photos are 3264 x 1836 pixels, so that's not it.

But I would recommend downsizing your photos just a bit. As nice as that size is for desktop wallpaper or for seeing tiny details, it might be too much for the web site software to handle, and will certainly eat away at the available storage for the site, which may increase costs at some point.
Between 1200 and 1800 pixels for the long dimension is what I aim for.
If you are on a Mac or use Photoshop, I can give you guidance. Sorry, I don't do Windows.

Ian
 

eriknetherlands

Moderator
Site Donor
Messages
2,698
Reaction score
1,930
Location
Netherlands, Eindhoven area
Front Passenger Floor Welding

214854 Cleaned panel; removing the coating from W&N.
203720 Copying the weldspots "step distance' from the frames rails
123241 Painted in Epoxy & copied the original weld spot
123528 Cleaned welding areas of replacement panel
143853 Cleaned welding areas of frame
And then some welding.
152856, 152928,
225237, frame rails all welded & smoothed ,first tacks on adjacent floor parts.
230024, stitch welding frame rails to floor to lower part of the firewall, like original.
230318, cleaning weldspots on the underside of the frame rails.
 

Attachments

  • 20160831_214854.jpg
    20160831_214854.jpg
    466.3 KB · Views: 239
  • 20160901_203720.jpg
    20160901_203720.jpg
    205.7 KB · Views: 249
  • 20160904_123241.jpg
    20160904_123241.jpg
    200.7 KB · Views: 238
  • 20160904_123258.jpg
    20160904_123258.jpg
    1.4 MB · Views: 248
  • 20160904_143853.jpg
    20160904_143853.jpg
    328.9 KB · Views: 252
  • 20160904_152856.jpg
    20160904_152856.jpg
    725.4 KB · Views: 246
  • 20160904_152928.jpg
    20160904_152928.jpg
    724.8 KB · Views: 244
  • 20160904_225237.jpg
    20160904_225237.jpg
    388.1 KB · Views: 263
  • 20160904_230024.jpg
    20160904_230024.jpg
    383.9 KB · Views: 230
  • 20160904_230318.jpg
    20160904_230318.jpg
    351.9 KB · Views: 236
Last edited:
Top