Fixing that little rust spot...

eriknetherlands

Moderator
Site Donor
Messages
2,698
Reaction score
1,929
Location
Netherlands, Eindhoven area
Thanks for the motivation guys, good to hear that it was/is a good read.

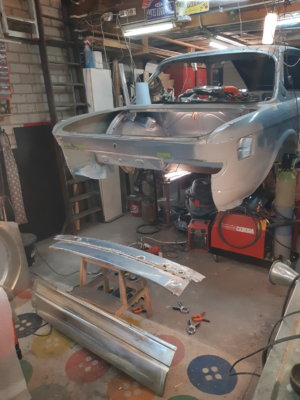
It's been since November since last update. I need to share something...It went to this in the meantime.

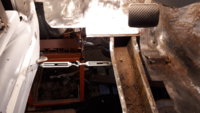
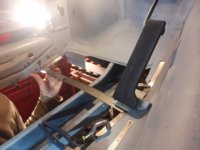
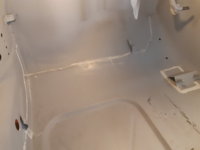
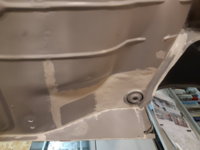
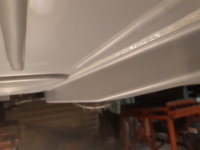
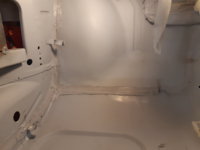
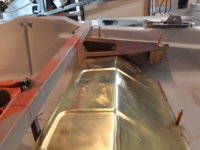
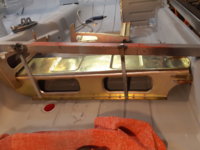
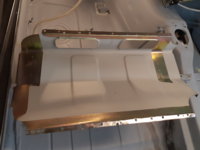
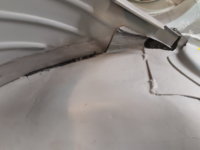
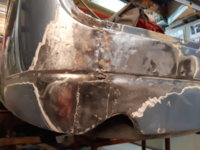
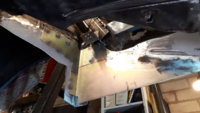
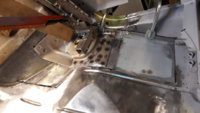
I finished welding and smoothing the left rear floor. My welding is getting better now, it's much smoother then the right side...if you slide your fingers over it the seam is hardly noticeable.

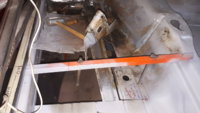
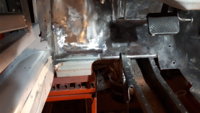
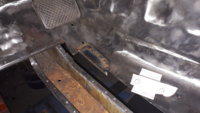
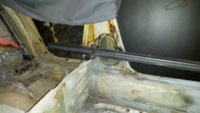
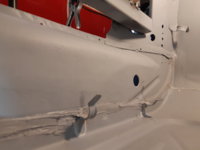
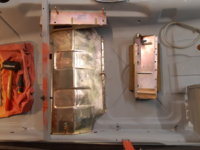
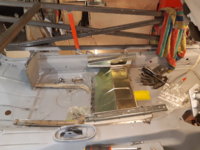
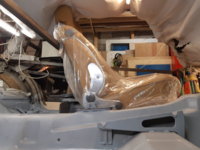
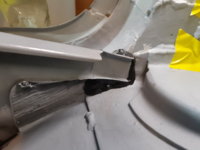
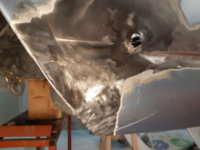
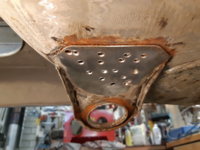
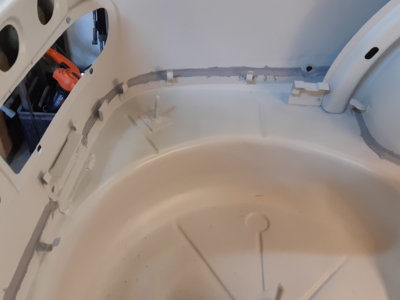
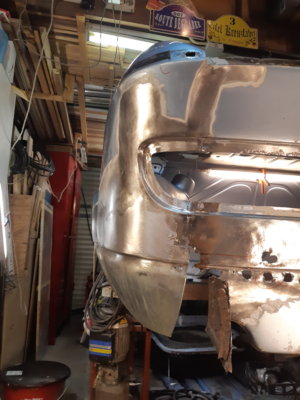
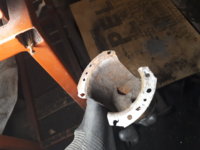
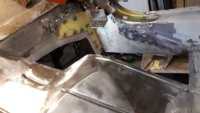
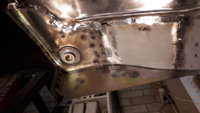
As an in between job I also cleaned out the rust between the spring mount and the wheel well in the left rear wheel arch. (pic 123720) It was not too bad, I expected more rust to come out from under it, and perhaps some pinholes into the wheelwell, but it was just surface rust. Not sure if it was worth the effort, but it is all clean again now. sandblasted & welded back in and sealed with seam sealer.

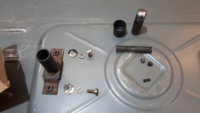
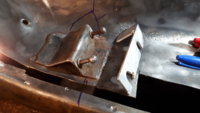
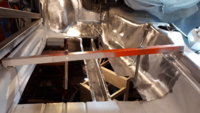
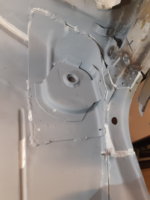
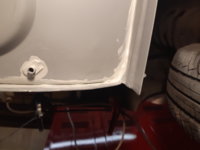
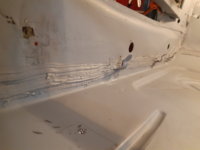
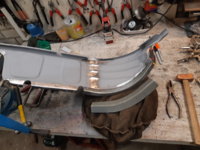
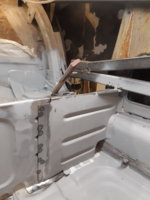
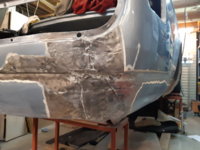
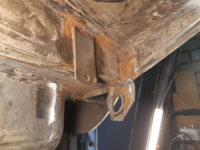
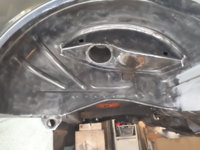
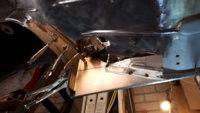
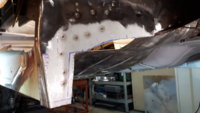
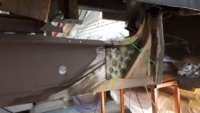
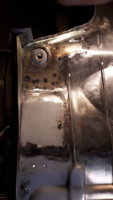
With the left rear floor in place, I tackled the rear subframe mounting point and the whole corner around it as well. It needed everything new; wheel well section, floor section & sill section. the only thing that was still OK was the thick reinforcement itself that holds the ~20*200 mm thick/long knurled bolt; I just sandblasted it and had it zinc coated.

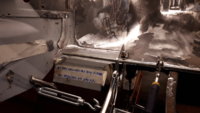
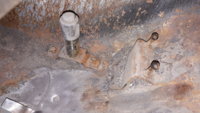
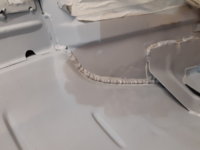
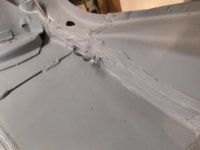
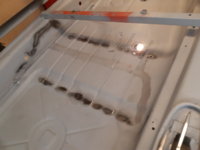
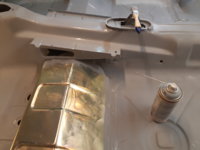
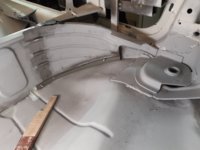
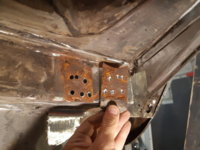
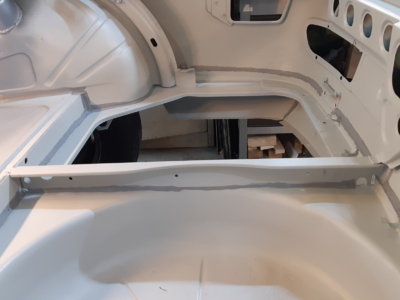
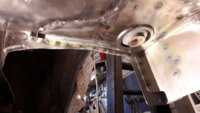
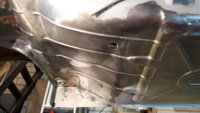
End corner of the inner sill layer was replaced earlier (part of it covered already in post # 134), and I included an extra flange on it, extending it to follow the wheel well, so it ties in better (stronger) to the rear subframe mounting point . You can see it spotwelded in pic ..232036; it's the 'flag shaped' yellow zinc part sticking out towards the left. It will be directly plug welded to the thick reinforcement plate later on, giving it a lot more stability: Originally this reinforcement is welded to the floor (0.8mm), the wheel well (0.8mm) and the sill (2.0mm). Now it has this additional flange of 2.5 mm to hold on to, and you can't see it from the outside!

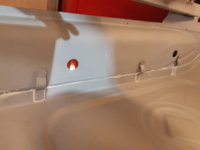
You can also see that I have omitted a rust source; the inner sill originally has a 20mm round holes for wax injection. Some of them are located on the interior side of the floor, but the most rearward point is actually on the bottom side. The white caps tend to fall out, and then it is a direct water entry point, close to a wheel. Not a good thing. So I choose to delete the hole, and made a new one that allows wax insertion from under the rear seat. That new hole is visible in 232036; it's located in the curved piece. From there it continues down through all the stacked layers, allowing wax to penetrate everywhere. (Better pic in next post, the one with the green line)
 

Attachments

  • 20181026_235654.jpg
    20181026_235654.jpg
    186.8 KB · Views: 351
  • 20180712_123720.jpg
    20180712_123720.jpg
    224.8 KB · Views: 341
  • 20180712_123817.jpg
    20180712_123817.jpg
    203.4 KB · Views: 326
  • 20180121_230319.jpg
    20180121_230319.jpg
    217.5 KB · Views: 339
  • 20181012_131441.jpg
    20181012_131441.jpg
    210.9 KB · Views: 314
  • 20181012_224753.jpg
    20181012_224753.jpg
    192.5 KB · Views: 342
  • 20181012_224956.jpg
    20181012_224956.jpg
    194.7 KB · Views: 335
  • 20181022_232036.jpg
    20181022_232036.jpg
    224.9 KB · Views: 321
Last edited:

eriknetherlands

Moderator
Site Donor
Messages
2,698
Reaction score
1,929
Location
Netherlands, Eindhoven area
And reinforcement + floor welded in and smoothed out.

I choose to first spotweld the reinforcement to the little new floor section, and then weld the assembly into the car. This way I could duplicate the original spotwelds on the reinforcement plate, as my spot welder only has short arms and cannot reach over the sill.

pic 235614 showing the line of the three holes that allow wax injection from under the rear seat.
152853 shows the floor section + the reinforcement spotwelded together. I needed to install these parts over and over again to make sure they are exactly aligned in the body prior to fixing it in position with these welds. Cleco's are very heplfull, and screws where more pulling force is needed to sandwich the layers tightly.
223433 in-out times 100
113509 spotwelded floor to wheel arch (as original). The welds on the floor still needed some improvement, some unevenness and holes were still present and needed to be filled & smoothed out
113532 seams of the floor section welded (from both sides) and smoothed out.
233929 view from underside; notice that the sill still only has one layer; the intermediate and outer are not even on yet.
235702 All finished.

From a whole rusted corner to this took me about 150 hours over 3 months...
 

Attachments

  • 20181026_235614.jpg
    20181026_235614.jpg
    166.3 KB · Views: 329
  • 20181021_152853.jpg
    20181021_152853.jpg
    260.6 KB · Views: 327
  • 20181021_223433.jpg
    20181021_223433.jpg
    193.4 KB · Views: 328
  • 20181024_113509.jpg
    20181024_113509.jpg
    192.1 KB · Views: 326
  • 20181024_113532.jpg
    20181024_113532.jpg
    182 KB · Views: 327
  • 20181024_233929.jpg
    20181024_233929.jpg
    190.1 KB · Views: 328
  • 20181026_235702.jpg
    20181026_235702.jpg
    195.8 KB · Views: 330
Last edited:

autokunst

Well-Known Member
Site Donor $$
Messages
3,606
Reaction score
2,619
Location
Milwaukee, WI
Erik, it is always a treat to see your updates. Stellar work as usual. Thank you for documenting this so well. It will be a road map for my future. :)
 

eriknetherlands

Moderator
Site Donor
Messages
2,698
Reaction score
1,929
Location
Netherlands, Eindhoven area
Last quarter of the floor!

having done 3 parts, the forth is now due. For this, it not only needed the floor itself, but also some sections of adjacent panels needed to be replaced:
- the accelerator mount and the floor on which it is welded.
- the firewall -corner with the floor & A-pillar. A notorious rust trap...

I tackled it as follows;
231050 Strip front floor by drilling out the welds, taking care not to damage the frame rails. The orange bar is welded in to later exactly relocate the seat frame parts. In some places I used a 1/2 inch wide belt sander to grind the welds out-it's becoming my favorite tool !
230758 Floor out. Note the large patch; not my style of repairing things, but it saved the floor from getting worse.
231051 Inner frame rail-> I think this shows the power of wax injection: there is hardly any surface rust inside!
231124 Cut out corroded corner of firewall
232806 new piece formed and trial fitted.
231004 introduced a tension element to keep the single sill layer at a correct position relative to the Frame rails. With the floor out, the single remaining sill layer moved outwards by ~15 mm. This shows the importance to measure stuff (and sometimes drill pilot holes for CLECO's) before dissecting panels.
232521 Welded in and cleaned and smoothed welds
210734 Accelerator pedal stop. Rust underneath, so must come out.
211639 Disassembled
111824 Bracket made to relocate the pedal mount in the same location, after replacing the floor below it.
 

Attachments

  • 20181031_231050.jpg
    20181031_231050.jpg
    203.2 KB · Views: 293
  • 20181101_230758.jpg
    20181101_230758.jpg
    282.7 KB · Views: 301
  • 20181101_231051.jpg
    20181101_231051.jpg
    251.4 KB · Views: 283
  • 20181101_231124.jpg
    20181101_231124.jpg
    177.8 KB · Views: 299
  • 20181101_232806.jpg
    20181101_232806.jpg
    216.2 KB · Views: 300
  • 20181101_231004.jpg
    20181101_231004.jpg
    217.4 KB · Views: 281
  • 20181103_232521.jpg
    20181103_232521.jpg
    216.5 KB · Views: 268
  • 20181031_210734.jpg
    20181031_210734.jpg
    467.4 KB · Views: 282
  • 20181031_211639.jpg
    20181031_211639.jpg
    131.3 KB · Views: 280
  • 20181102_111824.jpg
    20181102_111824.jpg
    213.1 KB · Views: 288
Last edited:

eriknetherlands

Moderator
Site Donor
Messages
2,698
Reaction score
1,929
Location
Netherlands, Eindhoven area
- continued from above.-

235625 Replace floor under accelerator mount
235644 Relocate new mount (sourced and made by CSL Garage, Budapest/ Miklos is a real great guy to deal with)
132722 Measure & measure & measure ....
224145 made 2 new depressions that are missing in the Walloth and Neesch front floor part. (as are the ribs, the curve up to the firewall, and the curve up to the tunnel...) (detailed description of the tools and process some 60 post earlier...)
224200 Mark and locate
225902 Pressed and drilled
231235 Plug trial fitted
003908 All cleaned prior to welding
004305 One fine, shiny frame rail !
233046 Relocated floor feature (needed to be shifted ~3 mm sideways, as the rib spacing of the W&N parts does not match the original rib spacing. As I already welded in the rear floor, these ribs did not line up with the rear floor anymore. Its much easier to relocate this little piece then 're-rib' the whole rear floor )
223810 new tabs fitted on the inner A-pillar. Could be spotwelded now as I still had access while the floor is out.
224021 Temporarily fitted the intermediate sill and A-Pillar to check floor fitment.
215531 Final installed front floor.

Quite some steps are missing, but I dropped my phone, and that caused two things:
no possibility to make pictures.
no distractions anymore so fully dedicated e9 evenings-> lots of progress in 1 week!
 

Attachments

  • 20181105_235625.jpg
    20181105_235625.jpg
    241.3 KB · Views: 285
  • 20181105_235644.jpg
    20181105_235644.jpg
    252.3 KB · Views: 283
  • 20181130_132722.jpg
    20181130_132722.jpg
    230.3 KB · Views: 279
  • 20181110_224145.jpg
    20181110_224145.jpg
    234.9 KB · Views: 277
  • 20181110_224200.jpg
    20181110_224200.jpg
    198.9 KB · Views: 279
  • 20181110_225902.jpg
    20181110_225902.jpg
    204.8 KB · Views: 274
  • 20181110_231235.jpg
    20181110_231235.jpg
    164.2 KB · Views: 284
  • 20181116_003908.jpg
    20181116_003908.jpg
    203.3 KB · Views: 271
  • 20190213_215531.jpg
    20190213_215531.jpg
    103.4 KB · Views: 264
Last edited:

eriknetherlands

Moderator
Site Donor
Messages
2,698
Reaction score
1,929
Location
Netherlands, Eindhoven area
And all nicely sealed with a thick flowing, remaining soft, german quality (30+ years on sea based wind mills) paint, called Brantho Corrux 3 in 1, drowned all gaps and crevices with a syringe. I gave it two passes allowing it to dry two days in between.
 

Attachments

  • 20190213_215543.jpg
    20190213_215543.jpg
    99.7 KB · Views: 282
  • 20190213_215605.jpg
    20190213_215605.jpg
    163.1 KB · Views: 272
  • 20190213_215620.jpg
    20190213_215620.jpg
    143.4 KB · Views: 266
  • 20190213_215701.jpg
    20190213_215701.jpg
    155.4 KB · Views: 277
  • 20190213_215855.jpg
    20190213_215855.jpg
    122.4 KB · Views: 268
  • 20190214_014012.jpg
    20190214_014012.jpg
    123.2 KB · Views: 256
  • 20190214_014119.jpg
    20190214_014119.jpg
    109.3 KB · Views: 267
Last edited:

eriknetherlands

Moderator
Site Donor
Messages
2,698
Reaction score
1,929
Location
Netherlands, Eindhoven area
After sealing the seams with the Brantho Korrux, the seam sealer was next in line.

On the inside of the sill originally there is this type of rubbery putty; Seam sealer. I tried to copy it as best as I could.
Here's some pics of the original putty in my car. (difficult to see, bad phone in 2015, I'm sorry) Hans and Fritz did not give it too much effort to get it straight in ~May '73. You can just make out that it has been quite hastely applied, and then brushed over.

First I did some trials on a plate with different brushes to get the correct structure. A harder brush with plastic strands gave the best reproduction.
Over the white paint came a first layer that I pushed in with a brush to make sure it has good adhesion. A day later I did the second layer, sloppy as possible, which is a bit difficult for me...
 

Attachments

  • 20150411_122601.jpg
    20150411_122601.jpg
    235.3 KB · Views: 278
  • 20150518_214513-eigen auto voor slopen.jpg
    20150518_214513-eigen auto voor slopen.jpg
    202.6 KB · Views: 257
  • 20190218_225241.jpg
    20190218_225241.jpg
    247.4 KB · Views: 255
  • 20190218_225350.jpg
    20190218_225350.jpg
    211.3 KB · Views: 244
  • 20190216_163335.jpg
    20190216_163335.jpg
    119.8 KB · Views: 234
  • 20190216_163431.jpg
    20190216_163431.jpg
    121.7 KB · Views: 246
  • 20190216_163506.jpg
    20190216_163506.jpg
    118.4 KB · Views: 244
  • 20190219_002353.jpg
    20190219_002353.jpg
    112.6 KB · Views: 230
  • 20190219_002412.jpg
    20190219_002412.jpg
    138.9 KB · Views: 255
  • 20190219_002538.jpg
    20190219_002538.jpg
    166 KB · Views: 260

Bejoe16

Well-Known Member
Messages
254
Reaction score
107
Location
Albany Ga
Unbelievable detail! Makes me want to keep my CSi shell even though I’ll never have time to get to it. Looking forward to every update.


Sent from my iPhone using Tapatalk
 

milwaukeesk

Member.
Site Donor
Messages
270
Reaction score
144
Location
Atlanta GA
I have so much respect for the job you have undertaken, the level of effort and attention to detail. Keep it up. When all is said and done one can only assume that your car will be incredible and what a story to tell!
 

eriknetherlands

Moderator
Site Donor
Messages
2,698
Reaction score
1,929
Location
Netherlands, Eindhoven area
It's been a while since I've posted updates in this thread, but work continued anyway. I did bug the forum with questions in separate threads, and received many grateful answers that allowed me to continue.

Let see if i can get this thread up to the point where I'm now.

In the last posts I told about my floor repairs. The cabin floor is mostly finished now, just the stuff that is mounted *on* the floor needs to go back.

235127, 234941 and 234933: Reweld the seat bases to the floor. they were chopped out, fixed up and zinced. Before removing them i devised a system to relocate the parts; the orange steel tube had some pins that allowed me to stuff the front edge of the base under & against it. It also doubled as a stiffener to make sure my sill did not move relative to the tunnel. I also used some Cleco's; they are wonderful.

211649, 211722 and 211902 show the coating inside the seat base, where it would be hard to reach later.
pic 233014 and 001539 welded and painted, inside and outside. I use a nice little spray can nozzle to get the paint in place it will not creep into by itself.

also a pic to check that all is well: I installed the seat rail and the seat. They slide, but not effortless. Some tuning may be needed....
 

Attachments

  • 20190216_234933.jpg
    20190216_234933.jpg
    218.9 KB · Views: 175
  • 20190216_234941.jpg
    20190216_234941.jpg
    196.8 KB · Views: 168
  • 20190216_235127.jpg
    20190216_235127.jpg
    238.6 KB · Views: 171
  • 20190221_211649.jpg
    20190221_211649.jpg
    130.8 KB · Views: 169
  • 20190221_211722.jpg
    20190221_211722.jpg
    143.5 KB · Views: 166
  • 20190221_211902.jpg
    20190221_211902.jpg
    250.5 KB · Views: 173
  • 20190221_233014.jpg
    20190221_233014.jpg
    290.4 KB · Views: 169
  • 20190223_001539.jpg
    20190223_001539.jpg
    158.7 KB · Views: 171
  • 20190222_122046.jpg
    20190222_122046.jpg
    254.4 KB · Views: 168
Last edited:

eriknetherlands

Moderator
Site Donor
Messages
2,698
Reaction score
1,929
Location
Netherlands, Eindhoven area
Next in was the plate going left to right under the rear seats.
It had some rust damage, so that needed to be fixed first.

pic 212802, 213352. Fixed a curved edge that was rusted out from below. Edge replaced, and all welded in.
180616 Spot welded the connections. I needed to use a piece of wood to bend the plate in place prior to spot welding it, as it tended to warp.

234216 In the point where it meets the rear wheel reinforcement, I did not want to weld, as it would bake off the rust protection (paint) inside the sill construction. So I choose to glue it in there with Teroson EP5055 structural Epoxy, the black stuff.
As you can cover large area's with it, it can be made to have similar rigidity compared a few spotwelds.
 

Attachments

  • 20190304_212802.jpg
    20190304_212802.jpg
    333.4 KB · Views: 183
  • 20190304_213352.jpg
    20190304_213352.jpg
    180.6 KB · Views: 164
  • 20190305_180644.jpg
    20190305_180644.jpg
    205 KB · Views: 166
  • 20190305_234216.jpg
    20190305_234216.jpg
    166.9 KB · Views: 172
  • 20190305_234233.jpg
    20190305_234233.jpg
    145.9 KB · Views: 162
  • 20190305_234723.jpg
    20190305_234723.jpg
    210.5 KB · Views: 165
  • 20190306_002321.jpg
    20190306_002321.jpg
    453 KB · Views: 182
Last edited:

eriknetherlands

Moderator
Site Donor
Messages
2,698
Reaction score
1,929
Location
Netherlands, Eindhoven area
and then I started looking at this....
 

Attachments

  • 20190528_105452.jpg
    20190528_105452.jpg
    251.2 KB · Views: 177
  • 20190528_105609.jpg
    20190528_105609.jpg
    241.6 KB · Views: 177
  • 20190528_105854.jpg
    20190528_105854.jpg
    240.2 KB · Views: 185
  • 20190610_173333.jpg
    20190610_173333.jpg
    298.3 KB · Views: 183
  • 20190614_121721.jpg
    20190614_121721.jpg
    284.5 KB · Views: 173
  • 20190701_234547.jpg
    20190701_234547.jpg
    251.1 KB · Views: 172
  • 20190701_234718.jpg
    20190701_234718.jpg
    423 KB · Views: 197

eriknetherlands

Moderator
Site Donor
Messages
2,698
Reaction score
1,929
Location
Netherlands, Eindhoven area
Long overdue update, but as I made this nice picture today, I thought it would be good to post it here (as well).

Since the above post I've replaced the rust in the spare wheel well. To do this I've taken it out completely.
Also welded in new rear lower valance left and right, and the lower tail panel.

Even though this thread actually started in 2015 with some practice welding on the fuel tank panel, I chopped out what I made in 2015 and replaced it with a fresh Walloth part.
All parts were Zinc electroplated before welding them in, including the towing hook and the pin inside the spare tire wheel well. I've spotweldedn weverything to keep the factory look, copying also the spotweld locations and spacing. In a few locations I MIG welded for additional strength, but ground them flat so they cannot be seen. I then placed a spot weld over it just for the original looks.
 

Attachments

  • 20210908_193123.jpg
    20210908_193123.jpg
    522.5 KB · Views: 147
  • 20210822_140243.jpg
    20210822_140243.jpg
    149.9 KB · Views: 137
  • 20210822_140229.jpg
    20210822_140229.jpg
    118.7 KB · Views: 141
  • 20210821_210712.jpg
    20210821_210712.jpg
    209.8 KB · Views: 136
  • 20210815_232059.jpg
    20210815_232059.jpg
    166.9 KB · Views: 139
  • 20210725_154834.jpg
    20210725_154834.jpg
    266.1 KB · Views: 144
  • 20210129_153349.jpg
    20210129_153349.jpg
    314.1 KB · Views: 151
  • 20210124_181018.jpg
    20210124_181018.jpg
    288.8 KB · Views: 150
Last edited:

Bmachine

Well-Known Member
Site Donor $
Site Donor $$
Messages
3,525
Reaction score
1,779
Location
Northern California coast
Incredible work there Erik! This is a humbling reminder to those who have been lucky to find a dry car that they are real exceptions. Your dedication and craftsmanship is a real inspiration!
 

eriknetherlands

Moderator
Site Donor
Messages
2,698
Reaction score
1,929
Location
Netherlands, Eindhoven area
So, in the meantime I've turned my car around in my tiny garage, as I am planning to remove the front fenders. As I will be dong a full bare shell repaint, the whole front needs to be emptied.
I've disassembled it up to the point where I now only have the engine, oil filter, steering box and the suspension left inside the car. the wiring loom is all a big pile under the fuse box. I did not yet have the courage to disconnect the wires to be able to carry the harness out; i want to document which connector goes where before I disconnect them from the junction box.

In my process I dismantle most things up to the point of last nut and bolt (really). My car always smelled like gas, and had a horrible mileage; about half what it should be.
So out with the carbs, and disassemble. Boy do they have a lot of parts!

Some interesting observations while disassembling my front carb:
- Missing one screw at the bottom of the carb: 4 screws should hold the bottom plate with the coolant hoses. Mine was only attached with 3. It did not leak any coolant however.
In general I found that the screw are quite loose on most joints of the carb. A 3yr old would have been strong enough to take mine apart. @deQuincey also noted a lost bolt a few weeks ago; mine wasn't any different. To reduce chance of loosing bolts, I plan to re-torque them after 1000 km or so. For other carb owners I'd advise to check your Nm's.
20211111_221837.jpg


- as the head of my engine has a 1980's casting date, it obviously has been replaced. However the intake runners are still the original 1973 parts. As a result the intake ports do not match to the runners. The gasket couldn't close that gap, literally. It must have drawn in air through the bolt holes into the cilinders; @sfdon already mentioned that it probably was difficult to hold an idle, and indeed the engine would stall when still cold and trying to idle.
20211112_004632.jpg


- a broken plastic link. Luckily i have 6 partial carbs to use for spares, but the first two i pulled of them were broken as well. See the small split along the length on the flat part? it still held fine despite the crack, but it's now replaced anyway.
20211111_223236.jpg
20211116_134152.jpg


- the jet section is distorted. The side facing the front window has sagged about 0,8 mm downward (measured after flattening it slightly to remove gasket remains). It's even obvious just eyeballing it; see picture. I'll have to replace it with one from my parts stash (I hope not too many variants exist of the jet section)
20211112_000339.jpg
20211119_174327.jpg


- it still has SOLEX branded gaskets (original from factory?)
20211112_001944.jpg


- The needle valve is not spring loaded as it should be (likely a non BMW replacement, although it does read "SOLEX 2"), and it has a 1 mm shim instead of the 2 mm prescribed in tech docs. Again, need to scavenge my parts pile.

20211112_150558.jpg


Sooo many little parts! Remember, this is only 1 carb...
20211112_174828.jpg
20211112_174900.jpg
 
Last edited:

Belgiumbarry

Well-Known Member
Messages
1,618
Reaction score
1,116
Location
Belgium
dammit Erik, what are you gonne do with that car once it is finished ? Put it in a museum ? i don't expect you will be driving it , no ?
 
Top