Getting this 3.0CSi back on the road

Just keep posting pics of the garage build. 1) It's part of the coupe restoration process 2) It adds variety to the thread 3) I don't think anyone could get tired of pics of the garage with that stunning lake behind it.

I'm sure I can continue to share some pictures of the garage build aswell, but I'll probably dump a whole load of pictures later instead of bumping this thread every time there has been a little progress.
Right now I can't wait for the ice on the lake to melt away! The ice cover is still about 60cm (23 inches) thick..

BEAUTIFUL!!!! (yes that is me yelling about how awesome the work looks).

Thank you Andrew!
 
All of my time lately have been put on the garage, but I've managed to get some important pieces sorted, first of all I got my 16" Alpina closed-hub wheels refinished.
I had the centers painted satin black and thanks to Markos who gave me a hint what to search for, I've managed to source some black universal cup holders that fit the bigger center-bore of the closed-hub Alpinas.
Still need to cut the cups down a bit, but that will be done when I have the wheels on the car.

Screen Shot 2017-09-03 at 00.03.10.png


Screen Shot 2017-09-03 at 00.03.17.png


I also bought a ducktail spoiler from daddywad here on the forum, spoiler looks great just need to fit it to the trunk lid and get it painted.
(Our greyhound is checking it out from a distance, still afraid of the table which he managed to break the glass in the day before;))

Screen Shot 2017-09-03 at 00.03.26.png


Screen Shot 2017-09-03 at 00.03.34.png


I've also bought a pair of early 70's Scheelmann 400-series seats from Gerrit, they are in need of new cloth but otherwise in good condition.
He also sold me new cloth that is the closest match to the original Scheel-cloth, so that is the theme for the interior, black scheel cloth and black leather/vinyl.
I have no photos of these yet as they are separated to pieces after the shipping and they are soon off to the upholsterer.

I've put alot of time into the garage project the last month, and it's progressing nicely, can share some pictures to fill out this update a bit.

So this is how we left it last fall, we used it as a carport over the winter.

Screen Shot 2017-09-03 at 00.03.43.png


Screen Shot 2017-09-03 at 00.03.51.png


Started with the first layer of wall insulation:

Screen Shot 2017-09-03 at 00.03.59.png


Put up plastic on the walls:

Screen Shot 2017-09-03 at 00.04.07.png


Screen Shot 2017-09-03 at 00.04.16.png


Here we have installed the wind "guides" that prevents the roof insulation from wind turbulence when it's storming (red arrow), you can also see we put in some 2x4 to raise the attic floor to be able to use thicker roof insulation.

Screen Shot 2017-09-03 at 00.04.24.png


Screen Shot 2017-09-03 at 00.04.30.png


Here we built the frame for the foldable attic stairs:

Screen Shot 2017-09-03 at 00.04.37.png


Time to put up plastic in the roof:

Screen Shot 2017-09-03 at 00.05.20.png


All done with the plastic:

Screen Shot 2017-09-03 at 00.05.28.png


Then started to put up the wood boards:

Screen Shot 2017-09-03 at 00.05.35.png


Screen Shot 2017-09-03 at 00.05.43.png


Then it was time for the wood boards on the walls:

Screen Shot 2017-09-03 at 00.05.49.png


Screen Shot 2017-09-03 at 00.05.55.png


Time to put hard insulation under the attic floor:

Screen Shot 2017-09-03 at 00.06.27.png


Screen Shot 2017-09-03 at 00.06.35.png
 
Last edited:
Floor complete, the walls are left open as the sides of the roof are still not insulated, will put another type of insulation on the sides later.

Screen Shot 2017-09-03 at 00.11.51.png


Then proceeded with panels on the outside:

Screen Shot 2017-09-03 at 00.12.01.png


Screen Shot 2017-09-03 at 00.12.09.png


Then it was time to put in the windows:

Screen Shot 2017-09-03 at 00.12.18.png


Screen Shot 2017-09-03 at 00.12.25.png


Screen Shot 2017-09-03 at 00.12.33.png


Screen Shot 2017-09-03 at 00.12.40.png


Then I had to dig a hole for the drain/sump, I'm going to have a totally flat floor with only a local drop to the drain/sump. Will not play with water inside anyway so I think that's the best solution for me.

Screen Shot 2017-09-03 at 00.12.47.png


Then we filled some more inside and now I just have to make it totally straight before starting to lay down the floor insulation. Also have all the electrical cables that is needed in the attic + outside in place, I pulled some extra cables to the attic so it's easier later when/if I decide to build a carport on the end of the garage.

Screen Shot 2017-09-03 at 00.12.54.png


Screen Shot 2017-09-03 at 00.13.00.png


Then some more panel work:

Screen Shot 2017-09-03 at 00.13.07.png


Screen Shot 2017-09-03 at 00.13.14.png


Screen Shot 2017-09-03 at 00.13.20.png


Screen Shot 2017-09-03 at 00.13.27.png


And this is where I am right now, concrete floor will be done mid-June and the floor polishing guy will come mid-July.

Screen Shot 2017-09-03 at 00.13.34.png
 
Last edited:
I love seeing the construction stuff as much as the car stuff. I'm building a 400sf elevated deck right now. That is quite the bunker you are building!
 
That is so incredibly cool Robert. Is it just you and your dad doing most of that work?

I imagine wood is fairly cheap in Finland, right?
 
Thanks to both of you! Yes it's only me and my father who is doing the recent work, I hired help to build the walls (frames) and put on the roof last summer.
We're going to do mostly everything except pouring the concrete and make the floor level/straight + I'm getting the concrete polished and sealed by another guy later. We could do this ourself but I'm sure I will have a much nicer floor if I hire professionals.

I can't say that wood is cheap, I checked prices on Home Depot and 2"x 2" and 2" x 4" prices were very close to ours.
The outside panels/boards with tounge/groove pattern were twice the price on home depot, don't know how fair comparison that is thou..
 
Nice job Robert! I love working on construction and seeing it. Looks to be built to last a long time!
What type of heat are you going to use?
 
Thanks Tim!

It's a nice feeling to build something and watch it grow and become what you set out to build!
We're sure trying to build it so it will last a long time but neither me or my father are construction workers by trade, so having friends that can point us in the right direction sure helps alot!
I'm putting down tubes for water underfloor heating, so I have the option to use that later if/when I have to replace the current geothermal heat pump I have in my house. The current heat pump is not dimensioned to heat another 1000sqft + heat loss from the culvert I would need to put down between house and garage.
Another option is to just have an electrical heating element in a small water tank with a pump circulating the water, that's very common around here.
But I'm starting out simple with an air to air heat pump on the wall.
 
My Buddy here in Reno just finished his Custom Home and went with a heat pump. He owns a Backhoe so he did all the tractor work himself and I think he said it's about 800'of trench at 8'+ deep to do this.
It looks like your going to have apartment space in it?
PS I'm not a builder either but a play one on the weekends!
 
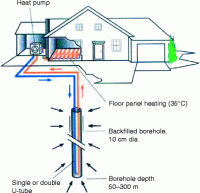
Okay, I have the other type of geothermal heating with a ~220 meter deep borehole, works great with very low heating expenses over winters.
borehole-1.gif

There is no apartment space in the garage, the attic will only be used as a cold storage as we have limited storage place inside the house.
 
Yesterday I bit the bullet... Spent 7-8hours straight to re-size and re-upload all pictures in this thread directly to the forum instead of the old (non-working) photo links to photobucket. Yeah, thank you Photobucket for doing that to your customers, thank you so much!!

But I thought I could upload some more pictures from the garage build at the same time, it's not far from completion now! But I'll start from the last update.

Put down some pipe:

1.jpg


Leveled the floor before putting down the floor insulation:

2.jpg


More stuff done on the outside:

3.jpg


4.jpg


Started putting down the insulation:

5.jpg


6.jpg


Three layers total, except where the two-pillar lift is planned to be installed.

7.jpg


Rebar

8.jpg


Then we started painting the outside:

9.jpg


10.jpg


More in next post.
 
Preparing the form for the ramp outside:

11.jpg


Stainless-steel angle irons with insulation pressed in between to stop the cold from getting in.

12.jpg


Put down rebar and the form is complete.

13.jpg


Floor-heating pipes put down on to the rebar:

14.jpg


15.jpg


And then it was time for concrete, luckily I left this to professionals.

16.jpg


17.jpg


18.jpg


19.jpg


Next day:

20.jpg


More in next post.
 
Then I got the rain-gutters installed + "snow barrier" on the roof.

21.jpg


Next up was the floor polishing, I hired proffessionals for this too, turned out great in my opinion.

22.jpg


Then I pulled some more cables.

23.jpg


24.jpg


Next up, more wall insulation.

25.jpg


Then we started with the OSB boards

26.jpg


27.jpg


Then plaster boards in the roof:

28.JPG


Roof finished

29.JPG


More in next post
 
Next step was to put up the plaster boards on the wall, didn't take any pictures while we did it because it was a bit stressful as the door-installer was comin the next day :eek: Here with lift-doors installed:

30.jpg


31.JPG


32.JPG


More work done on the outside around the doors, smaller door also installed + lights

33.jpg


Prep for paint on the inside:

34.jpg


Half-way painted + insulation protection boards installed:

35.JPG


Lower half painted grey and after that I installed the lights + sockets and got the power turned on:

36.jpg


37.jpg


Stairs:

38.jpg


And a little more work done on the outside, just some painting left to do, otherwise finished with the outside!

39.jpg


And this is where I am currently :)
 
Last edited:
Thanks guys! Still some finishing touches to do on the inside but I think it's looking great already:)

The e9 got to see some daylight today for the first time since March, started and did run fine. Will be transported to the garage sometime soon, or at least before the weather changes.

IMG_0869.jpg
 
That is really awesome Robert, congratulations! It goes to show, taking care of a car with any degree of passion involves a lot of seemingly unrelated peripheral work.

But it is really interesting to see what technique you are using for dealing with the weather out in Finland.

Side note: Are those overhead lights LEDs? I converted all my fluorescent tubes to LEDs and there are really awesome. Not the least of which is the benefit of not having to worry about the kids playing ball in the garage and risking to hit those stupid fluorescent to see them crash on the floor, spilling mercury everywhere. Plus instant on, better lighting, lower electricity, etc...
 
Back
Top