My Alpina B2 powered 3.0CS

Mark is the only retailer that I know. I see a frame come up here and there. If you don’t want them to tilt they aren’t that complex. The sliders themselves are separate from the stationary frame. Sliders come up on ebay also, and some
forum members have spare sets.

Cheers, I have the sliders for this seat but might need another set in the future.
Do you know if all csl’s came with tilt mechanisms or was it an option?
does the tilt mechanism bolt to the car, or do you need the additional stationary frame as well?
I presume all this adds quite a bit of height to the seat?

I’m not and expert but I believe that most CSL’s did not have tilting seats. The tilting frame is all one piece, that bolts to the car. I don’t think it affects the height at all. The frames are very compact.

615D8DBF-B3B6-44D0-9243-2C63A589A03F.jpeg
 
James,
have you seen these for sale? In country so picking them up might be doable. Been advertised since weeks......


Keshav
 
I’m not and expert but I believe that most CSL’s did not have tilting seats. The tilting frame is all one piece, that bolts to the car. I don’t think it affects the height at all. The frames are very compact.

View attachment 92530

Mine have both sides tilt’s or how else should the rear passenger get in there? Even for a Csl there are 4 seats ;)
 
James,
have you seen these for sale? In country so picking them up might be doable. Been advertised since weeks......


Keshav

Thanks Keshav,
These are the seats we were discussing earlier, price is for one seat only
 
Hi guys, I have not seen a CSL that doesn't need the tilt frame. As Keshav says, you can't get in the back otherwise.

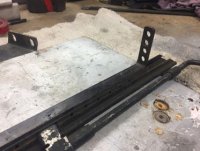
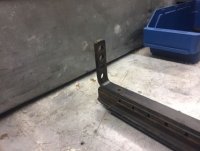
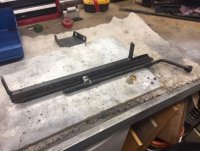
Pictures attached of the slider/runner with the locking handle. Each seat has one of these one side of the seat and the same thing but without the handle mechanism on the other side. These two sliders bolt to bottom of the Scheels.

As you can see on the pics, there is a prong at each the end of the slider that has holes in it. These holes are where the tilt bracket assy bolts, the choice of holes gives height adjustment to the seat.

The special tilt frame then bolts to the floor sheet metal brackets for the seats. (see Markos's pic for tilt frame)

The sliders in my experience are difficult to find, in fact I need two (without Handle) if anyone has them?

The tilt frames come from @Gerrit . I have access to Scheel reproduction seats if you need them.

Mark
 

Attachments

  • 96066525_3013479888733979_5310300073035300864_n.jpg
    96066525_3013479888733979_5310300073035300864_n.jpg
    21.6 KB · Views: 241
  • 96029995_990708027997916_571389963589910528_n.jpg
    96029995_990708027997916_571389963589910528_n.jpg
    17 KB · Views: 230
  • 96242321_730078657812018_6366103463612383232_n.jpg
    96242321_730078657812018_6366103463612383232_n.jpg
    23.3 KB · Views: 217
Mine have both sides tilt’s or how else should the rear passenger get in there? Even for a Csl there are 4 seats ;)

Good point. I suppose I presumed that you could slide the seat forward enough. I haven't installed mine so I wouldn't know. I must have misread as optional. There does seem to be a number of images of cars without the slider handle, but that could just be because they couldn't find the frame during restoration. Who knows. This is precisely why I have to add the "not a csl" expert disclaimer. :) My apologies for the misinformation.

BTW - the parts book only lists "seat with bracket"

@daddywad & @JamesE30,

Here is a slider for sale. Note that the later sliders were longer on the seat-side, but the bottoms were (to no surprise) the same. I have both but the longer one is locked in my trunk (which now will not open) - more on that later...

 
JamesE30 -

Beautiful work! You've given me a bad case of engine detailing envy :)

What is your plan for your radiator and cooling system?

I have a very similarly configured Coupe which I'm in the process of reassembling after a new paint job. In the reassembling processing I'm also doing my best to detail my engine bay without pulling the engine.

I don't have any over heating problems as long as I'm moving, but if I've been on the road for a few hours on a hot summer day and then hit stop and go traffic my thermostat flirts with the red zone. Worst, if my tank is low the high heat can lead to vapor lock.

I've read some good posts in the forum about upgrading the fan to more blades (9 I believe it is) and or installing a new aluminum radiator. I'm torn between keeping everything in the original configuration vs. not having to stress about over heating. I believe it's pretty easy to swap out the radiator so one school of thought is do the upgrade and keep the original parts to be swapped back in.

I'd be interested in your thoughts as well as other members.
 
Sanded the raised lettering on the powder coated valve cover.

View attachment 88201
I would like to know how you achieved such a great end result. I pre-sanded the raised sections to a fine finish then high temp sprayed the entire cover black then very very carefully sanded the raised section back to the bare finish. The constant problem was sanding the non raised section as well. Re-did the cover twice and still nicked the black bits. Mine was the crinkle finish so the sanding on the black was accentuated. Very professional looking result compared your original vision for the car. Going to be some car.
 
Thanks for all the good info and kind words guys.

JamesE30 -

Beautiful work! You've given me a bad case of engine detailing envy :)

What is your plan for your radiator and cooling system?

I have a very similarly configured Coupe which I'm in the process of reassembling after a new paint job. In the reassembling processing I'm also doing my best to detail my engine bay without pulling the engine.

I don't have any over heating problems as long as I'm moving, but if I've been on the road for a few hours on a hot summer day and then hit stop and go traffic my thermostat flirts with the red zone. Worst, if my tank is low the high heat can lead to vapor lock.

I've read some good posts in the forum about upgrading the fan to more blades (9 I believe it is) and or installing a new aluminum radiator. I'm torn between keeping everything in the original configuration vs. not having to stress about over heating. I believe it's pretty easy to swap out the radiator so one school of thought is do the upgrade and keep the original parts to be swapped back in.

I'd be interested in your thoughts as well as other members.

For the cooling system, I have new silicone hoses from Ireland Engineering (not every hose as the plumbing is a little different on the Alpina motor so a couple are just new oem hoses)

New oem radiator from WN

Newer style water pump with screw on fan attachment, newer style fan clutch and new 9 blade fan.
The new 9 blade is a fraction larger in diameter so hopefully no interference with the hood. Would love to find a red 9 blade but in very good condition they’re not so common.

Im sure this system will suffice for normal driving, but I do like to take my car to the alps in summer and I know the e30 struggled sometimes in slow moving uphill traffic.

I’ll see how it goes and may upgrade to an electric fan or alu radiator in the future if it’s required.

I would like to know how you achieved such a great end result. I pre-sanded the raised sections to a fine finish then high temp sprayed the entire cover black then very very carefully sanded the raised section back to the bare finish. The constant problem was sanding the non raised section as well. Re-did the cover twice and still nicked the black bits. Mine was the crinkle finish so the sanding on the black was accentuated. Very professional looking result compared your original vision for the car. Going to be some car.

I’ve done a couple of these and I know the struggle.

The problem I had with this valve cover is that the previous owner did a very bad job of sanding (grinding) the ribs down, consequently removing too much material and leaving an uneven finish.

I did my best to level it out smoothly but the ribs are now quite low so it was a challenge not to hit the black, and I must admit I touched it a couple spots in the roundel but barely enough to notice..

Key is to mask the painted/powder coated surface as much as possible. Mask it with masking tape, then duct tape or something thicker that the sand paper won’t eat through right away.
Use a stiff sanding block or orbital and work your way through the paint evenly so as not to roll off the edges/corners. Keep an eye on your masking to make sure your not going though. Re-mask if necessary, finish with passes in one direction, with a slightly higher grit. Still use the stiff block (wood is fine) any softer and you’ll roll the edges.

At least that’s how I do it.. haha

09314570-B2A8-4C3A-AA93-E88E89230212.jpeg

7723BC03-916E-4764-BC62-A0C794B62C28.jpeg
 
Working on some clutch/brake components

AE68CAC0-B071-4CA2-BAC2-DBE251000CFA.jpeg


Also started to rebuild the pedal box with all the freshly plated/powder coated parts.

7C3B3654-2292-47B8-9393-0A8FBFE993B4.jpeg


Anyone have any tips to put these new pedal bushings in?? Wtf.. it was hard enough getting the old ones out, but the new ones are rock hard and extremely tight. It took me an hour to get the first one in with a lot of lube, and a lot of force. Ended up using the bolt/nut/socket contraption to press it in with a lot of pressure and wiggling..
I destroyed the second one.. ! there has to be better way!
I did warm them up but will try boiling them next time.

FD7FF51D-8A98-4F64-856E-1F2783DA366B.jpeg
 
Last edited:
Anyone have any tips to put these new pedal bushings in?? Wtf.. it was hard enough getting the old ones out, but the new ones are rock hard and extremely tight. It took me an hour to get the first one in with a lot of lube, and a lot of force. Ended up using the bolt/nut/socket contraption to press it in with a lot of pressure and wiggling..
I destroyed the second one.. ! there has to be better way!
I did warm them up but will try boiling them next time.
Boiling will help for sure, it will soften the black ones much. New W&N black ones are much more "plastic" than oem white.
I used long bolt (m10 i think) between two bushings with large diameter washers, while screwing/tightening the bolt with two bushings from outer sides bolt/nut will slide bushing in place at the same time. Some little corrections of the proper bushings positioning at the very beginning where made with tiny flat screwdriver.
 
Waiting on new accelerator bushings and a few other little bits but pedal box is starting to come together.

1BF21BA2-304C-4334-9456-5F1331879FE2.jpeg


Still more pieces needing cleaning and rebuilding including the steering column. I will likely have this piece powder coated with a fine structure black. Seems I’m missing the plastic key cover, anyone have a european source for this?

1BD93B7D-9284-4777-8B28-95CE3E1DAD90.jpeg


Another daunting task is the heater core.
I plan a basic clean and rebuild of this. I’ve ordered the various foam pieces needed and take it apart and inspect the radiator to see if it needs reconditioning. Otherwise unless anything is badly damaged mostly I’ll just clean and and reassemble. Anything in particular to look out for with this?

7FF56070-524B-4706-B5CA-6172C15E792C.jpeg


I pulled out my kidney grills to take a look what I could do. Luckily mine were in quite good condition over all. I’ve decided to try and mirror polish all the alu pieces and maybe clear coat them after.
I first media blasted this to remove the anodising and started with 320grit. Going to be a long process..

3F0AD888-0117-49CD-A6A7-6E5D7D0ACA17.jpeg
23A34989-37E4-4D25-BC51-E184D1073379.jpeg
 

Attachments

  • A3D01824-047A-4077-83B2-92D64BED20D0.jpeg
    A3D01824-047A-4077-83B2-92D64BED20D0.jpeg
    241.6 KB · Views: 216
Hi @JamesE30,

Nobody makes the key cover with the FAHRT. The e12 one kinda fits. I had this modeled but never went to round 2 on the iteration. I am looking for 3D scanning shops in Seattle for another part. I will see if I can bundle this in. If not, I’ll send it to my modeler for round 2.

Note the stepping due to printer resolution. If printed in ABS you can use acetone vapors to smooth the stepping.

I can have the part cast also but would need to do a group buy. If anyone with CAD skills wants to take this over I am happy to share the file.

E76AF1F3-DF5E-4D1B-B770-E89FFB82892D.jpeg
AC7F6FC0-FAE4-4A9B-9DD4-C0CEE33DC831.jpeg
8319B9CE-01AC-43F6-B1D3-FB444645FDC5.jpeg
 
I am trying out some powder coating that I picked up that may be a match or close to the original texture Will let you know. Try an Eastwood product called |"plastic refinisher " on the black plastic housing and parts for the heater box, It comes out a really nice matt/satin finish _erfect for making old lastic look much better
 
Hi @JamesE30,

Nobody makes the key cover with the FAHRT. The e12 one kinda fits. I had this modeled but never went to round 2 on the iteration. I am looking for 3D scanning shops in Seattle for another part. I will see if I can bundle this in. If not, I’ll send it to my modeler for round 2.

Note the stepping due to printer resolution. If printed in ABS you can use acetone vapors to smooth the stepping.

I can have the part cast also but would need to do a group buy. If anyone with CAD skills wants to take this over I am happy to share the file.

Hi Markos, thank you for the reply. I’d love to
Have a go at that cad file if you don’t mind sharing it, what issues did you have with the fitment of the part?

So the original e9 part has the raised text and the e12 not?
 
Hi James, just doing a heater myself, once you pull it apart to remove the radiator you will have all the cross rods with the flaps attached will fall out.

These are covered in a thin foam sheet that will have disintegrated to dust. Once you clean the foam off to replace it you may as well get all the yellow rods and all the other parts replated including the riveted parts. Thats pretty much it, there's not much to them but re-assembly is a pain getting all the rods to align at the same time. Careful paint job before assembling and it will look great.

Thanks, I guess I’ll give it a go! I’ve got this far haha

I’ve been digging through my boxes and boxes of hardware checking which little fasteners and screws I’m still missing and realised I do actually have the original key surround! Haha

Of course it’s not in perfect condition but I’ll see what I can do about that..

A1BE4851-FC58-4323-8CDE-653BA1672876.jpeg
 
Back
Top