1974 BMW CSE

Here are a couple of videos I took. Here you can hear the man himself describe some of the processes and challenges they had to deal with.

Including a “speed run” limited to 25 or 30 miles an hour because when stopping from a higher speed the regeneration is so strong it can get the car to jump off the lift.


Hey guys,
I've been backed up with family and work but I am a couple of partial days into installing the front Wilwood brakes with the new hubs and all. Should have something next week to look at.

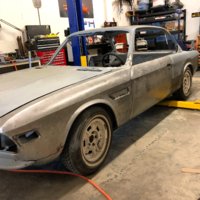
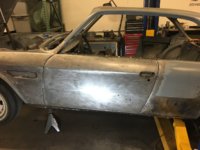
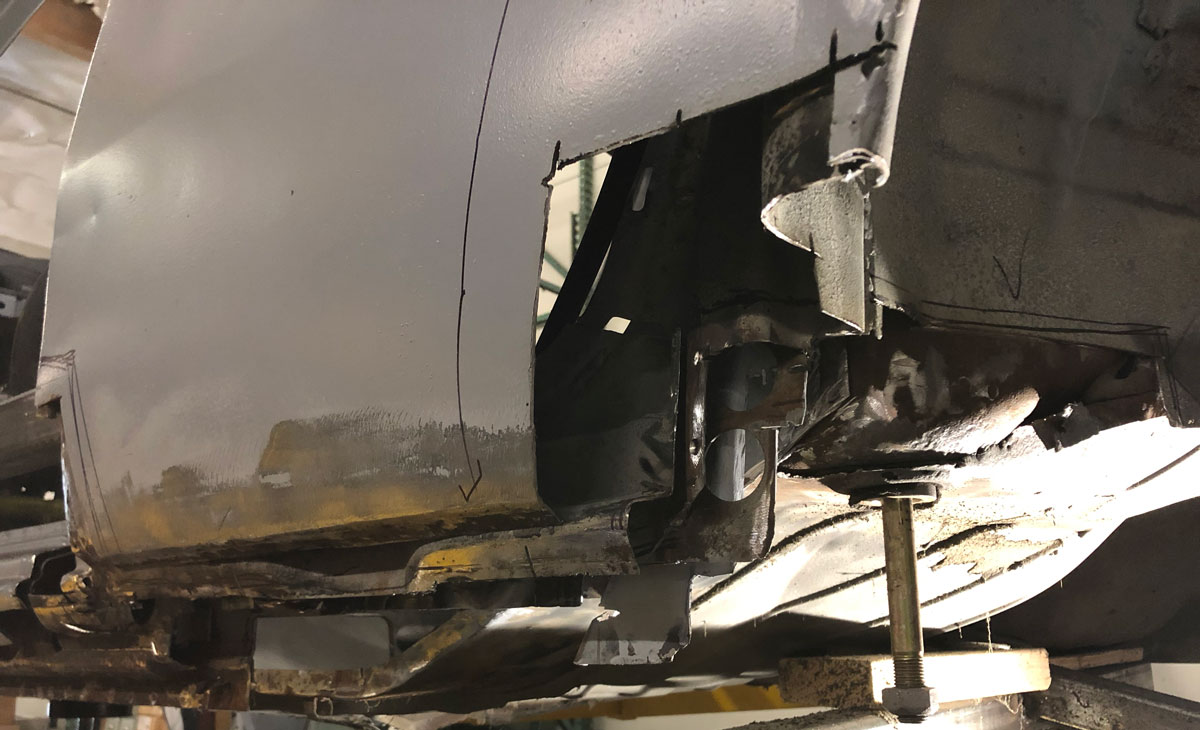
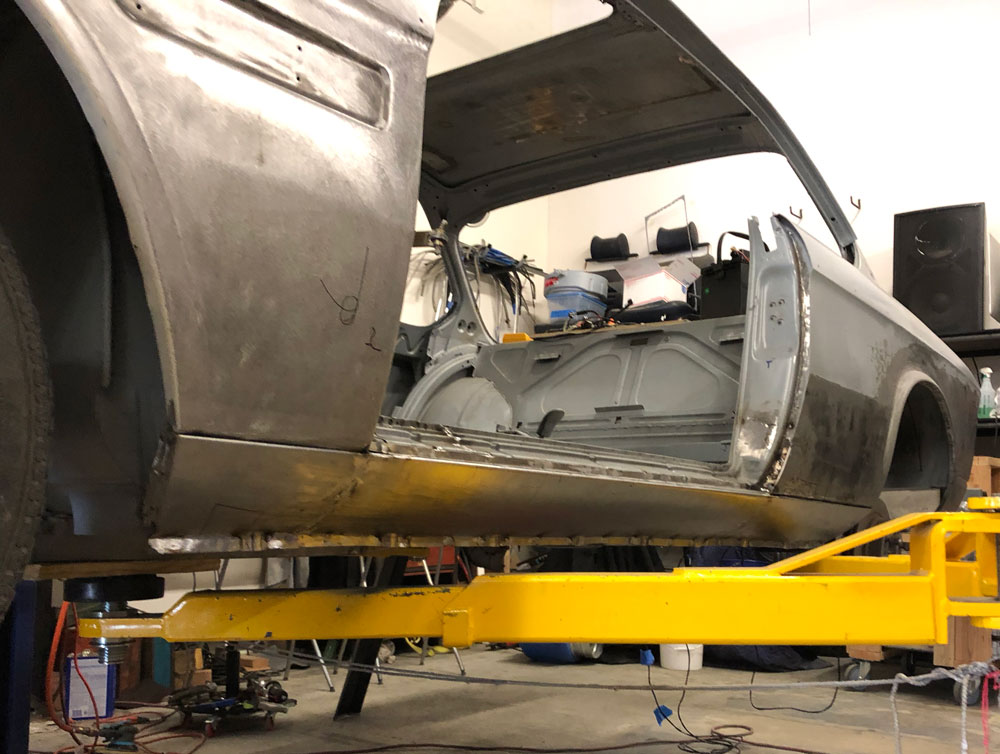
Meanwhile We finally have an entire driver side of the car DONE! It's a truly great feeling to be done complete with inner fender, new fender, inner and outer rockers, repaired door frame, new door skin and repaired rear quarter. We opted for custom and welded rocker trims. I had seen it on a couple coupes in photos and they looked terrific.

Also, since we were going this far Tyler did some magic with tight door gaps. He didn't go as crazy as his previous (ludicrous) 911 guys opt for, but certainly tighter than the e9 ever had. Funny thing is that after it was done it was a bit to tight for the design of the hinge. We are having to back it off just a touch as the hinge pulls the door tighter while opening. It made me laugh some - it wasn't that BMW/Karman wasn't capable of tighter gaps, they just weren't capable of engineering a hinge able to support tight gaps :)

Anyway, she is looking really good on her stock wheels!

Driver Side complete.JPGDriver Side Gaps.JPG
 
A lot of progress lately. We have a goal to be driving this car in a month. By mid-August. Of course there won’t be any interior, glass, lights. But around my complex here to do some testing.

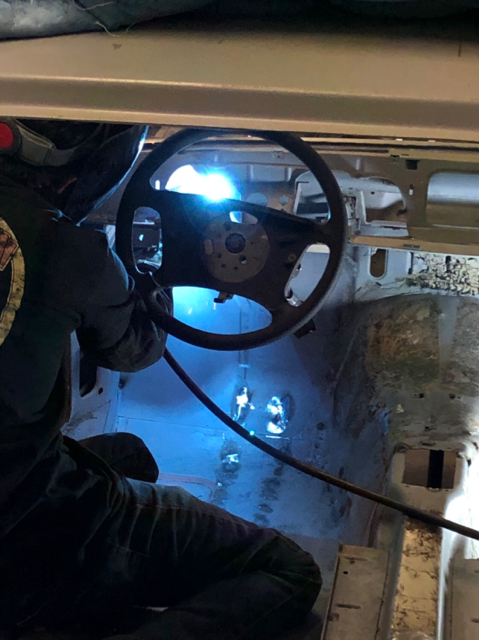
We got the E46 steering column forward bracket welded in (we were waiting to verify the angle).

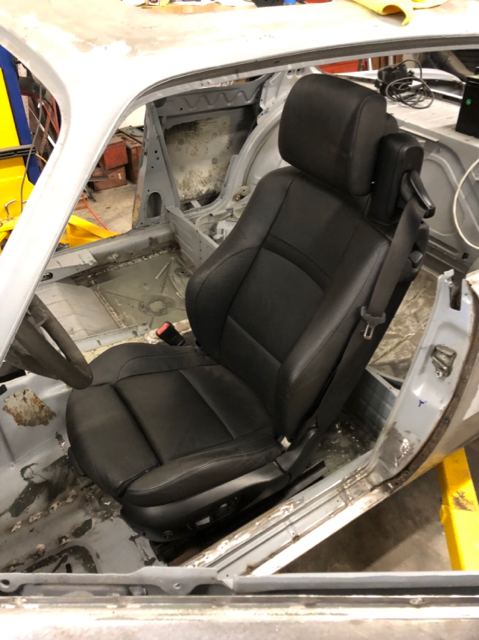
We got the E93 drivers seat in. We are still fabricating the structural support and will have more photos of that tomorrow. I am sad to not have the beauty of the stock seats, but very excited to be able to sit lower (as my head scrapes the ceiling) but for a daily driver, the convenience of the integrated seatbelt. Hence the structural work we are doing now.

We are also wrapping up the machining work to the control arms to mate up to the VW steering rods.

So things are coming along at a decent pace!

00832211bba9069ccbce2ed31cdc6de4.jpg

a9248d3aba51242c610cc3de9c0126bf.jpg
 
Still on track for driving the coupe mid August. New front hubs and big Wilwood brakes done in the front.

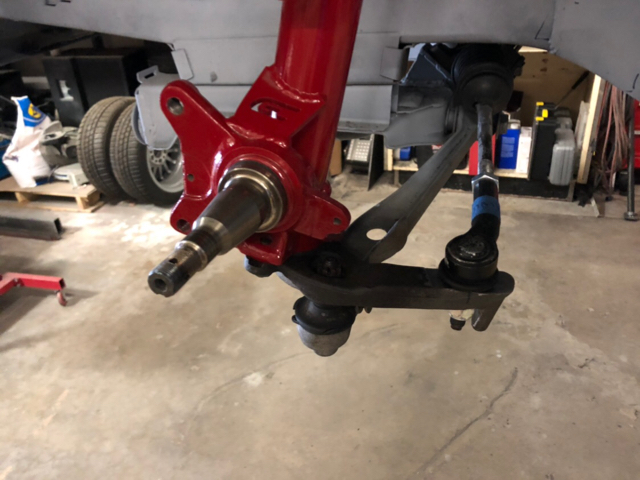
Also we finished the machine work on the control arms with the relocated tie rod connection point.

We finished engineering the battery box this morning and picked up a lot of aluminum. A week or two of fabrication there. It’s moving right along.

11d00aba1ed1404f778c520c20342460.jpg


5f7ffacf36ef26d67d0da5f36cfab742.jpg
 
Last edited:
Hi guys! Those of you that bother to read this thread know that I also have a Blog for this project. This is for family, friends and others that are interested, but not in the E9 or EV communities. I paste those blog posts here just for the record. Some folks have enjoyed it because they usually encapsulate a long process into a single story. Keep in mind that they are written for laypeople so it is dumbed down when it comes to this group.

We Will Rocker You

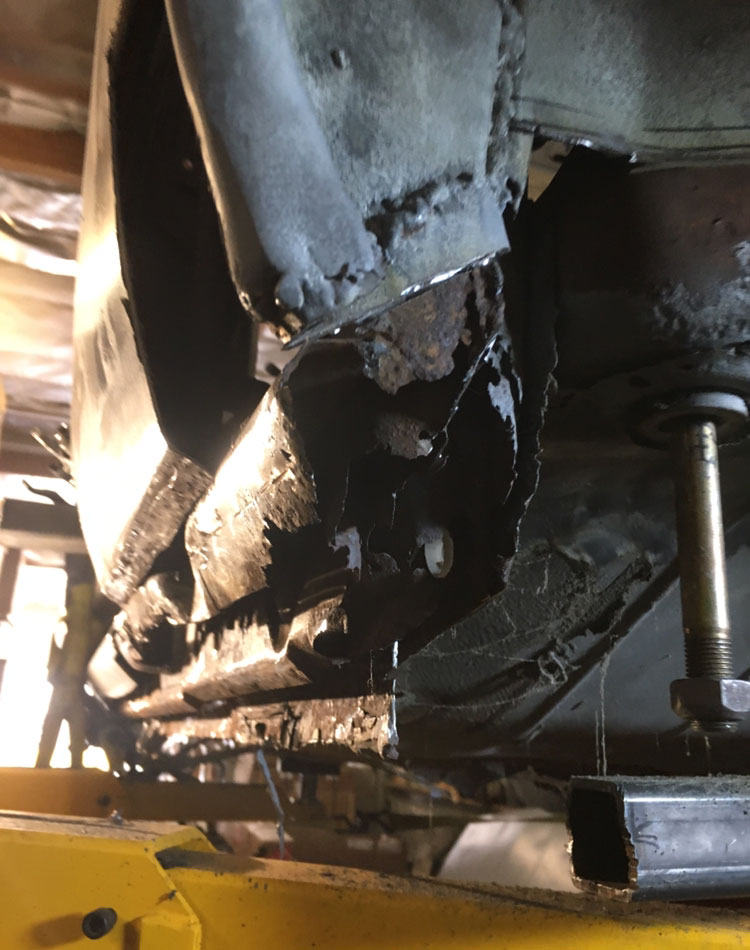
We’ve mentioned more than once that our car had not gotten along very well with snow and rain in the past. The more we dig into the structure, the more we think that she may have spent considerable time on the bottom of a lake.

Our coupe is no special case. Rust prevention was just not given much thought until later in the 1970s. I have talked to long-time owners who had to rebuild inner fenders, floors and rocker panels in the late 1980s - when their car was only 15 years old. Our car spent its first twenty years in Berlin where it saw plenty of wet weather, major rust is to be expected.

Bad-Rockers.jpg


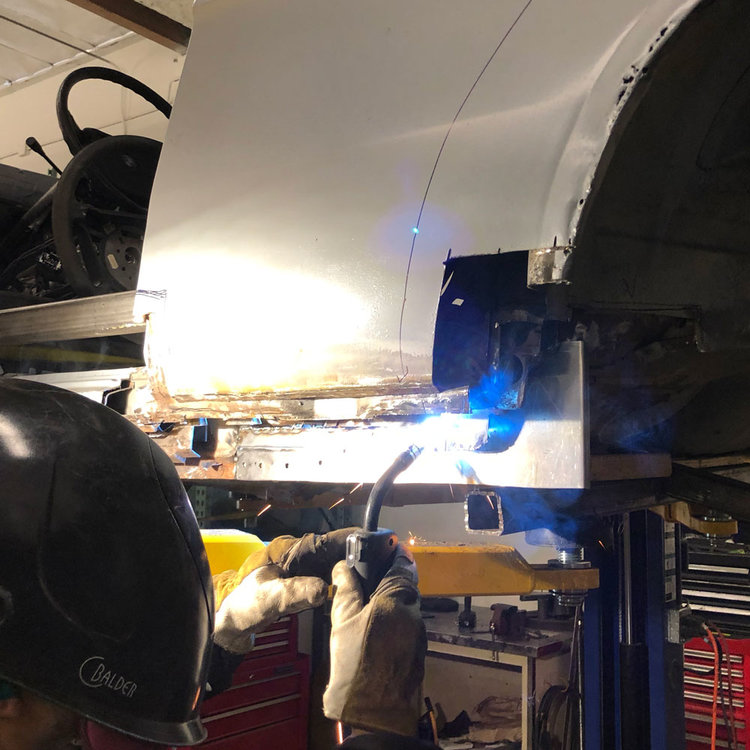
For those who aren’t familiar, rocker panels are the bottom edge of a car under the doors. They provide much of the structure - or frame of the car. There are multiple layers of steel forming the coupe’s rockers. Since this was the first E9 we rebuilt, we honestly didn’t know how many layers there should be, and the shape they should all take. Tyler performed a lot of archeological digging on each of the four corners to discover what the rockers should look like. We also received a lot of help and photos from the great community at e9coupe.com. We could have purchased and welded in new steel rockers, but there was plenty of good steel in the center. We thought it more gratifying to leave the good and fabricate only the rotted sections of each layer.

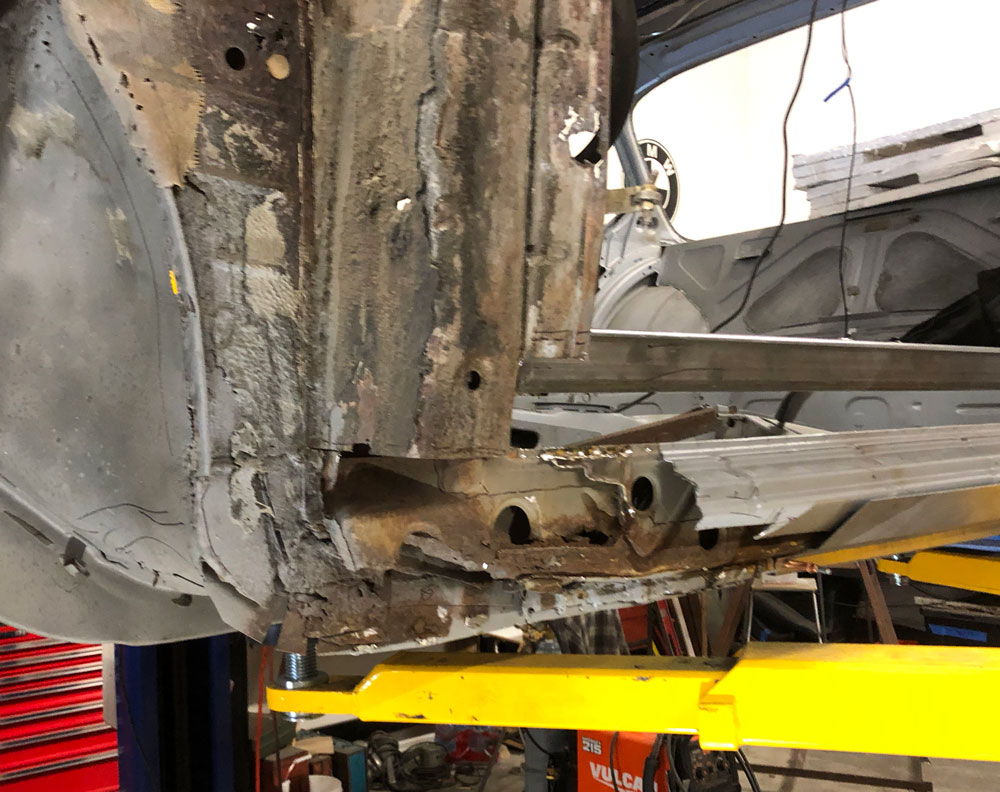
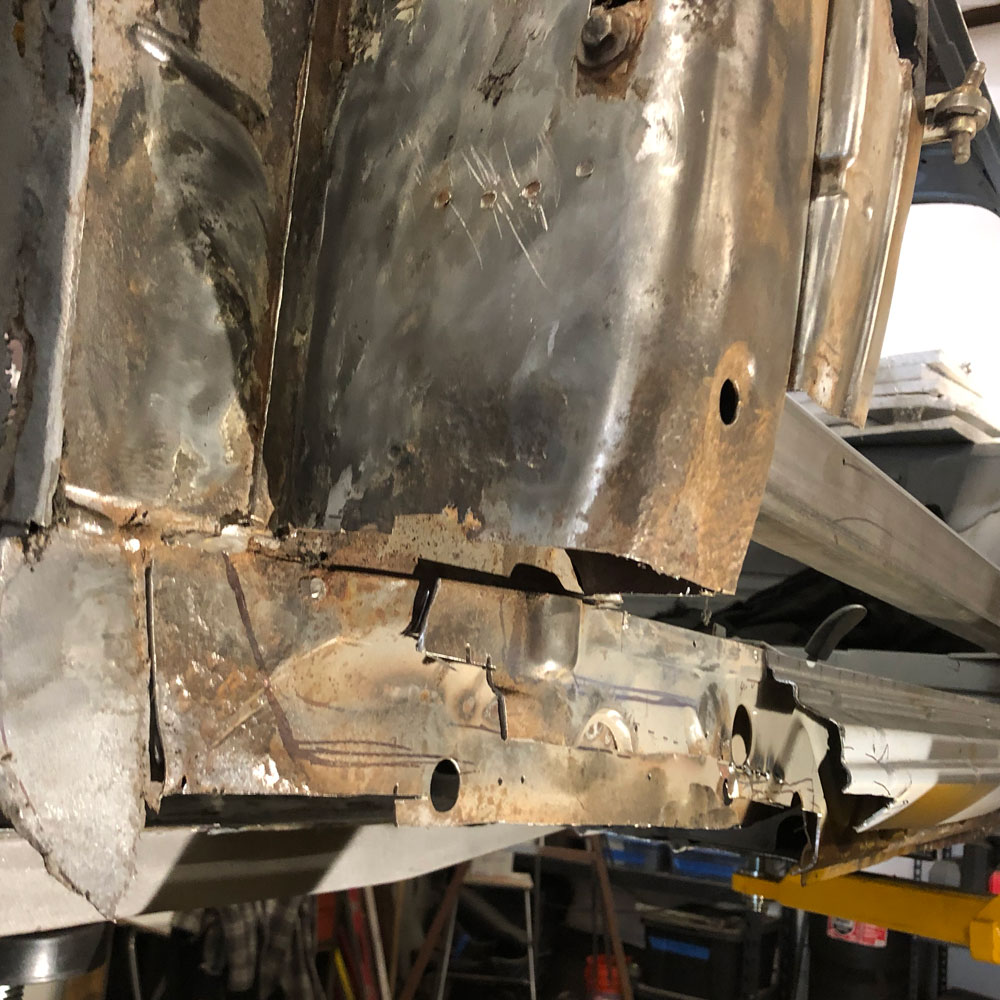
Here’s a shot of our driver side rockers looking from the rear tire forward. It’s not a pretty sight.

We Can Rebuild It
We began by carefully cutting the rot out layer by layer back to good steel. This photo shows what was left once the rot was removed.

We began by carefully cutting the rot out layer by layer back to good steel. This photo shows what was left once the rot was removed.

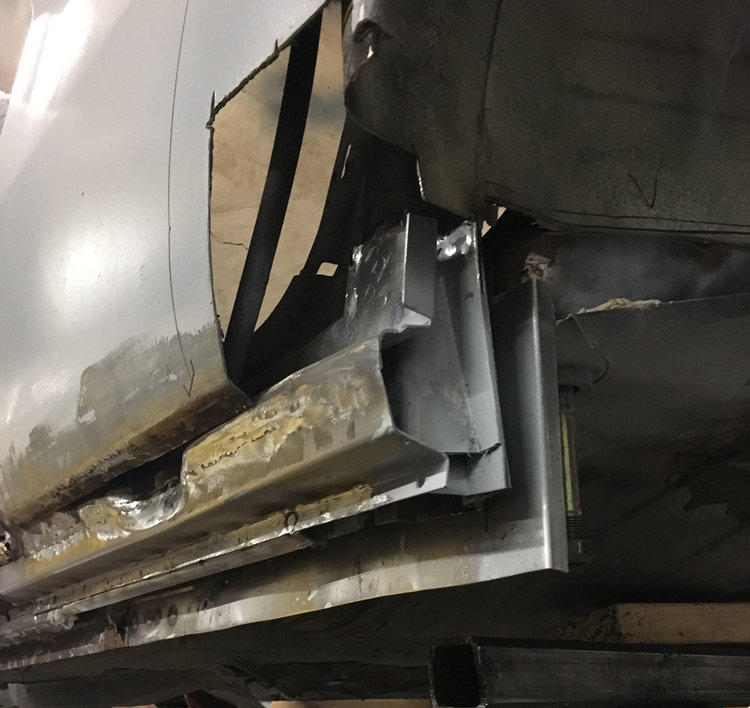
Tyler then fabricated a section to rebuild the first layer.

Tyler then fabricated a section to rebuild the first layer.

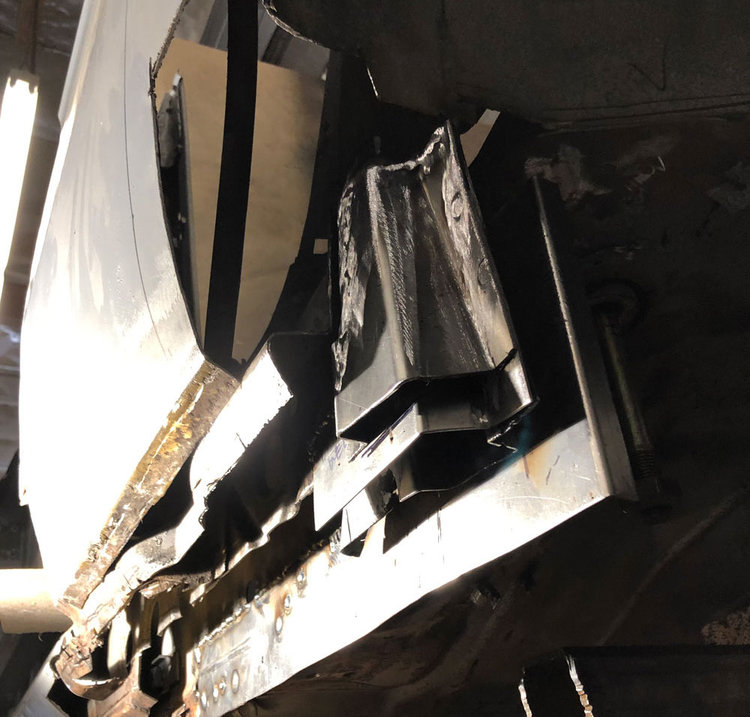
We then started fabricating the next layers. We also rebuilt the lift point pockets.

We then started fabricating the next layers. We also rebuilt the lift point pockets.

More fabricating and more welding…

More fabricating and more welding…

Surely the front wasn’t as bad…

Front-Rocker-1.jpg

The front was no better than the rear. Rust is one thing, but some driveway rust repair had been done at some point confusing how things should actually assemble. This required Tyler to do some real digging on both driver and passenger sides to recreate how the layers were supposed to look.

Figuring out what was supposed to be going on was the biggest challenge.

Figuring out what was supposed to be going on was the biggest challenge.

We are not against buying sections of metal when it makes sense. More than happy to not fabricate this complicated little guy.

We are not against buying sections of metal when it makes sense. More than happy to not fabricate this complicated little guy.

Capping it all off

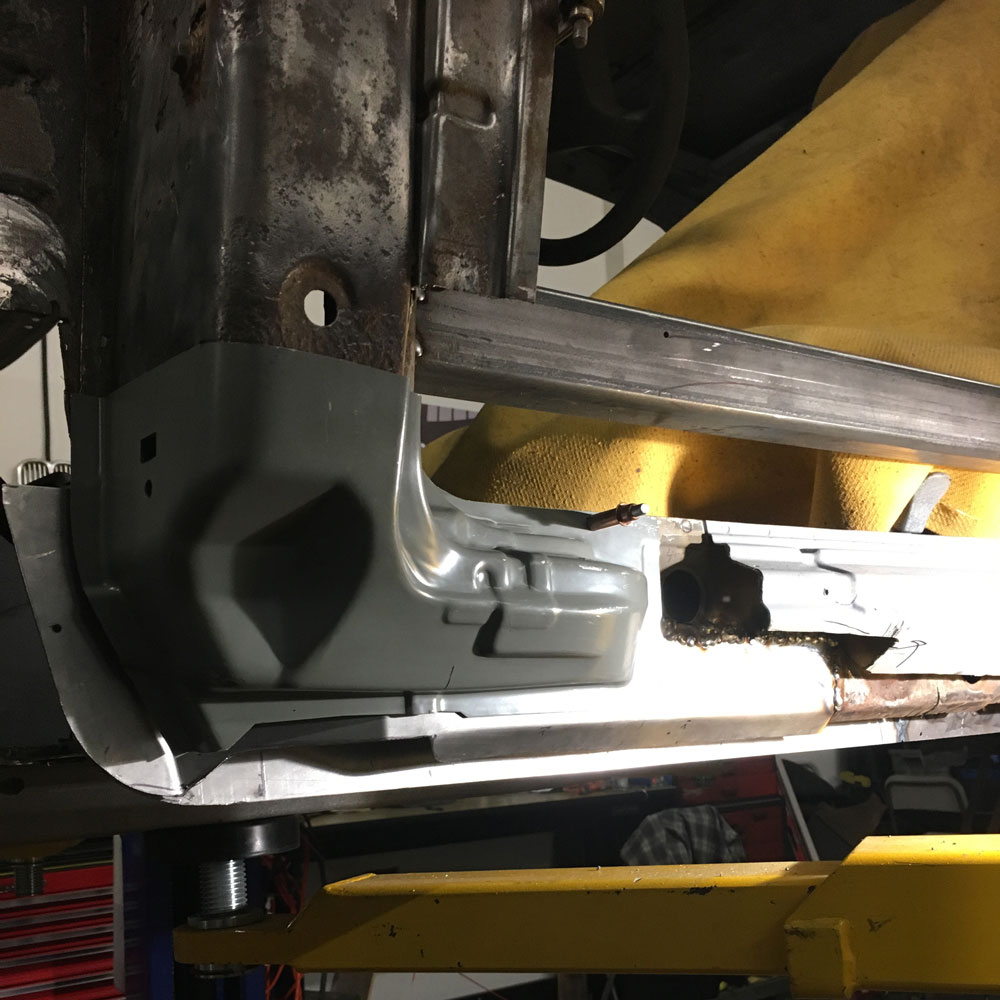
With the structural layers all complete we can finally cap it all off. We went our own direction here, opting for a custom cap with tight gaps to the fender and quarter panel which we welded in place. This provides a very clean and tidy look.

Finished-Rockers.jpg


Meanwhile, we were floored.

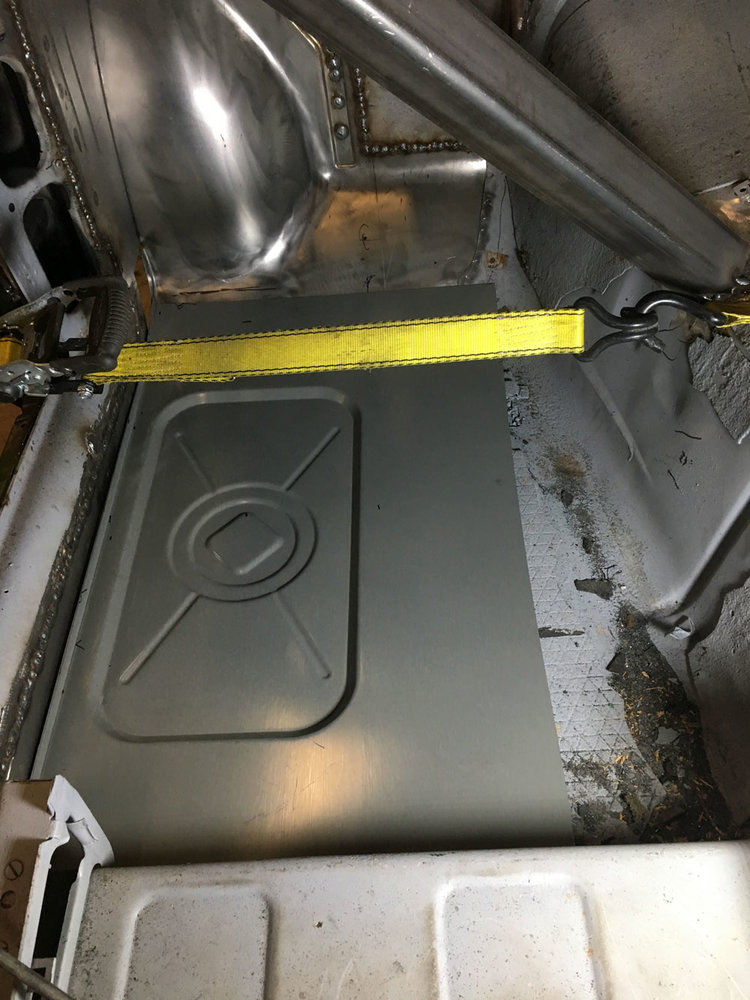
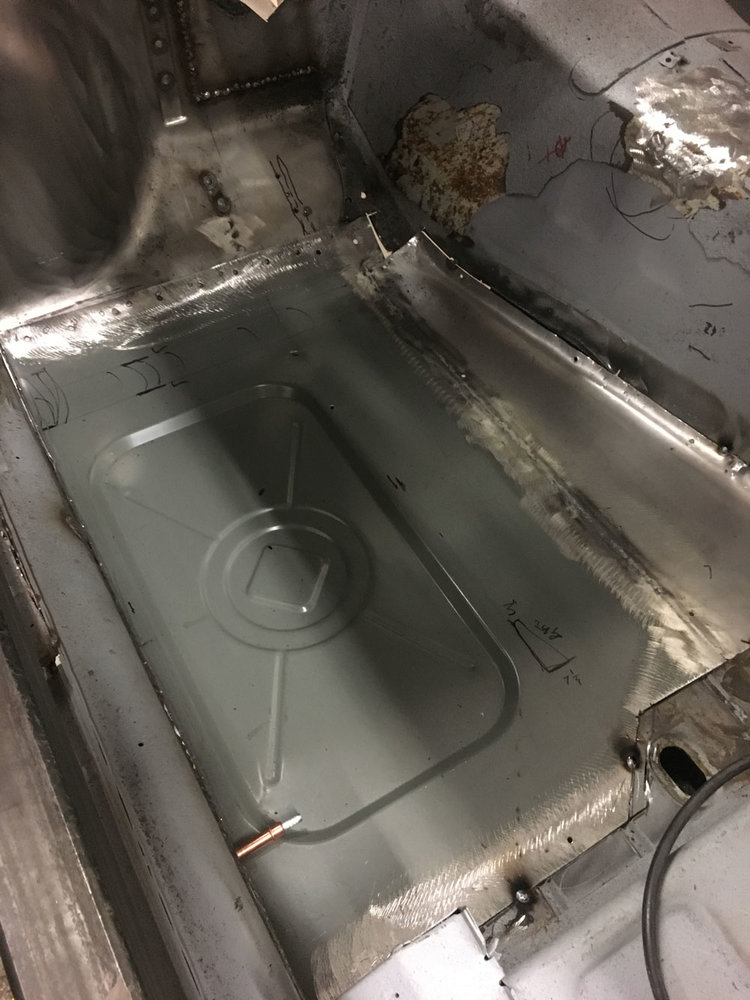
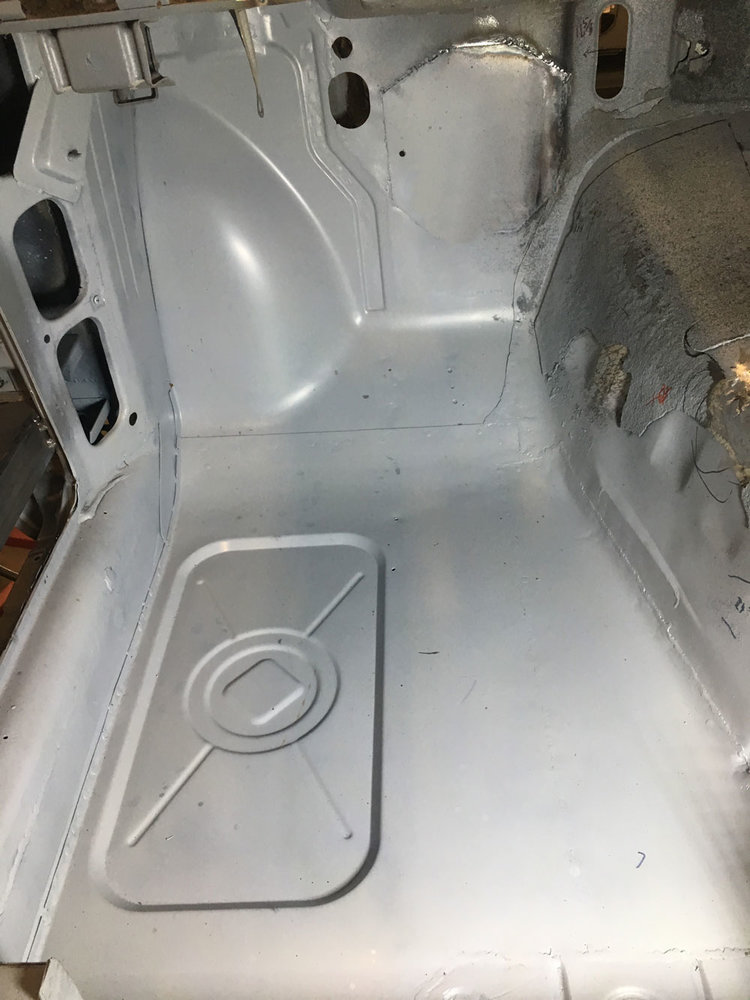
While all this was going on we were also fixing up the floors. The coupe had Fred Flintstone floors on all four positions. We purchased new floors for this. The rears were perfectly stamped and shaped for the car, but the fronts seemed to be a generic “Automobile, Front” floor pan. The stamp was directly over the frame rail. So we cut off the side, pushing the stamp to it’s proper place between the rail and the rocker. We then extended the inside to the transmission tunnel and curved all the edges to mate to the car. A bit of work, but in the end it looks as good as the floor restoration work I saw at BMW Classics in Munich last winter.
Floor-1.jpg

Floor-2.jpg

Floor-3.jpg


Also, if you Instagram, don’t forget to check us out there. This blog gets a bit behind, but the Instagram feed delivers your BMW CSE action up-to-the-minute!
instagram.com/bmw_electric_shark

Instagram.png


Cheers!

Paul
 
Hi guys! Here's another blog post:

We’re Just Spinning our Wheels

Our most exciting day by far is the day we spun the wheels with the Tesla drive unit. Here’s the story of how we got there.

Rear Subframe Modifications
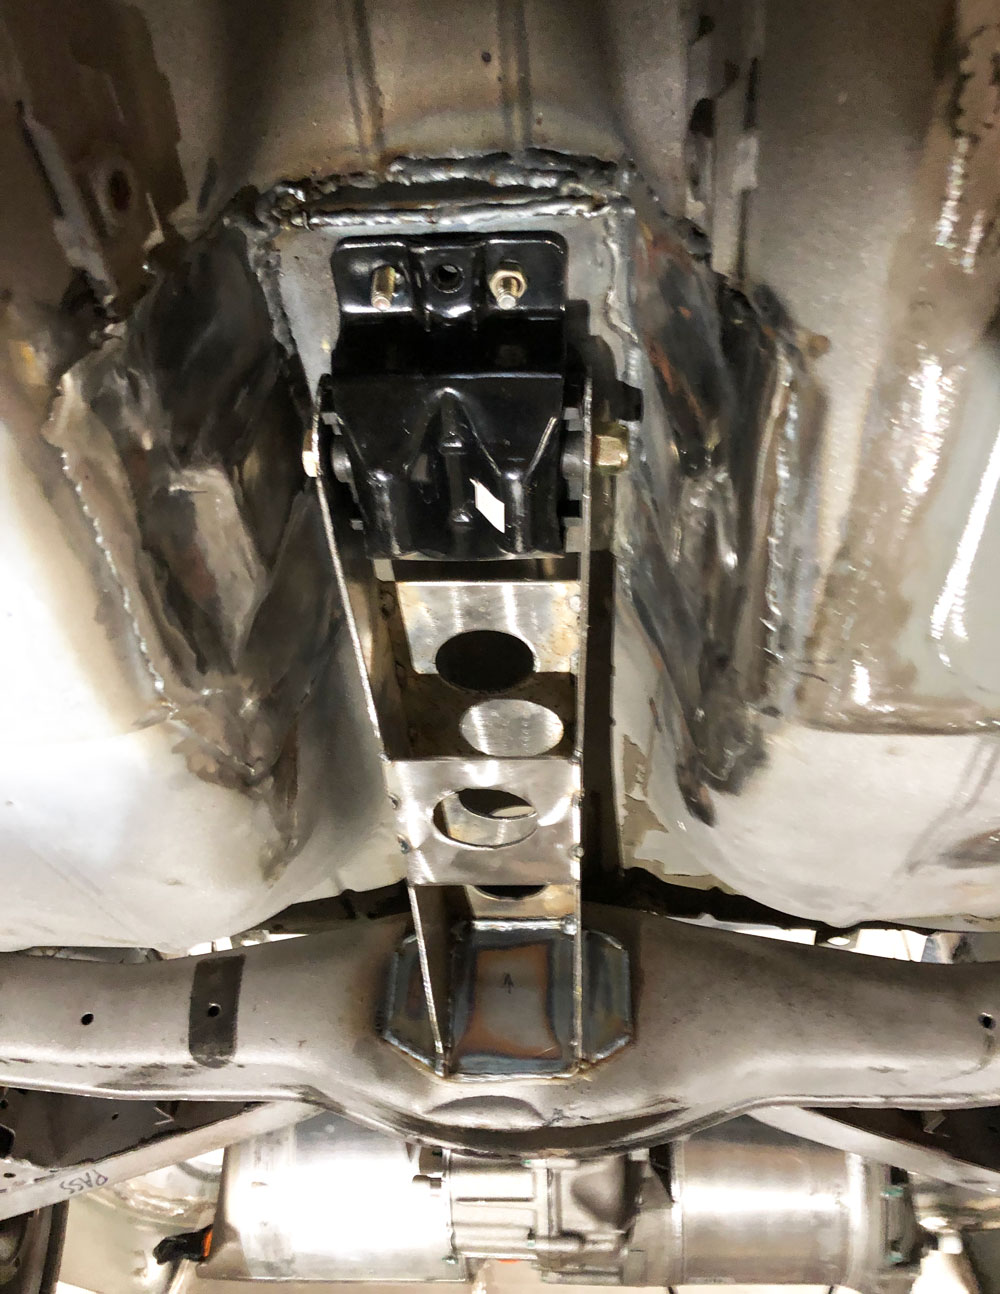
Before we could apply any torque to the wheels we needed to complete our rear subframe. The BMW rear suspension is built of a subframe which attaches to the car in three main locations: left and right in front of the wheels, and a center location at the rear of the differential. This rear location provides the front-to-back rigidity, forming a “Tee” shape. The Tesla unit is sitting where the differential and rear mount used to attach, so we have no way to reattach that important rear mount.
What we do have is a transmission tunnel that is no longer being used for a transmission and driveshaft. We fabricated a new arm and mount to complete our Tee shape - inverted forward. With the help of a $35 Chevy Suburban motor mount and some fabrication work we now have a safe and complete rear suspension.

Looking front to rear, the subframe extension extends forward. Notice the Tesla unit in the rear, at the bottom of the photo.

Looking front to rear, the subframe extension extends forward. Notice the Tesla unit in the rear, at the bottom of the photo.

Tesla to BMW Frankenstein Axles

In order to turn wheels, one needs drive axles. We explored various methods to mate the output of the Tesla to our BMW hubs. We couldn’t modify and reuse the original BMW axles as they would twist like California-legal paper straws under the high torque of the Tesla unit.
We turned to The Driveshaft Shop in North Carolina whose slogan is “We specialize in the impossible”, and for good reason.
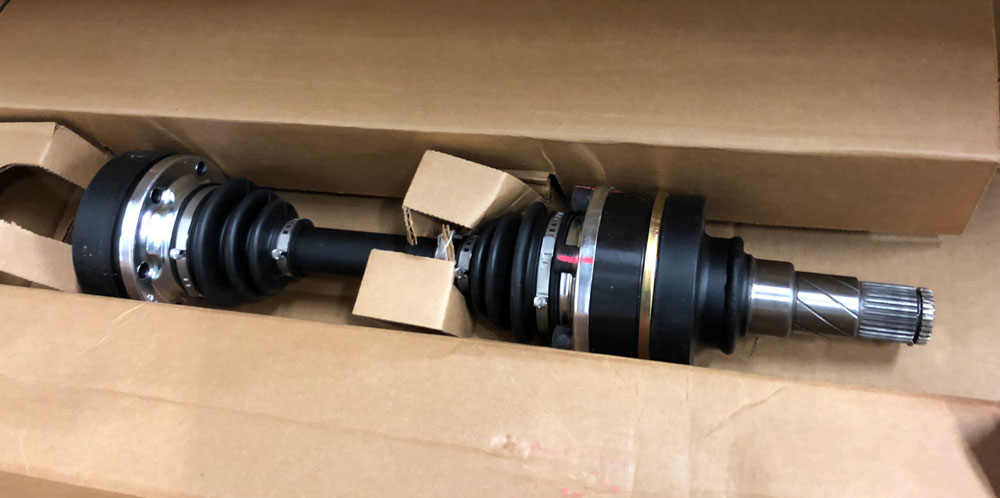
We sent them the inner portions of a pair of Tesla axles and a host of measurements. A few weeks later a beautiful new pair of Frankenstein axles showed up and bolted right in. The craftsmanship is stunning.

Beautifully crafted axles. They are completely new but the far right section which was out of a Tesla. The left end bolts to the BMW wheel hub and the right spindled end inserts into the Tesla drive unit.

Beautifully crafted axles. They are completely new but the far right section which was out of a Tesla. The left end bolts to the BMW wheel hub and the right spindled end inserts into the Tesla drive unit.

Control System

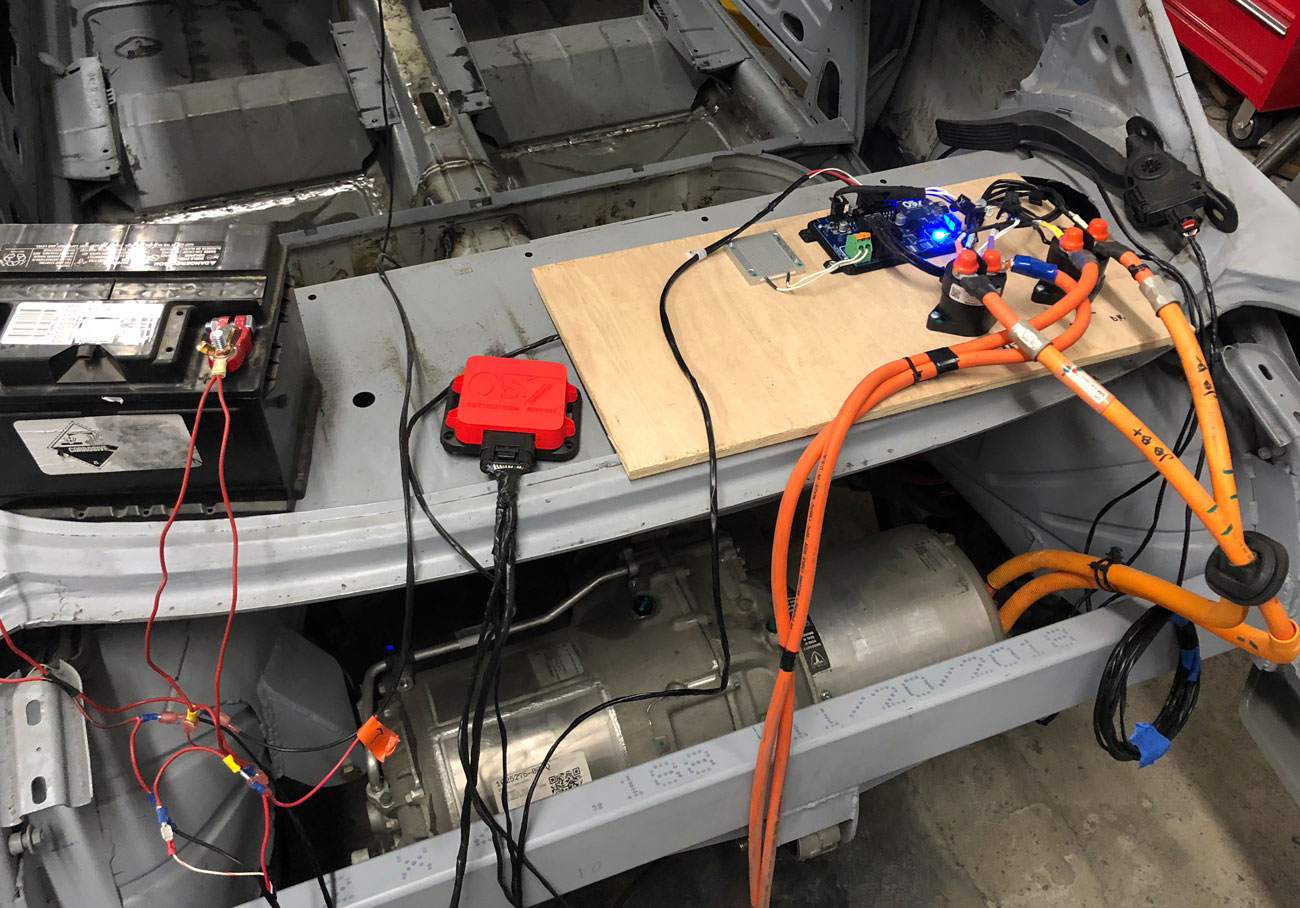
On the rear deck of the car we temporarily set up all the gear needed to run the Tesla drive unit. While an electric car does avoid a lot of the dirty, greasy, mechanical complexities of a gas burning car, it does have its own fair share of infrastructure.

To communicate with the Tesla unit are using the 057 Technologies control system. We believe that Jason and his team have put together the most elegant and capable unit for those of us crazy enough to convert their cars to Tesla drive. There are other companies making fine control units and I evaluated each of them before landing on the 057. I like that each 057 is directly paired to a particular Tesla drive unit with matching firmware. I believe that it is offering tighter, closer to native control of the Tesla unit than the others. This is, however, only my opinion based on my particular research and understanding. The market is changing fast, and things have surely evolved since my research. There are 057 critics who don’t like their direct pairing as it prevents you from purchasing the control unit separately (to control a Tesla drive unit you purchased elsewhere). As an Apple guy, I have usually preferred the power of closed systems, but that is a whole other argument. This is simply a matter of preference.

To further beat a dead horse, there is another strong reason I selected the 057 unit. Their device is a small box you hide inside the car and communicate with it any way you like. You can use simple buttons on your dashboard, or talk to it through a touchscreen that you can design as you like. All other controllers are touchscreen systems that you must install into your dash. They do not allow you to edit the look and feel of that touchscreen. As you can see from my early mockups of the interior, I have strong ideas about how I want the inside of the car to look and feel. I didn’t want to simply bolt on a generic looking touchscreen into the dash.

Our Jetson’s-inspired control panel, used for our early testing.

Our Jetson’s-inspired control panel, used for our early testing.

Here is our collection of control equipment L-R. (offscreen) our vintage control panel, 12v battery to power the three computers, 057 Tesla controller, precharge system including control board, resistor, and high voltage contractors, and accelerator pedal.

Here is our collection of control equipment L-R. (offscreen) our vintage control panel, 12v battery to power the three computers, 057 Tesla controller, precharge system including control board, resistor, and high voltage contractors, and accelerator pedal.

We (Almost) Have Lift-Off!

I must mention the days of troubleshooting once everything was all connected. Not to get overly technical, but there are a lot of variables in place and all of them have to go perfectly right for success. High-voltage from the Tesla battery modules, 12 volts from our car battery, the precharge system to properly ramp up high voltage into the Tesla inverter (part of the drive unit), the control modules, (both the 057 unit and the module inside the Tesla drive unit), accelerator pedal, axles, lubrication and more. We had issues not with some but with most of these things. Things as tiny as a bent pin inside the accelerator pedal, resulting in no communication to the unit. Both Tesla and 057 have safety mechanisms in place. If something reports an error, things generally don’t spin. We got pretty comfortable reading error codes from the Tesla unit on our laptop.

This process itself was incredibly gratifying. Yes, we were frustrated and just wanted to see the wheels spin. But it delivered an unexpected gift of added respect for all the years Tesla (and all of the other) engineers spent developing and refining these automotive EV systems. To think that this should be easy is crazy. But equally crazy is that because of their work a guy like me can buy a bunch of parts from various sources and build such a classic electric sports car.

After all of the dreaming, engineering, fabricating and troubleshooting, we were finally able to experience the best day ever on this project and there were cheers all around.
Here’s a short little video:


The day finally came when we were able to spin the wheels on the coupe for the first time.

Cheers,
Paul
 
Hi guys! Here's another blog post. Remember it was written for friends and family, so it is pretty technically dumbed down. But there's still some interesting info here for this group.

A Seat in First Class

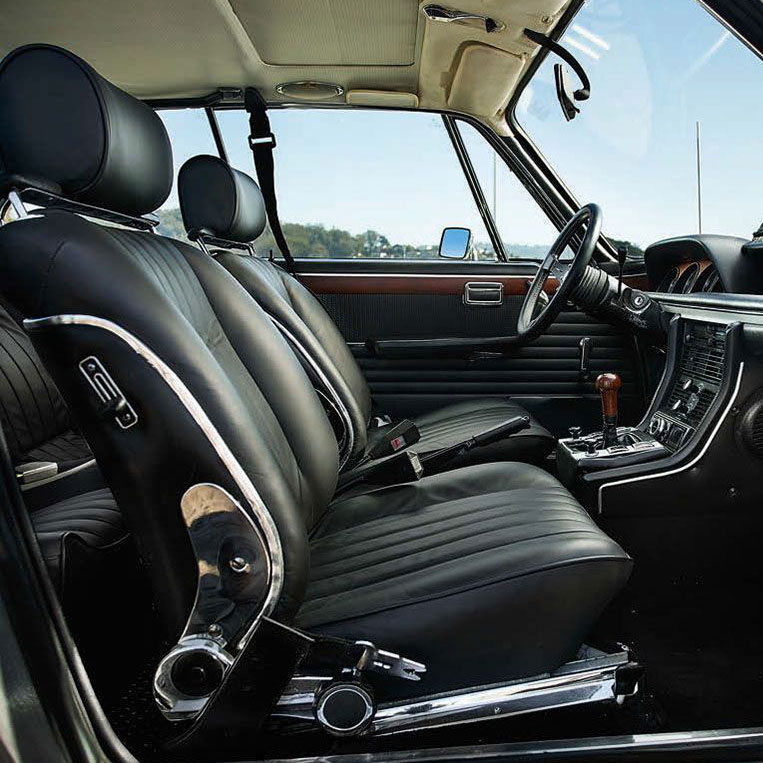
Some of the prettiest classic seats you have ever seen. (Photo credit unknown)

Some of the prettiest classic seats you have ever seen. (Photo credit unknown)

The Problem
One of the coolest things about the BMW Coupe are the seats. From all that chrome greeting you when you enter the car to the stunning design of the headrest supports. They are just beautiful to look at.

But we are building a daily driver. Something that we can comfortably drive on a regular basis. In that respect the factory seats are greatly lacking in these ways:
  1. They sit extremely high. At 6’3” I have to slouch down or recline the seat into the lap of my kids to keep my head from rubbing the ceiling.
  2. They don’t hold you in. While they were “sport seats” for their day they hardly hold you in the way a modern sport seat does today, especially in spirited driving. Make a hard left turn and you’ll find yourself sitting in the passenger seat.
  3. The Seatbelt is subpar for everyday use. Being a pillar-less coupe, the shoulder belt attaches way back near the rear seat. (For those not familiar, most cars have a solid vertical pillar that runs from where your door latches to the roof of the car. This is where your grab for your shoulder belt). In later models this attachment point was relocated to the roof (as the above photo shows). This point is too high and too forward to provide proper restraint. None of this was a problem at all for our ancestors who didn’t use the safety belts to begin with.

The Solution
In order to drive the car every day I really wanted to solve all three of these issues with new seats. After researching all options (and there are plenty) I landed on seats from a BMW E93 (2004-2013) M3 Convertible. This particular variation solves all of these issues along with a couple of bonuses:
  1. They will adjust so low that I would need to sit on a phone book to see over the dash. I can also raise the seat higher than the original seats.
  2. The M3 version of these seats have gobs of lateral support, adjustable lumbar and thigh support and so on as you would expect.
  3. The convertible version of these seats is designed with the shoulder belt retracting from the top of the backrest itself. I reach no further than my actual shoulder to grab the belt. This also makes it incredibly convenient when my kids hop in the back seat. Finally, the retracting and restraint mechanism is far smoother and far safer than the 45 year old unit.
  4. Bonus 1 - These seats are electric and gazillion-way adjustable with driver seat memory settings. Don’t roll your eyes, remember daily driver…
  5. Bonus 2 - These seats are heated, so those frigid 55 degree Southern California mornings we see in February won’t feel nearly so bad. I don’t know if I will bother implementing this, but it would be fun to add the control to the touch screen.
I searched for a just the right pair of nice condition used seats for several months. Eventually I found an entire 2011 M3 Convertible interior (all 4 seats, door panels, carpet, console) for less money than I had been tracking for just good front seats. Because of this I will experiment with modifying and using the M3 rear seats as well. The look, feel and leather would match and they are much lighter in weight. I have seen a lot of restorations where Recarros or other modern seats are installed into the fronts, and the stock rears look terribly mismatched.


The Process
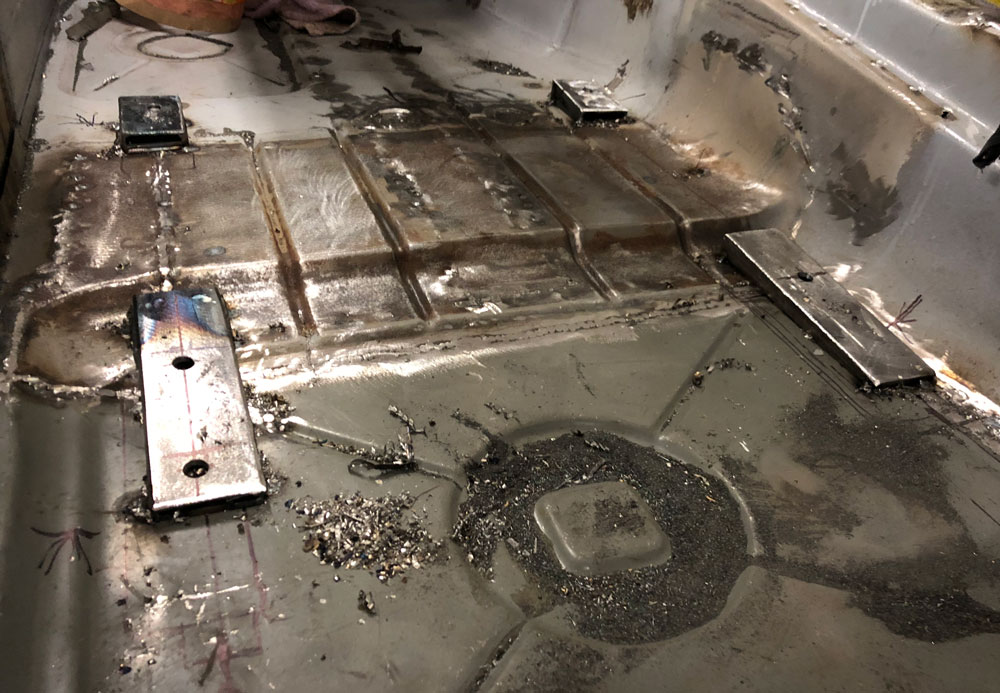
First we had to remove the factory seat bases. Unlike most modern seats, the coupe has the front-to-rear adjustment mechanism as part of a tall base which is welded into the floor of the car. We removed this whole base to expose a flat clean floor.
We then needed to create a new mounting solution for the new seats. This seems simple enough as the new seats just bolt to a flat floor. Keep in mind our new seats have the seatbelts integrated. The mounts don’t just need to hold the seat down to the floor - they need to securely hold the seat and a human down in a collision.
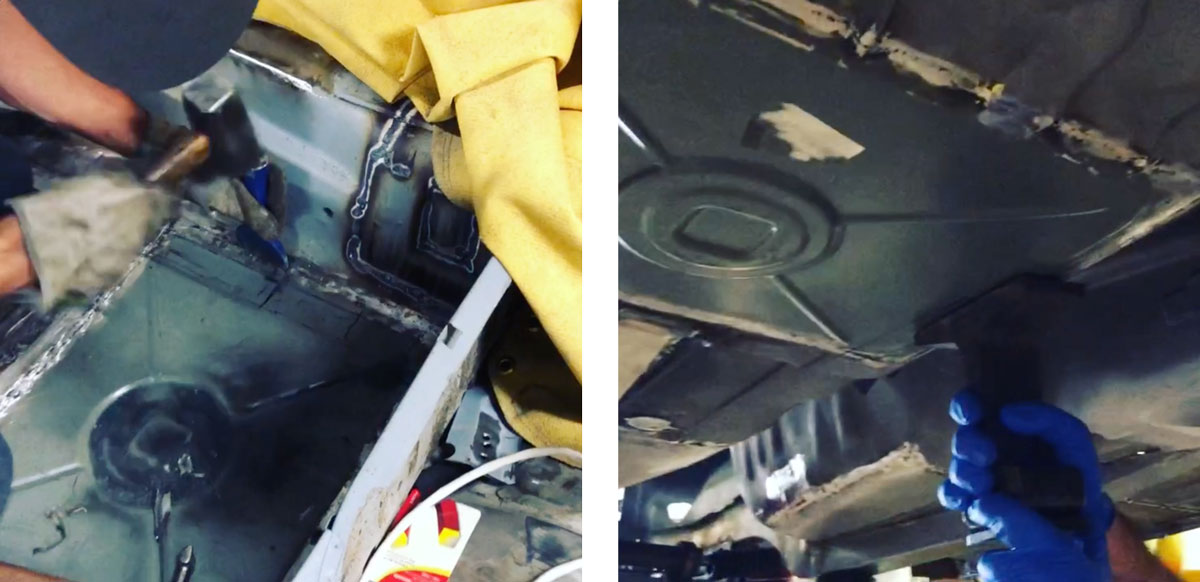
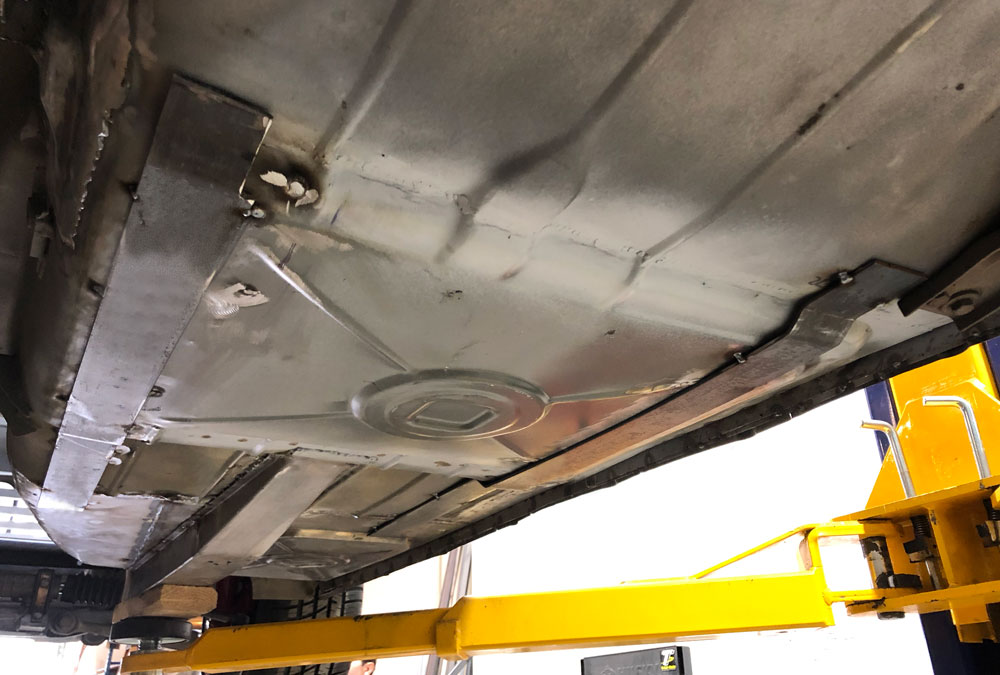
To accomplish this, we fabricated steel plates to run along a long section of the floor under the car. These greatly distribute the mounting points providing more than enough strength. To do this we performed some ship building techniques to flatten areas of the pan.

Tyler hamming the floor from up top while Brett holds the Dolly with a rod to the floor. I would have helped as well, but I was busy shooting video.

Tyler hamming the floor from up top while Brett holds the Dolly with a rod to the floor. I would have helped as well, but I was busy shooting video.

Steel plates were fabricated to mate with the bottom of the floors. The seats will bolt through to cap nuts welded to these plates.

Steel plates were fabricated to mate with the bottom of the floors. The seats will bolt through to cap nuts welded to these plates.

Our floor risers create a smooth surface for the seat rails to rest on. They will be further welded once all fitting is finalized. Notice how BMW uses two rear bolts on the shoulder belt side of the seat.

Our floor risers create a smooth surface for the seat rails to rest on. They will be further welded once all fitting is finalized. Notice how BMW uses two rear bolts on the shoulder belt side of the seat.


New Seats 2.JPG


The Result
After all was done we now have a pair of comfortable, convenient seats with integrated modern safety belts. Not nearly as elegant as the factory seats, but they fit perfectly into our design standard for the project: Update Everything you Touch. I couldn’t be happier with the fit, and the feel when sitting in the car.

Cheers!

Paul


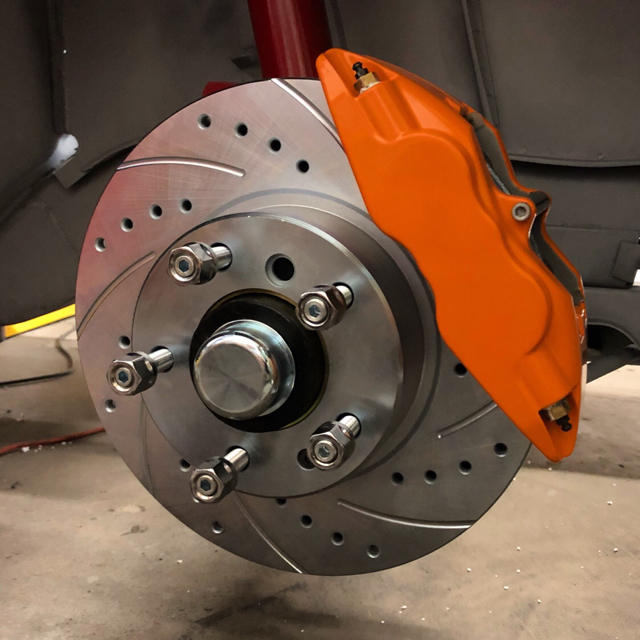
The Brakes are coming along on the coupe. I know, I'm going full Lamborghini on the orange calipers, but I figured I'd have some fun.

I do have to say a few things to those who are considering the Ireland Engineering kit for Wilwood big brakes. I don't know those guys, and I say this respectfully. I have bought a number of smaller parts from them. The parts have been quality and they do a nice job of supporting these cars.

Please tell me if I have it wrong- but the way I see their Wilwood kits is that they are reselling Willwood components that they have found to work, but all the conversion items are their own products.

That all said, I found issues with all of the custom items (which I believe to be manufactured by Ireland)

1- First, a simple diagram or instruction page wouldn't have killed them to provide. We toyed around for 45 minutes trying to figure out the secret orientation of the bracket, and which bolts should go where. Once again, it was only this forum where I found a photo of an installed kit to give me some help.

2- The front adaptor plate bolted perfectly to the calipers, but the bolting to the E9 just wouldn't go. The holes in the bracket were perfectly spaced, but the spacer sleeves they welded on were not centered to the holes in the bracket. We had to bore out the sleeves on both brackets in order to get the bolts to line up.

3- The adaptor ring to align the rotor to the hub was more than 1mm too large for the hub, and nearly a mm to small for the rotor. Essentially, it is useless. I shot them a video of all the play, and they hadn't heard of that from anyone else. I was just lucky. In the meantime I am using a lot of rounds of electrical tape to fill the gaps, which finally got the rotor centered.

4- We thought we would get lucky with the rears. All of the holes did line up perfectly, hurray! But the brackets were not flat. They were curved like a banana along the flat plane. Both of them. We had to heat them up and hammer them just to get them to lie flat. It is critical that they are flat to get secure mounting (obvious, I know).

In their defense, they were very gracious about the hub adaptors (I didn't bring up the others, because we could fix those issues ourselves). They have offered to pay me back for a machine shop to build rings that will center the rotors. So they are taking care of their customers. I just want to let folks know to be prepared to customize as needed. Having learned all this, next time I would simply buy rotors and calipers from any source and make my own brackets. In fact, that way I could preserve the nicer look of a vertical caliper, rather than the odd angle the brackets put it to.

Here's the front:
Fronts.jpg


For the rear, I didn't like the extreme angle that the bracket put the caliper at. So we decided to weld their bracket to the front of the hub. This required notching the trailing arm some. By doing this we were able to match the angle of the front calipers. After this photo, we welded nuts to the holes to allow easier mounting of calipers.
Rear-Custom.jpg


Lastly, we are fitting Tesla 12v parking brakes. We could have used any other manufacturer, but a used Tesla calipers are $100 for a pair, and Audi, BMW etc are all $400 for a decent pair. So Tesla it is. I do really recommend this conversion. A simple 1 second 12v input and a work drive locks the pads is in place. Reversing the 12v opens the pads. Since I won't have a transmission to hold the car still, I need very solid parking brakes. (in this photo, the Tesla unit is not yet bolted to the car, it is simply grabbing onto the rotor and hanging there). I will be using the old BMW caliper mounting holes to bolt a new adaptor plate to bolt to these units.
Rears.jpg


Cheers!
Paul
 
the parking brake is a great idea. you can easily do a one button parking brake like a high end car. i want to do this to my car as well! do you know what the oem disc thickness is on the tesla is?
 
do you know what the oem disc thickness is on the tesla is?

That I don't know, but Tesla actually uses a Brembo caliper, and I assume it to be fairly generic. I should have mentioned that. I could measure it but the pads seem to have nearly an inch of space when fully open, and they compress really far closed. I could measure that for you. All that to say, I think they could be fitted to your car regardless of the rear discs you are running. You do want to build in some logic to the voltage so that it triggers it for only a second then stops, and vice versa. Those pads need to stay very close to the disc to stay aligned in their track.

There are 4 pins on the connector- Two of them for for the motor, and I am assuming the inner pair are feedback about amperage. I haven't had a chance to dive into that, but I assume I will be able to measure that to turn off the voltage in both directions. If that is not the case, then a simple 1 second of juice could work as a last resort.
 
Moment Motors in Austin posted today on Facebook what appears to be an E9 conversion. I only have FB for car parts & don’t know how to post the link, but here’s a screenshot

E72E70EB-DA71-488C-A21B-153AED96F9A6.png
 
Yeah, I have seen some of their cars. They do very nice work. They seem to stick to low-voltage conversions, as most shops do. It is far simpler to do, as you bolt a motor to the front of the existing transmission and power it by a small battery pack. You drive your car in 2nd most of the time, and go to 3rd gear on the highways. Modest power and low range. The huge advantage is that you can always put the gas motor back in if you regret it. The Tesla conversion we are doing makes that far more difficult. So there are clear advantages to the low-voltage small motor conversions.

Still, I am going to be very interested to watch this build!

You put very succinctly what I had been trying to grasp. Thank you. My commute in the next year or so (depending on construction issues) will go from 8-10 mins to about 20 minutes. I'd been tinkering with the idea of getting a clean shell of a 2002 and doing a conversion for a DD, but I was a bit intimidated by your efforts. I need to go visit Moment, as they're closer, and try to make it out to see your efforts. Not alot of folks to discuss this with in my part of the world.
 
Last edited:
Back
Top