hey markos that box looks familar
You are using an out of date browser. It may not display this or other websites correctly.
You should upgrade or use an alternative browser.
You should upgrade or use an alternative browser.
Deconstruction Thread: How to part-out an E9
- Thread starter Markos
- Start date
Received dash wood and frame from Markos today, all was as stated and in excellent condition- Markos has a good grasp of stating the condition of the parts in case anyone wants to help him finance his project!
Thanks Peter! Technically that is a 'Budget Resto' part so it's not on the books in this thread.
Hey Markos -- this is a great thread. If the binacle you plan to pull from your existing car is good, I am interested.
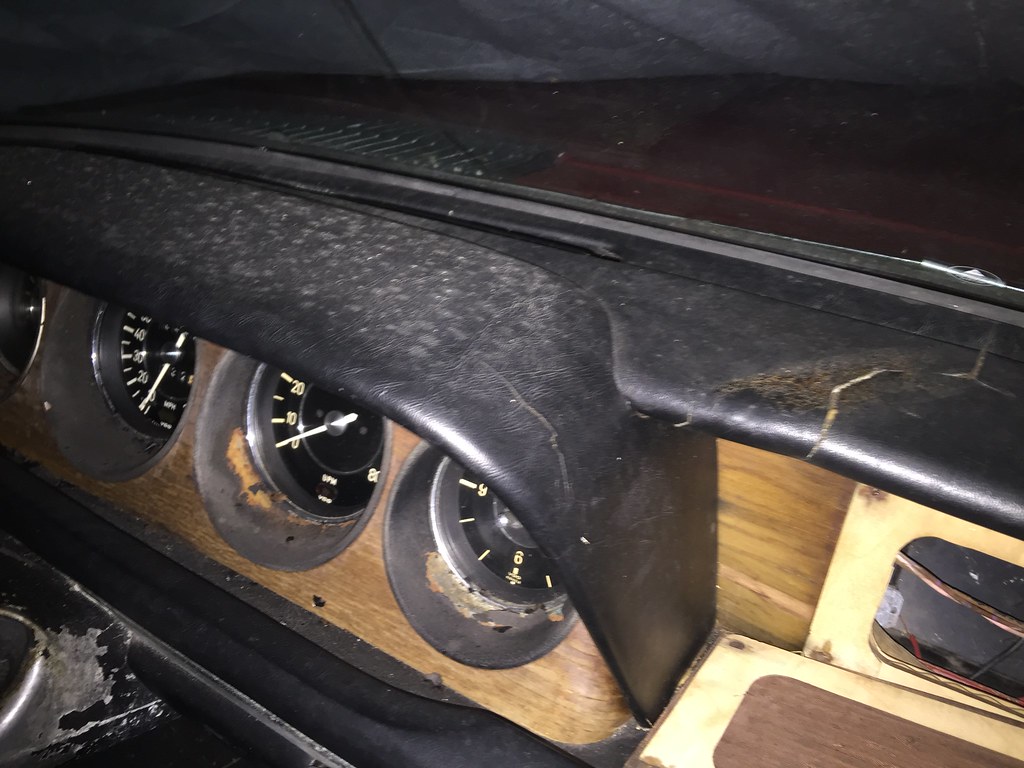
Sure thing Chris. The project car has a binacle in decent shape but there is a surface crack in the vinyl. I'm going to get a lesson in dashboard dismantling real soon. Honestly I'm a good 6 months away from swapping over interior items to the project car, but I may start dissecting my project car dash earlier than later. Pic below...
hey markos that box looks familar
Indeed - the Frankenstein box! Now holding three pieces of glass, and my back still hurts today. As Obi-Wan might say: "It's more packaging tape now than box." Given that it's no longer going to see the cargo hold of a greyhound bus I removed half the amount of tape haha!
You can see why I'm excited about the 'new' dashboard and steering column:
Update:
Sold the AC Setup: $600 (friend pricing)
Sold e-brake grip: $20
Total Sales: $2,796
Remaining: $604
Last edited:
Got some sleep - time to explain a few pics.
The lower steering column cover is secured by three long fine threaded specialty screws (flat top). I'm missing one and have one on reserve for a local member. The steering column itself is held on with four 13mm bolts that are simply enough to remove. Before doing so, figure out how you want to pull the column. I always try to pay attention to what bolts must be loosened or removed first. Sometimes you need the leverage of a fixed part to break loose other fasteners on a part you are removing. I first unscrewed the clamp on the splined steering column shaft, figuring I could pull it free after I unbolt the column. Next I unbolted the four column bolts and dropped the column. The column wouldn't disengage from the splined shaft. Instead I removed the four 13mm bolts on the steering column guibo. To my point about leverage, I was able to break the bolts loose without bolting the column back up, but it would have been easier if I started with the guibo first.
To pull the column off you need to remove the wiper and blinker stalks. The wires for the stalks are soldered to the stalk.. The stalks are held on with two phillips screws on each side. The pigtail for each arm extends about 12" down the column. Of course some thoughtless individual decided to cut my blinker pigtail 6" down the column.
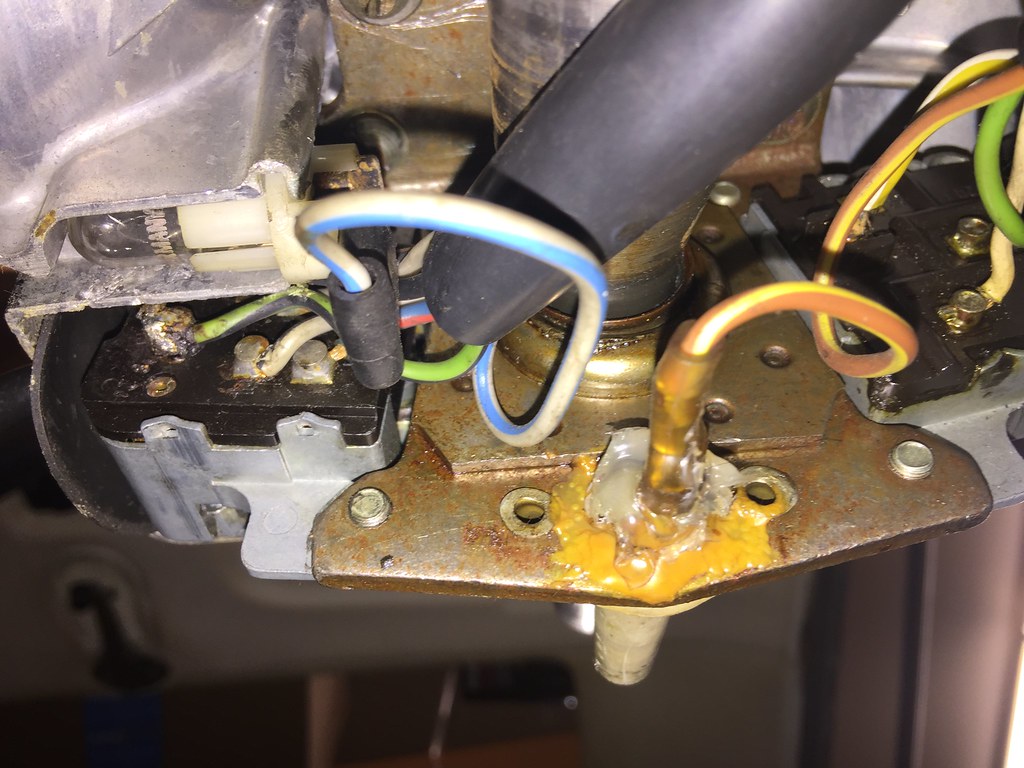
This is the backside of the stalks. You can see the backside of the lower screws holding the stalk in place. Also visible is a weak attempt at fixing the horn plunger (see the glue). This one is a lost cause.
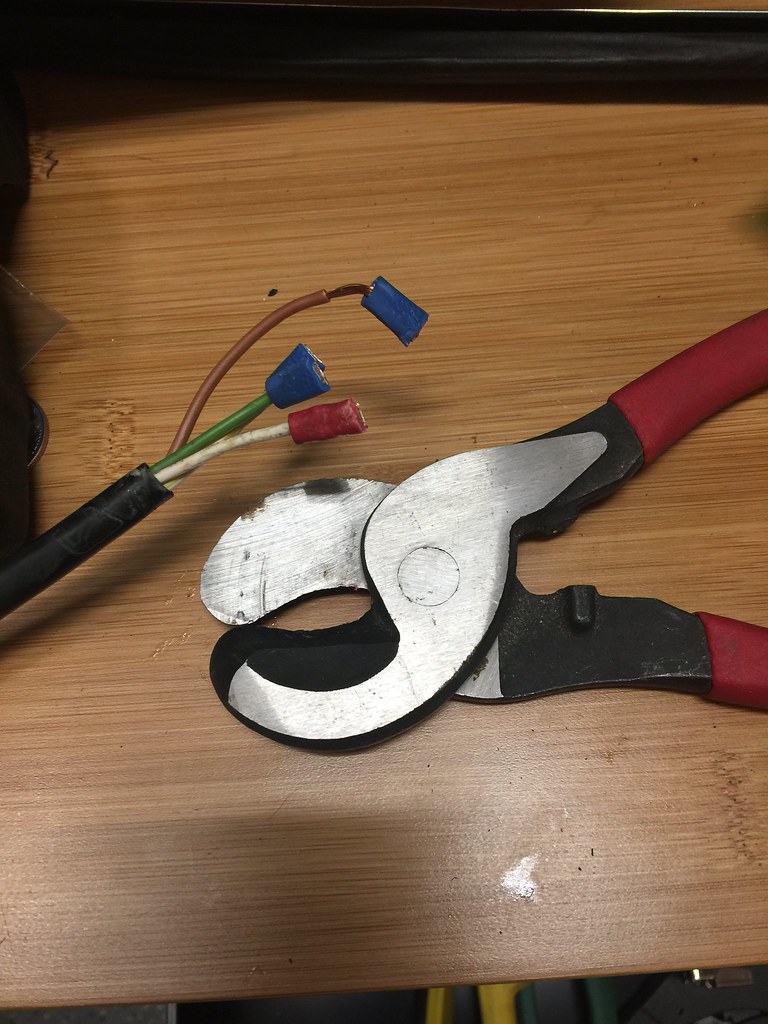
I have these big cutters I use for home wiring. They will cut through a hunk of wiring or butt connectors with ease. They are also good for vacuum tube, fuel lines, etc. These are the butt connectors of my poorly spliced blinker stalk chopped in half with my cutters.
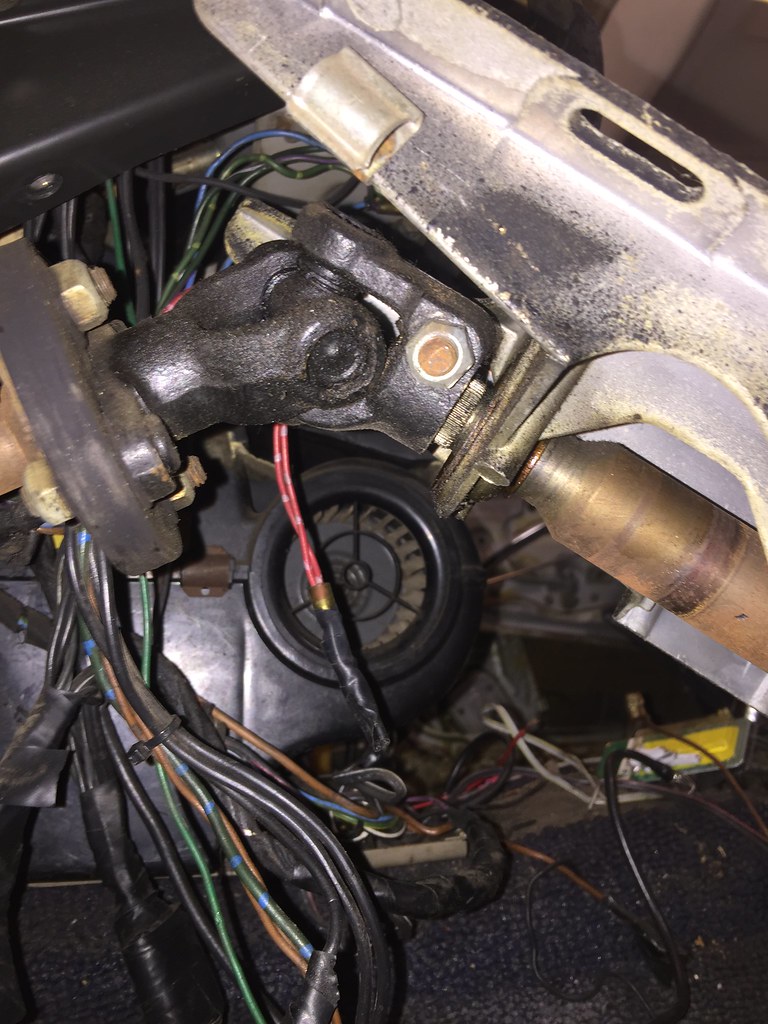
On the right is the collapsed steering column. The rusty bolt in the center of the image is for the clamp that secures the upper steering column to the u-joint. To the left is the u-joint and guibo.
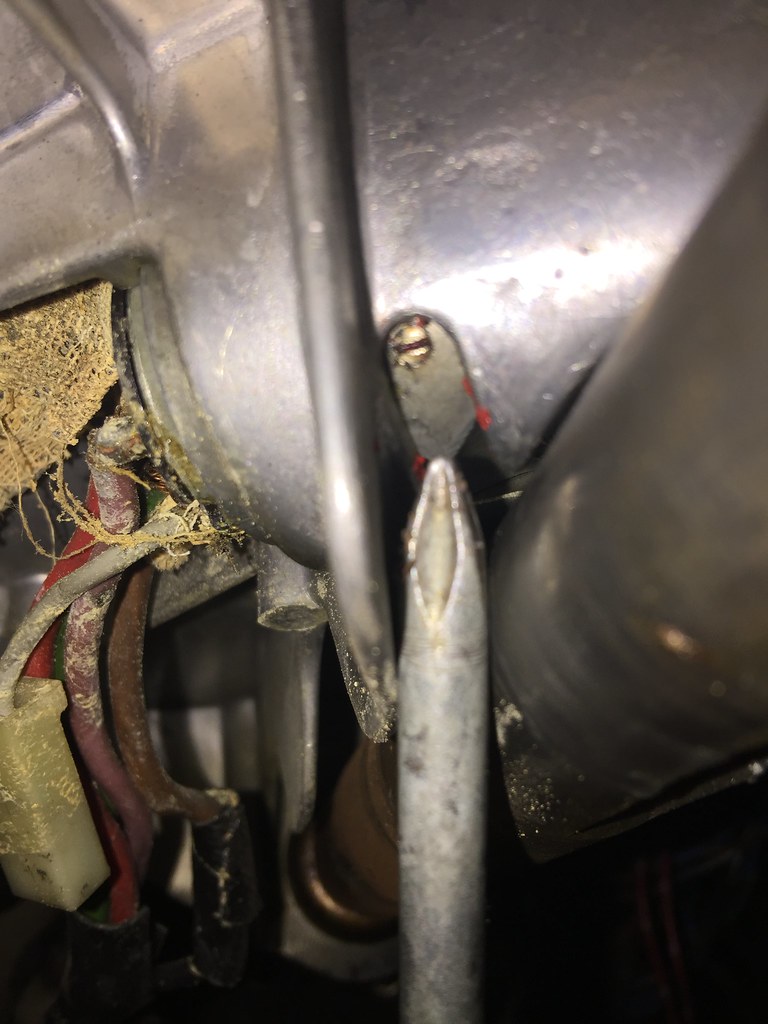
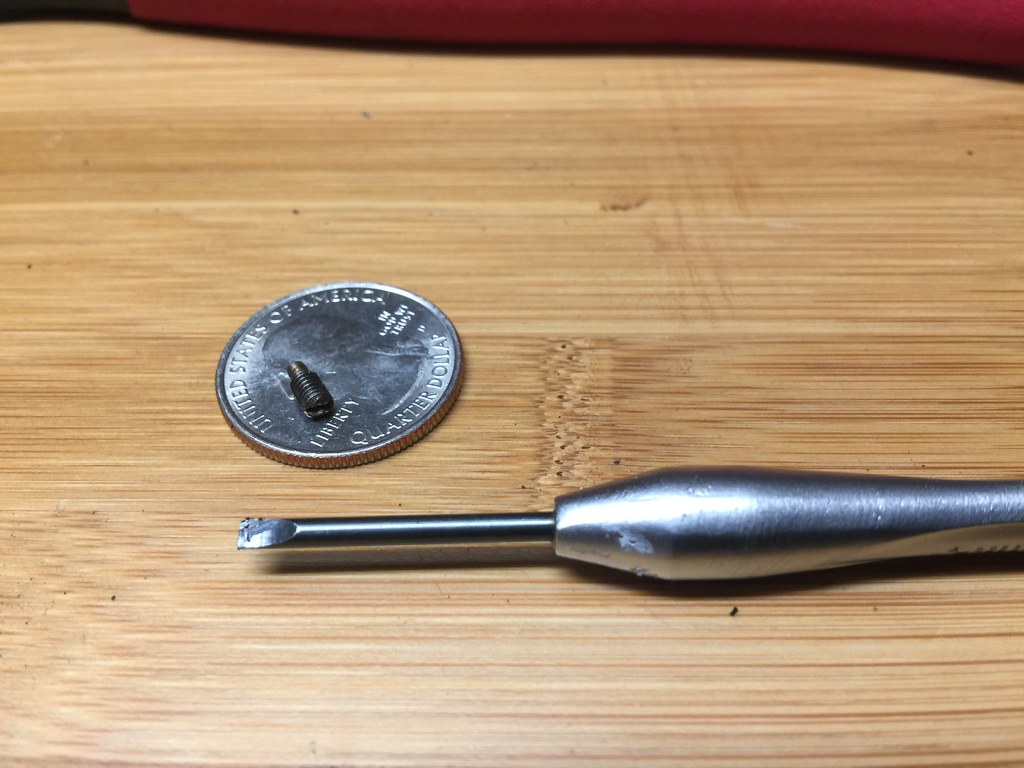
You can't remove the plug on the ignition cylinder without removing a very small set screw. Be sure to do this first!
This give you an idea of how small the set screw is:
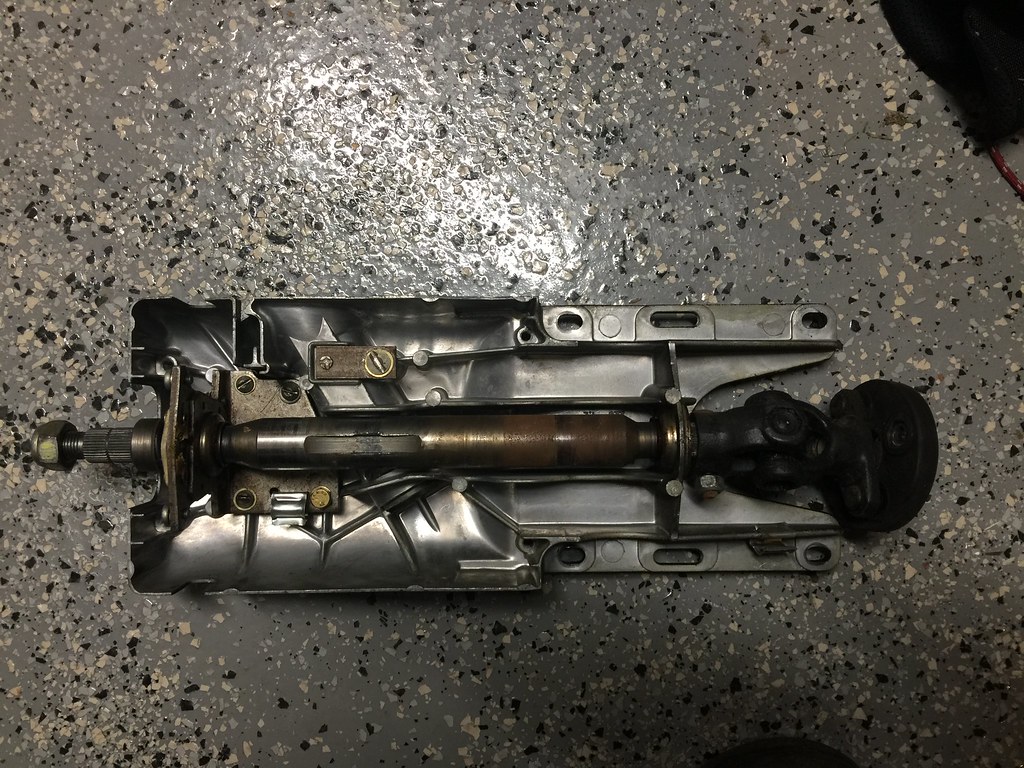
It's a misnomer to refer to the upper steering column cover as a "cover". It's an integral support of the steering column as well as the ignition cylinder.
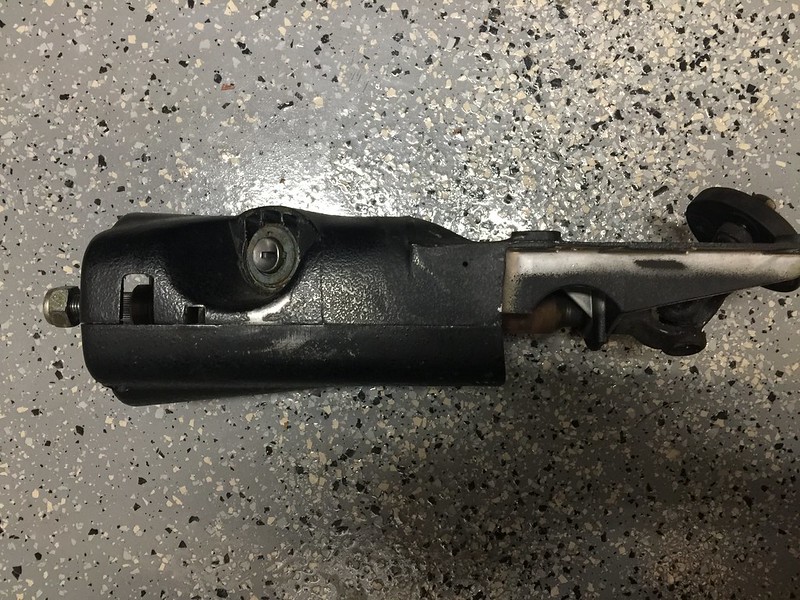
I figure the best way to store this stuff is to bolt it back together:
The lower steering column cover is secured by three long fine threaded specialty screws (flat top). I'm missing one and have one on reserve for a local member. The steering column itself is held on with four 13mm bolts that are simply enough to remove. Before doing so, figure out how you want to pull the column. I always try to pay attention to what bolts must be loosened or removed first. Sometimes you need the leverage of a fixed part to break loose other fasteners on a part you are removing. I first unscrewed the clamp on the splined steering column shaft, figuring I could pull it free after I unbolt the column. Next I unbolted the four column bolts and dropped the column. The column wouldn't disengage from the splined shaft. Instead I removed the four 13mm bolts on the steering column guibo. To my point about leverage, I was able to break the bolts loose without bolting the column back up, but it would have been easier if I started with the guibo first.
To pull the column off you need to remove the wiper and blinker stalks. The wires for the stalks are soldered to the stalk.. The stalks are held on with two phillips screws on each side. The pigtail for each arm extends about 12" down the column. Of course some thoughtless individual decided to cut my blinker pigtail 6" down the column.
This is the backside of the stalks. You can see the backside of the lower screws holding the stalk in place. Also visible is a weak attempt at fixing the horn plunger (see the glue). This one is a lost cause.

I have these big cutters I use for home wiring. They will cut through a hunk of wiring or butt connectors with ease. They are also good for vacuum tube, fuel lines, etc. These are the butt connectors of my poorly spliced blinker stalk chopped in half with my cutters.

On the right is the collapsed steering column. The rusty bolt in the center of the image is for the clamp that secures the upper steering column to the u-joint. To the left is the u-joint and guibo.

You can't remove the plug on the ignition cylinder without removing a very small set screw. Be sure to do this first!

This give you an idea of how small the set screw is:

It's a misnomer to refer to the upper steering column cover as a "cover". It's an integral support of the steering column as well as the ignition cylinder.

I figure the best way to store this stuff is to bolt it back together:

Last edited:
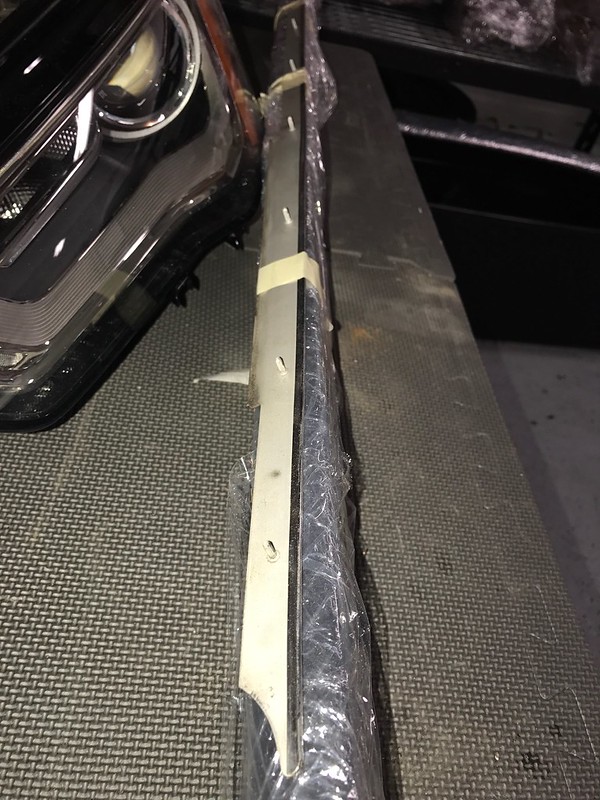
Slightly out of sequence but before I forget, let's remove the dash "grab bar". The aluminum trim panel is a press fit with little aluminum studs holding it in place. Use a plastic pry bar to gently pull it away from the dash. You will also need
I sold my trim strip to Peter C, so this picture is borrowed from Vitaliy (who stripped his new e9 in record time!).
The "grab bar" is held on with about 10 phillips screws. Don't forget the two large and slightly hidden ones at the A pillars (see the rusty screw)
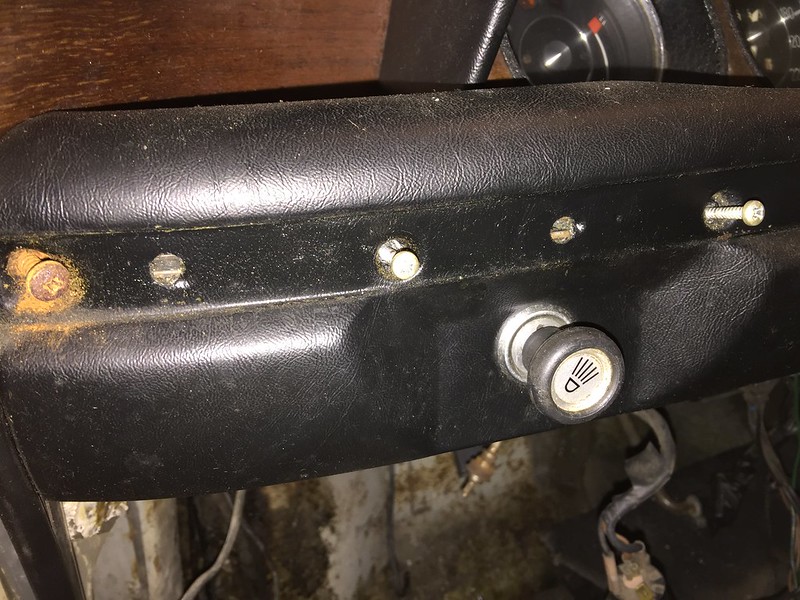
I removed the entire headlight switch, but you can either remove the face of the switch and leave it on the body, or unbolt it from the body and leave it connected to the "grab bar".
If you wish to remove the headlight switch from the dash, unscrew the rubber handle on the headlight. Next unscrew the trim plate using a small screwdriver to get it going:
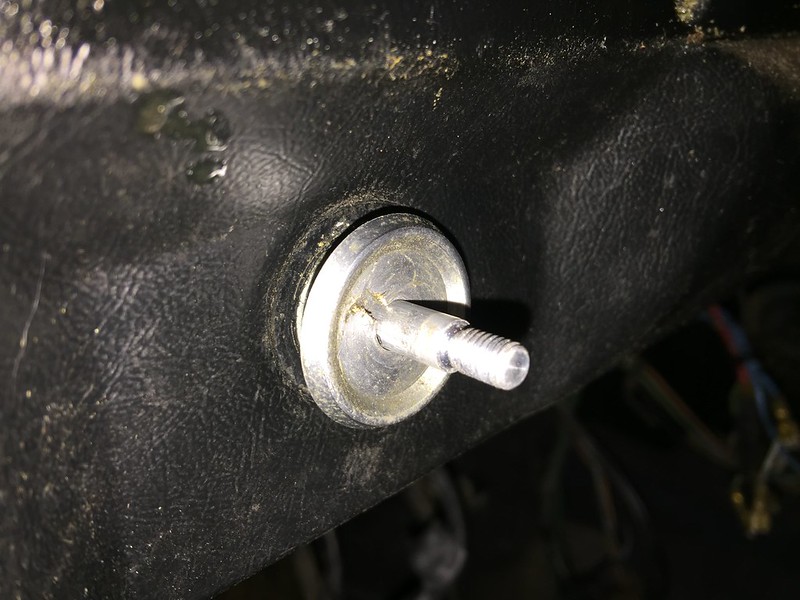
If you wish to remove the headlight switch from the body, remove the two vertical Phillips screws securing it to the body. Note that one screw is already removed in this picture.
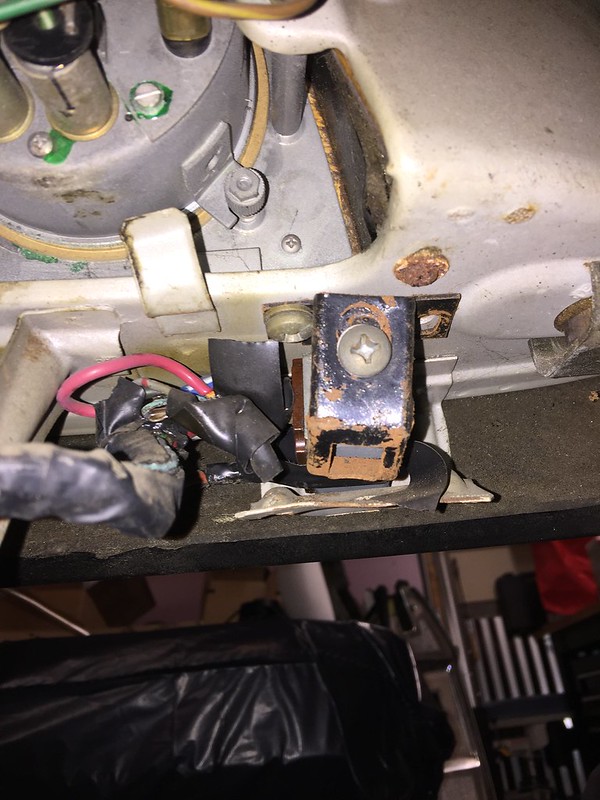
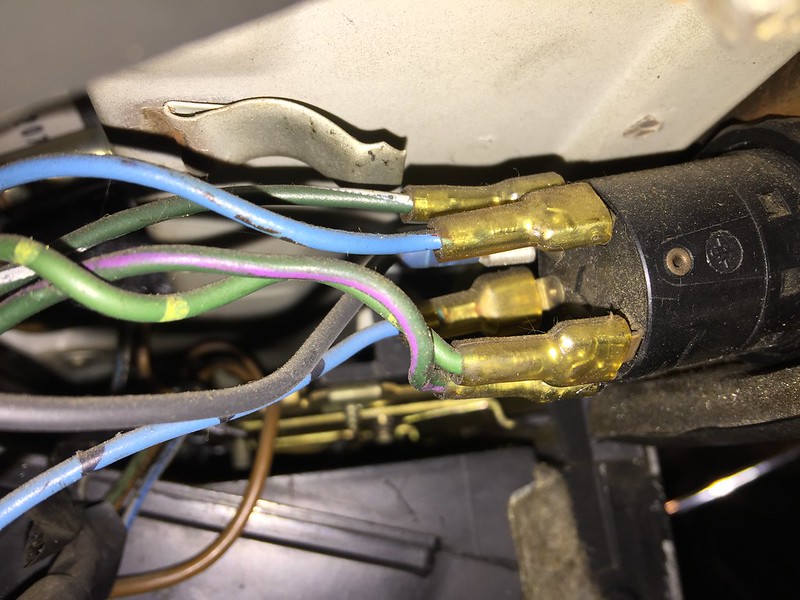
If you have a hazard switch on your "grab bar" (model year '73+ I believe, my car was built in '72), you need to unplug the wires. If you wish to remove the switch, you may unscrew the plastic ring that sandwiches the switch to the "grab bar". This may be easier with the "grab bar removed" The plastic threads can be difficult to unscrew. A little WD-40 would help. I wouldn't recommend PB plaster or any penetrating oil.
Backside of hazard switch:
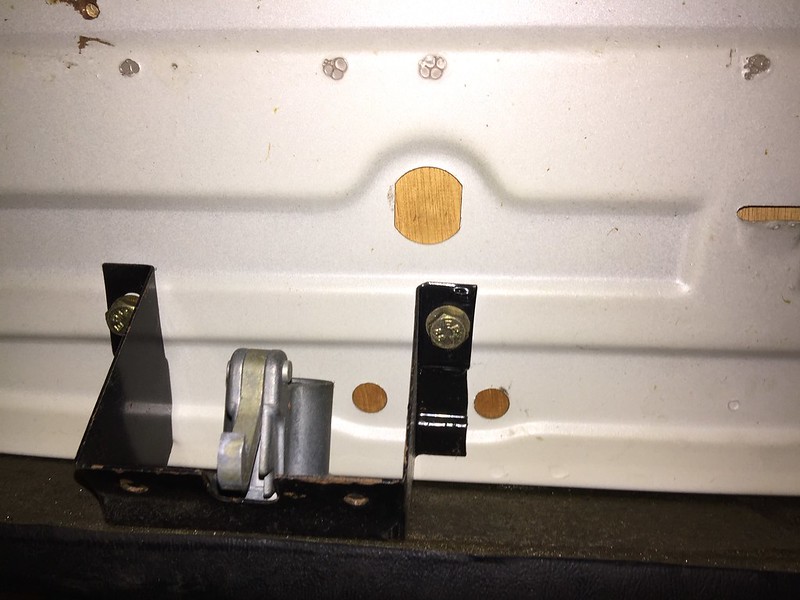
Not necessary for "grab bar" removal, but you may wish to remove your glove box lock and/or button. Two 10mm bolts secure it to the body:
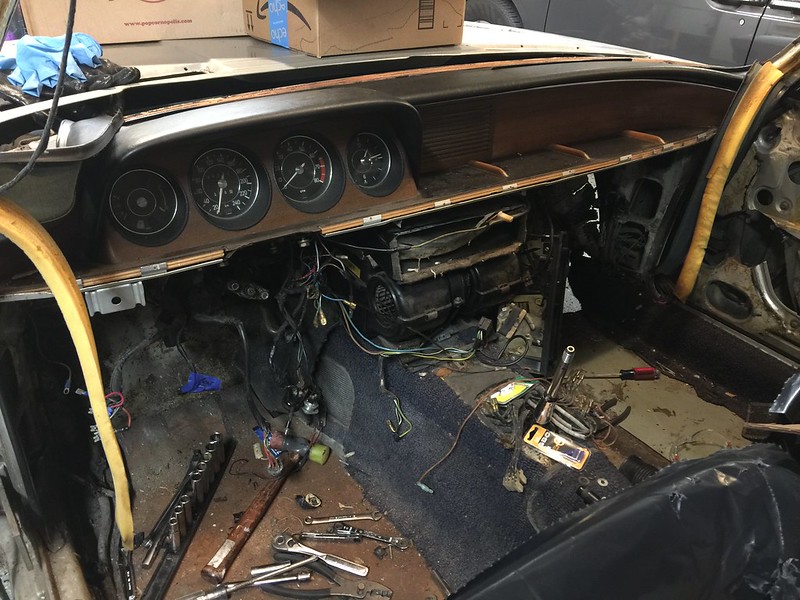
Removing the "grab bar" leaves you with a slightly exposed dash.
I sold my trim strip to Peter C, so this picture is borrowed from Vitaliy (who stripped his new e9 in record time!).

The "grab bar" is held on with about 10 phillips screws. Don't forget the two large and slightly hidden ones at the A pillars (see the rusty screw)

I removed the entire headlight switch, but you can either remove the face of the switch and leave it on the body, or unbolt it from the body and leave it connected to the "grab bar".
If you wish to remove the headlight switch from the dash, unscrew the rubber handle on the headlight. Next unscrew the trim plate using a small screwdriver to get it going:

If you wish to remove the headlight switch from the body, remove the two vertical Phillips screws securing it to the body. Note that one screw is already removed in this picture.

If you have a hazard switch on your "grab bar" (model year '73+ I believe, my car was built in '72), you need to unplug the wires. If you wish to remove the switch, you may unscrew the plastic ring that sandwiches the switch to the "grab bar". This may be easier with the "grab bar removed" The plastic threads can be difficult to unscrew. A little WD-40 would help. I wouldn't recommend PB plaster or any penetrating oil.
Backside of hazard switch:

Not necessary for "grab bar" removal, but you may wish to remove your glove box lock and/or button. Two 10mm bolts secure it to the body:

Removing the "grab bar" leaves you with a slightly exposed dash.

Last edited:
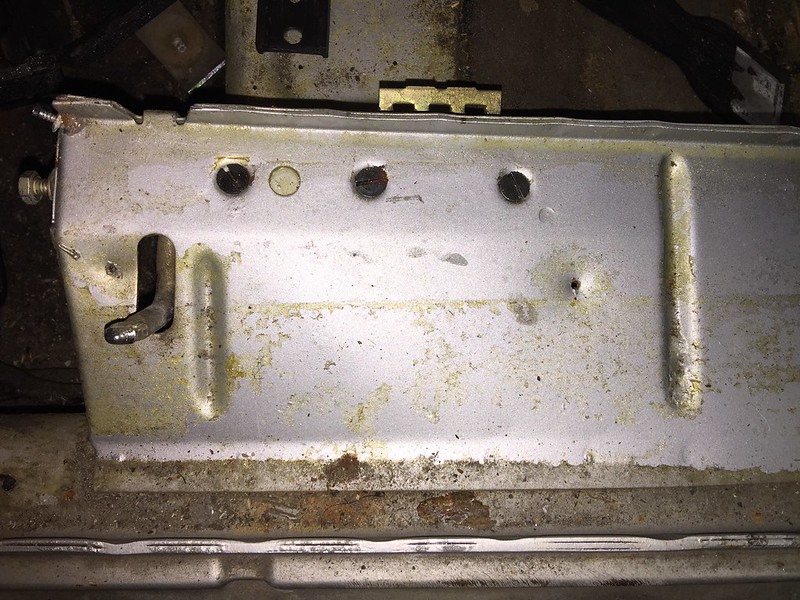
Now these steps wouldn't necessarily make sense for a coupe owner who simply wanted to pull the dash. It is however a lot easier to get to one of the two dash tray Phillips screws after removing the AC box.
The AC box is held in place by about six bolts. I left off at 2 AM tugging on this thing wondering why it wasn't moving. Even after removing on the bolts, I forgot to unscrew the AC lines the first time. I recommend a bit of PB Blaster on the fittings. Mine were pretty tight. You also need a big wrench, probably around 22 mm or so. I used two adjustable wrenches.
These last two obvious 8mm bolts need to be removed..
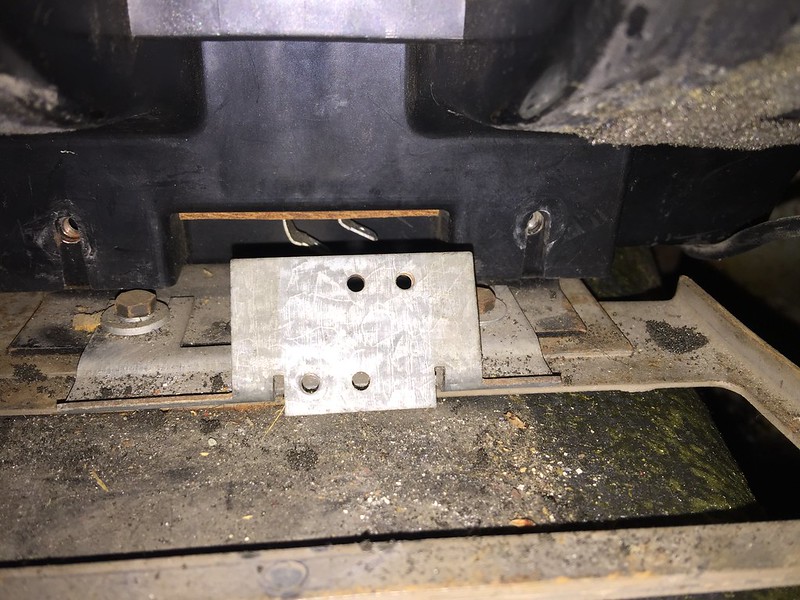
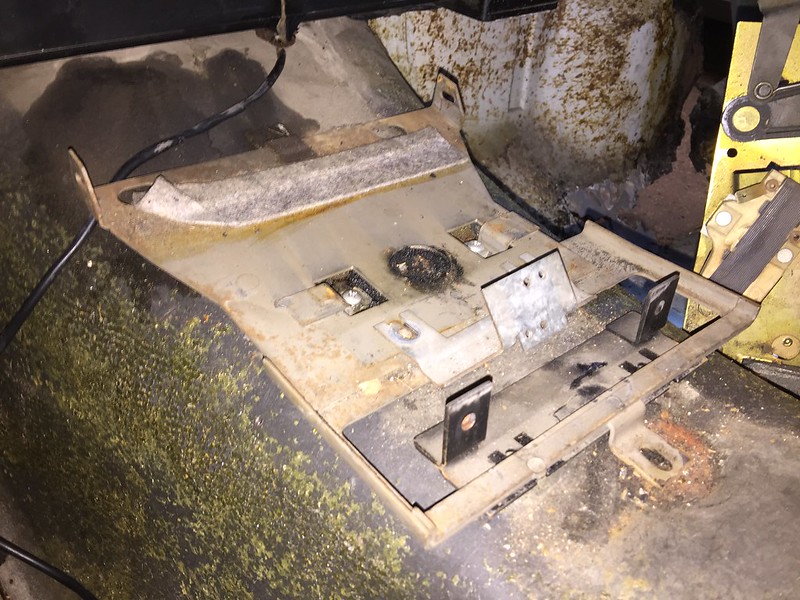
Here is a clean view of the AC box support. The angled piece up front needs to be removed to slide out the AC box but I put it back in for this photo (in the wrong spot - should be in front of the evaporator mounting tabs - see above). There are two Phillips screws that hold down the mounting plate.
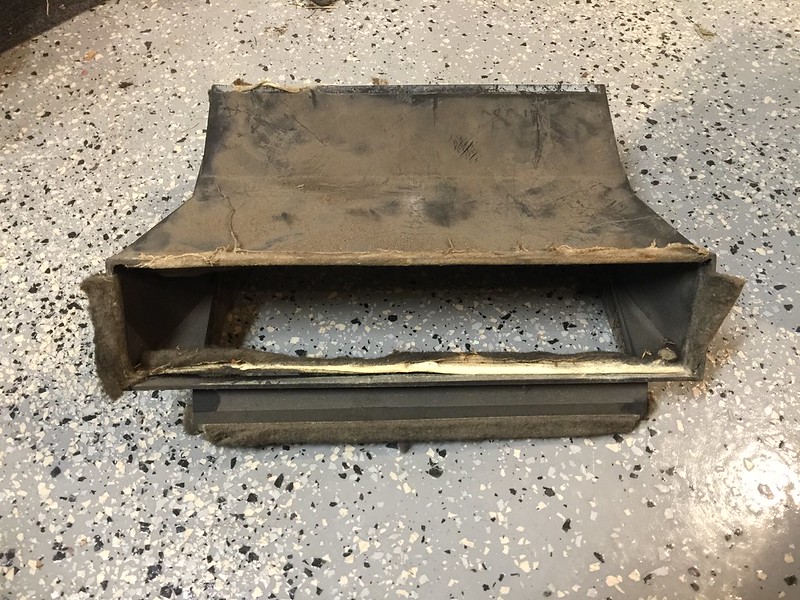
With the box removed, I can get a good look at the ducting. This piece has a tendency to warp. This one has a very small crack that can be easily repaired, but no warping. Checking to see the condition of a local member's duct before sending this to the other buyer. He is flexible - good for everyone.
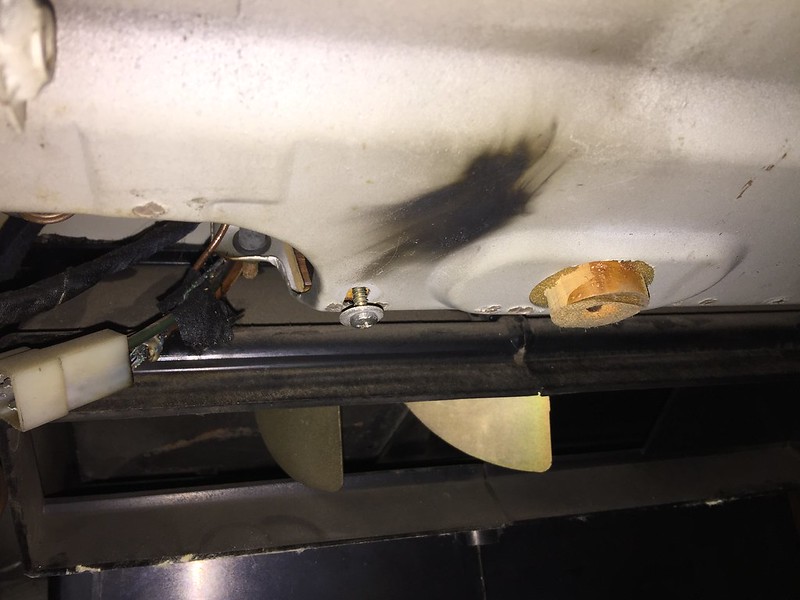
Now I finally have access to the infamous dash phillips screw! See the green circle in the subsequent message.
The AC box is held in place by about six bolts. I left off at 2 AM tugging on this thing wondering why it wasn't moving. Even after removing on the bolts, I forgot to unscrew the AC lines the first time. I recommend a bit of PB Blaster on the fittings. Mine were pretty tight. You also need a big wrench, probably around 22 mm or so. I used two adjustable wrenches.
These last two obvious 8mm bolts need to be removed..

Here is a clean view of the AC box support. The angled piece up front needs to be removed to slide out the AC box but I put it back in for this photo (in the wrong spot - should be in front of the evaporator mounting tabs - see above). There are two Phillips screws that hold down the mounting plate.

With the box removed, I can get a good look at the ducting. This piece has a tendency to warp. This one has a very small crack that can be easily repaired, but no warping. Checking to see the condition of a local member's duct before sending this to the other buyer. He is flexible - good for everyone.

Now I finally have access to the infamous dash phillips screw! See the green circle in the subsequent message.

Last edited:
There are three of these bolts and two screws to remove from the underside of the dash.
Passenger Side:
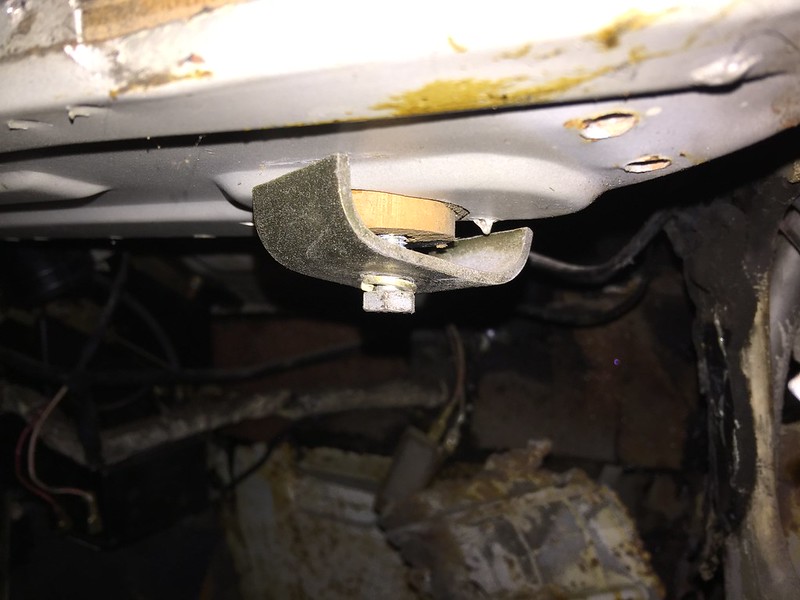
Driver's Side:
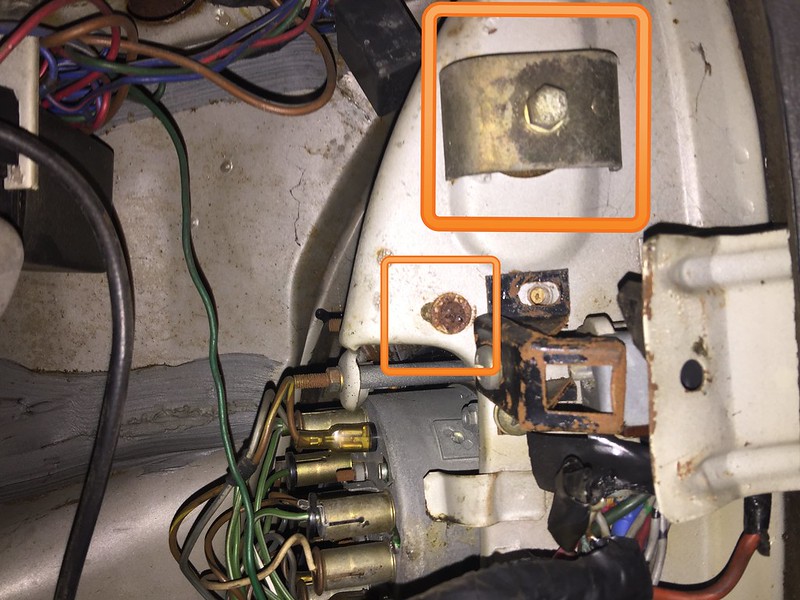
Center. The bolt is easy enough with a box wrench and the screw is achievable with pliers or an L-shaped Phillips but the screw is annoyingly tedious. I'm going to remove the heater components first (edit: done - not in order though see above).
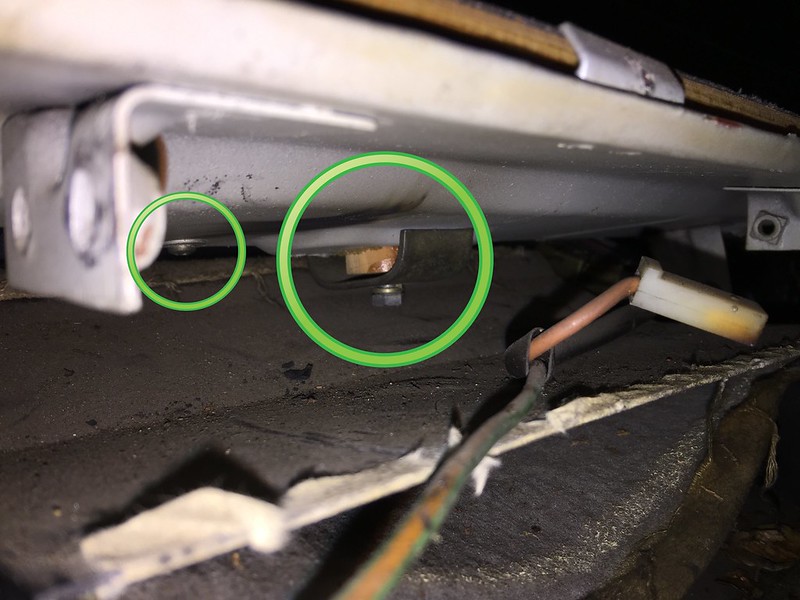
After you have the dash bolts off, and the two screws securing the dash, it's almost ready to come out.
Next I removed the instrument cluster. There are two 8mm nuts holding it to the body. You have to go after them from under the dash. The wiring for the four gauges all condense into two pig tails. There are two plugs that are clipped to the body that disconnect the gauge pig tails from the main wiring harness. To remove the cluster, you need to unclip the pig tails, unscrew the speedo cable, and remove the trip meter reset. Everything else can stay connected. I removed the speedo cable from the top after pulling the cluster out a bit.
The black hole on the shiny speedometer back is where the trip meter reset cable enters. The speedometer cable is the big threaded plug in the center.
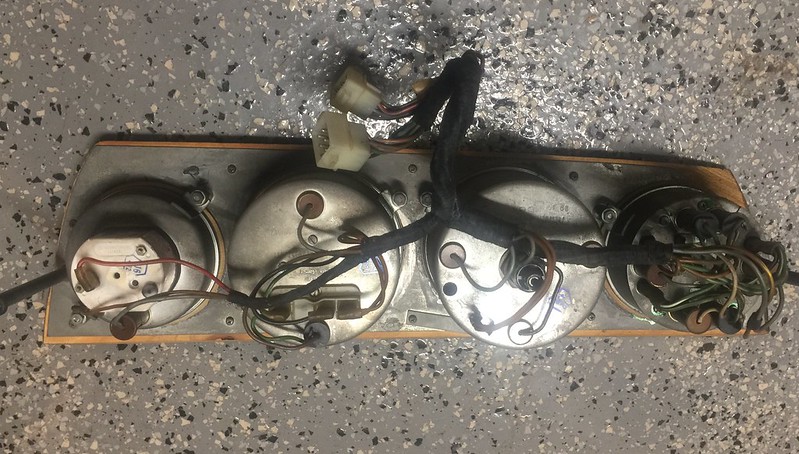
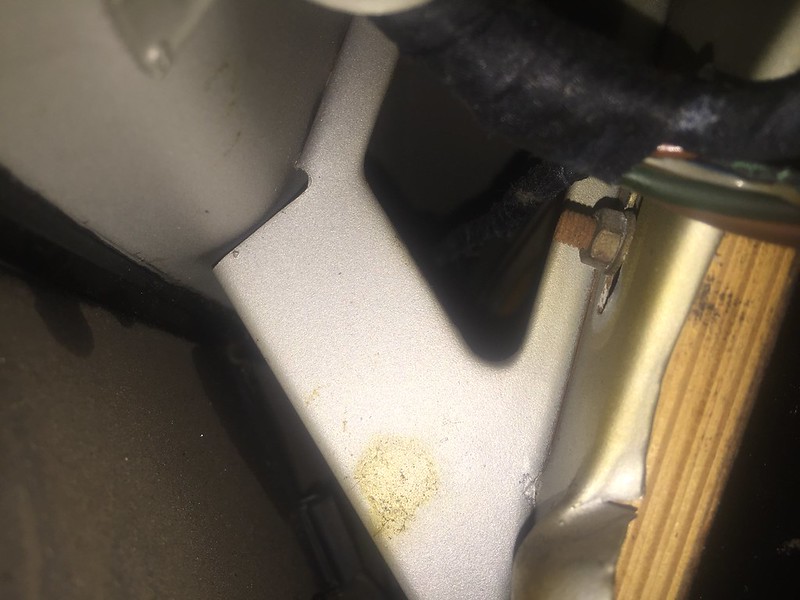
Now the dash is ready to come out, but wait - I forgot one more 8mm nut. I removed the cowl nut on the left side of the cluster, but not the right. It is a tight squeeze getting this bolt out with the heater box in place. A ratcheting 8mm box wrench does the trick.
Right back here to the right of the cowl
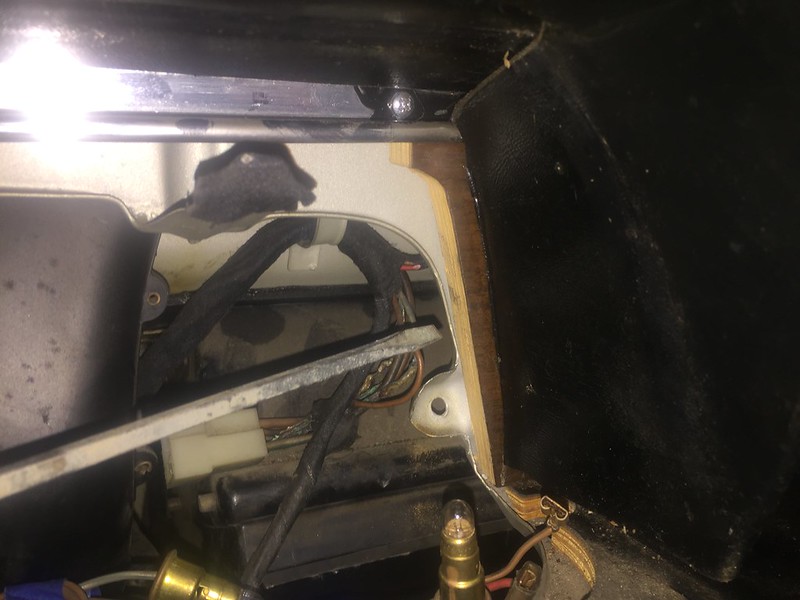
You will find this:
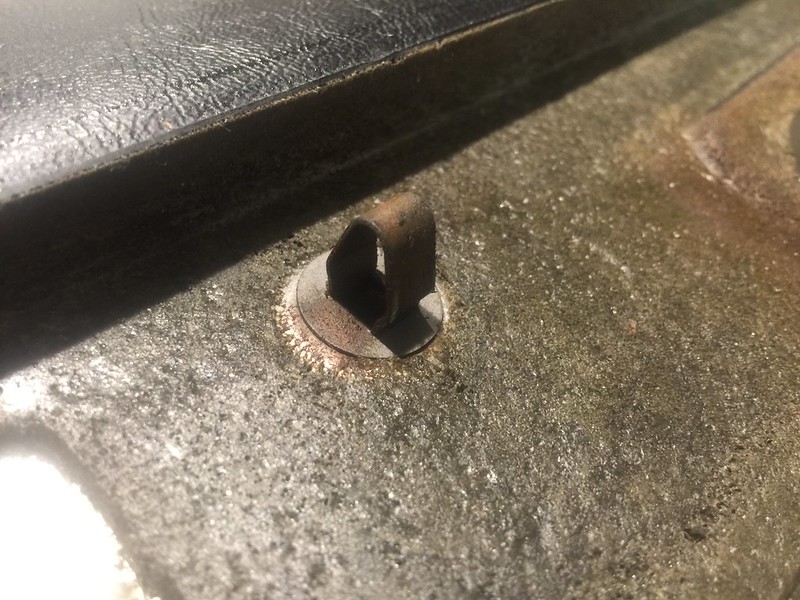
Next you can pull the top of the dash with the cowl in place. It is held on with clips. It's a little scary tugging on the thing. Once the clips pop out I still found it quite difficult to squeeze the dash past the a pillars. I probably should have pulled more towards the interior and less 'up'.
These are the infamous dash clips that everyone wants. If they pop off of the dashboard upon removal, you can use pliers to insert them back into the dash.
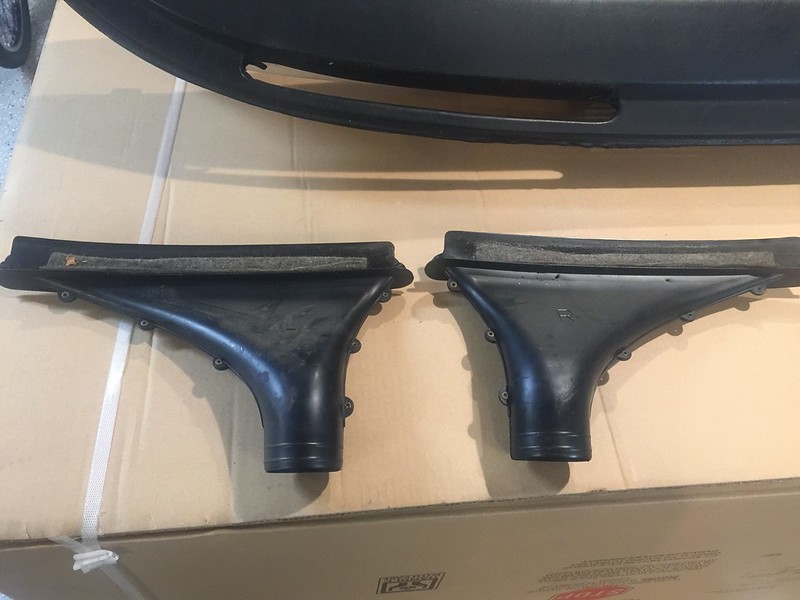
As you are lifting the dash out you can disconnect the defroster vents. I know that folks have removed these with the dash in place but this seems to be very tricky without cracking the vents. These things are made of glass!
And here she is, this is why I bought the parts car!

Passenger Side:

Driver's Side:

Center. The bolt is easy enough with a box wrench and the screw is achievable with pliers or an L-shaped Phillips but the screw is annoyingly tedious. I'm going to remove the heater components first (edit: done - not in order though see above).

After you have the dash bolts off, and the two screws securing the dash, it's almost ready to come out.
Next I removed the instrument cluster. There are two 8mm nuts holding it to the body. You have to go after them from under the dash. The wiring for the four gauges all condense into two pig tails. There are two plugs that are clipped to the body that disconnect the gauge pig tails from the main wiring harness. To remove the cluster, you need to unclip the pig tails, unscrew the speedo cable, and remove the trip meter reset. Everything else can stay connected. I removed the speedo cable from the top after pulling the cluster out a bit.
The black hole on the shiny speedometer back is where the trip meter reset cable enters. The speedometer cable is the big threaded plug in the center.

Now the dash is ready to come out, but wait - I forgot one more 8mm nut. I removed the cowl nut on the left side of the cluster, but not the right. It is a tight squeeze getting this bolt out with the heater box in place. A ratcheting 8mm box wrench does the trick.
Right back here to the right of the cowl

You will find this:

Next you can pull the top of the dash with the cowl in place. It is held on with clips. It's a little scary tugging on the thing. Once the clips pop out I still found it quite difficult to squeeze the dash past the a pillars. I probably should have pulled more towards the interior and less 'up'.
These are the infamous dash clips that everyone wants. If they pop off of the dashboard upon removal, you can use pliers to insert them back into the dash.

As you are lifting the dash out you can disconnect the defroster vents. I know that folks have removed these with the dash in place but this seems to be very tricky without cracking the vents. These things are made of glass!

And here she is, this is why I bought the parts car!

Last edited:
Today @mark99 stopped by and snagged all the extra carpet. I traded the remaining carpet for an STL model of the parking brake handle.  Very good trade IMO! I wish I removed the seat slider handle months ago. My ass is thanking me. Three screws hold it in place, then the unit slides out the front. I also removed the sliders from my front seat bases so they don't tear up my epoxy floor when I set the seats down.
I got all of the AC out - everything but the condenser. I'm going to drain the coolant tomorrow so I can pull the radiator and get at the thing. The condenser fan can come out the front. It's held in place with two 10mm bolts and nuts, plus the wiring that goes to the relay on the inner fender. On the '72 there is a dryer by the ignition coil and a dryer behind the passenger headlight. You don't have to remove all the lines, just one end or the other. I couldn't budge the lines on the condenser, so they are staying put.

I got all of the AC out - everything but the condenser. I'm going to drain the coolant tomorrow so I can pull the radiator and get at the thing. The condenser fan can come out the front. It's held in place with two 10mm bolts and nuts, plus the wiring that goes to the relay on the inner fender. On the '72 there is a dryer by the ignition coil and a dryer behind the passenger headlight. You don't have to remove all the lines, just one end or the other. I couldn't budge the lines on the condenser, so they are staying put.
Last edited:
Our coupes have a dryer and a muffler that looks like the dryer but without the sight glass and mounts upside down. If one is behind the headlight it was moved, both should be in engine bay. These were installed at the port of entry by Hoffman.
Our coupes have a dryer and a muffler that looks like the dryer but without the sight glass and mounts upside down. If one is behind the headlight it was moved, both should be in engine bay. These were installed at the port of entry by Hoffman.
Good to know. I'll snap some additional pics. They do look nearly identical.
This AC stuff is for the forum. I don't want anything to do with it haha!
Last edited:
So this panel, the studs...there are no nuts on them?


Last edited by a moderator:
So this panel, the studs...there are no nuts on them?
Correct. Just pry gently with a plastic trim removal
tool or a screwdriver covered in electrical tape.
Last edited:
Our coupes have a dryer and a muffler that looks like the dryer but without the sight glass and mounts upside down. If one is behind the headlight it was moved, both should be in engine bay. These were installed at the port of entry by Hoffman.
I've heard about this 'muffler' in the a/c system and wanted to find out why it was there. I found this bit of info:
"High side muffler assemblies
This is used on some car applications in order to reduce the so called “pumping” noise from a compressor. The design of this part makes it impossible to flush it, clean and remove all the debris. Older muffler designs even includes internal small parts that held even more debris when a compressor failed. "
It sounds like the Sanden style compressors wouldn't need this because of their greater number of pistons, resulting in a smoother pumping action with less pulsing, I believe.
Ian
The muffler was full of clean oil. Looked like vegetable oil.
Dryer on left, muffler on right. the dryer has a little circle on the top that I presume is the observation window that Chris mentioned.
Edit: I can't find this pic
Edit: I can't find this pic
Last edited:
Yep. And rotary compressors don't need the muffler and even if you found one it would have flare fittings.
Dryer on left, muffler on right. the dryer has a little circle on the top that I presume is the observation window that Chris mentioned.
Yep. And rotary compressors don't need the muffler and even if you found one it would have flare fittings.
Yay one less thing to ship!
Yep. And rotary compressors don't need the muffler and even if you found one it would have flare fittings.
Rotary meaning like a Sanden? I was going to convert to one of those.
Why does it not need a muffler? Just curious.
rotary compressors have several pistons vs one in the York so the output is already smoothed out.
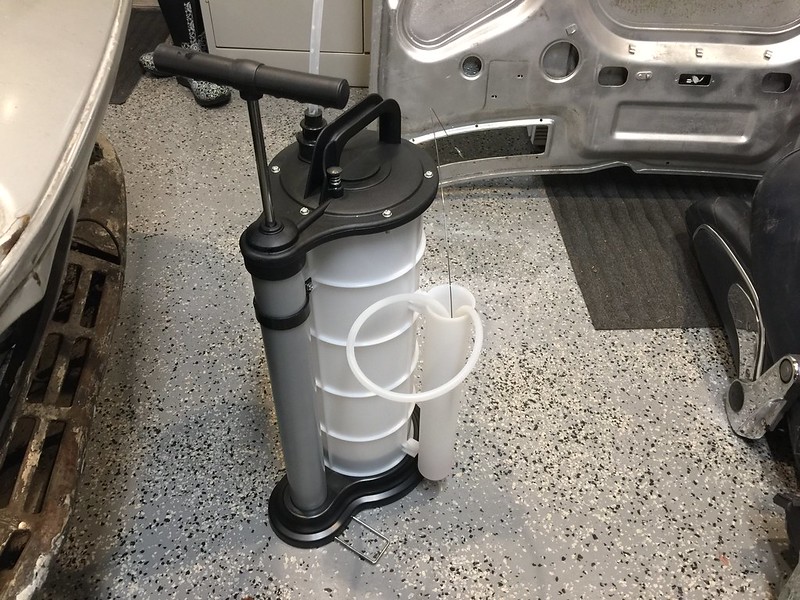
I picked up a fluid evac from Harbor Freight for $90. That is a decent (not great) savings over the nearly identical MityVac version. This thing is pretty awesome. I removed the coolant from the radiator without getting a drop on the floor. Then I pulled the water pump and extracted the fluid from the block.
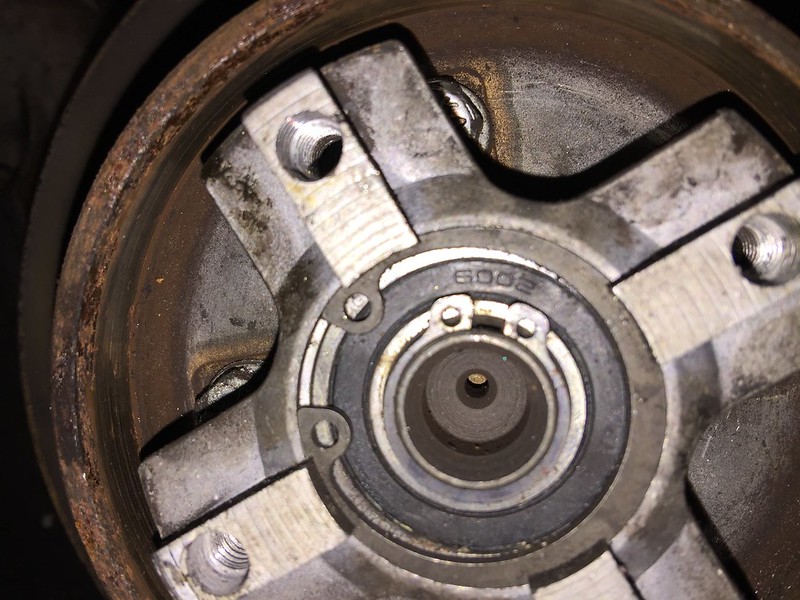
I removed the AC fan blade. There are four 10mm bolts holding the blade on, plus another four 10mm bolts holding the clutch and pulleys on. You can spot them here:
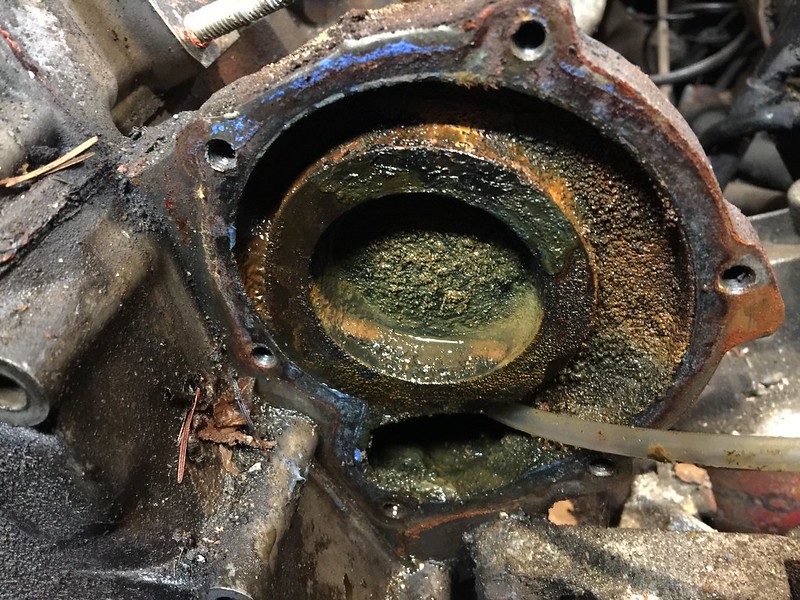
So anyway, drain the coolant from the radiator then pull it. I also drained the coolant from the block where the water pump mounts. Ewww! This wasn't necessary to remove the condenser but it gave me extra room and I had the extractor out and full of coolant.
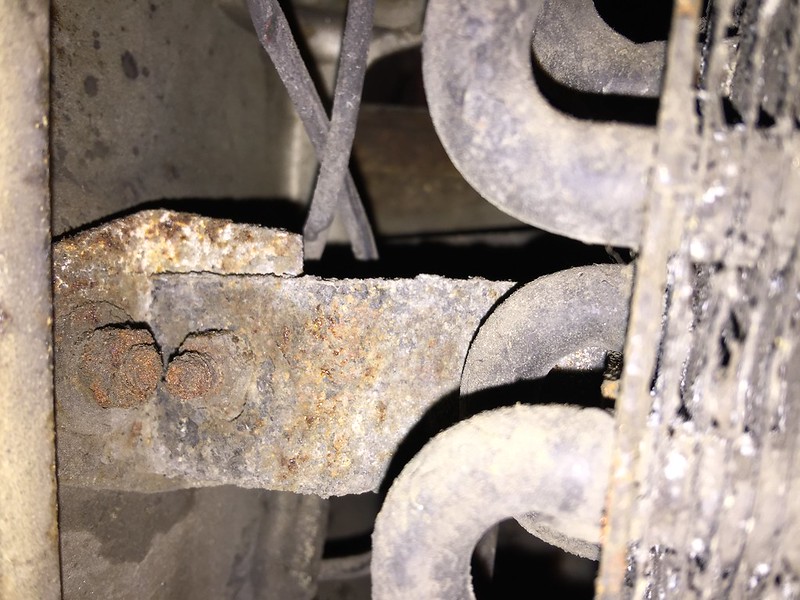
The condenser is held in place by three 10mm bolts. The brackets that the condenser is bolted to are also removable and I presume they are important for an AC upgrade. The large bolt at the top of this pic is where you would adjust the height of the hood up front. This may give one perspective on what we are looking at. Picture taken from the front of the car with the headlight grilles and kidney grille removed.
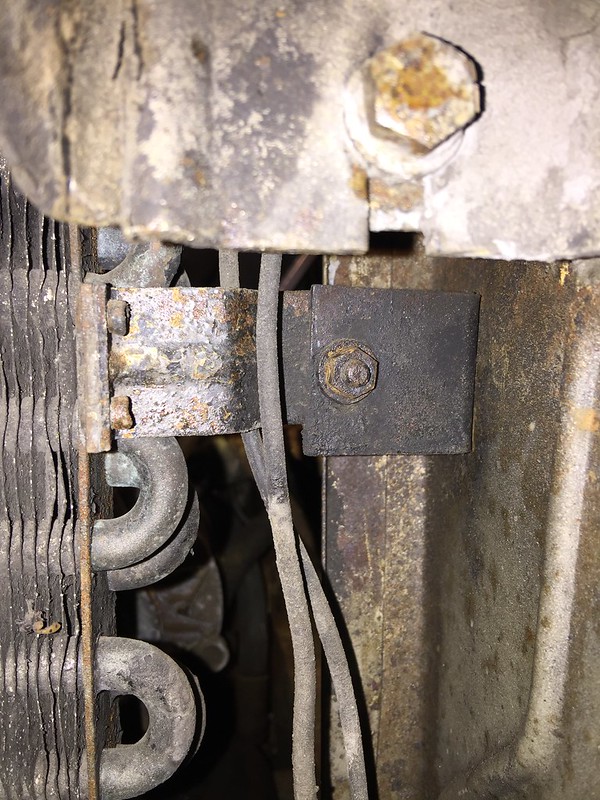
From the engine side, you can see how close the nuts are on the condenser bracket. Barely enough room to fit an open ended wrench, but not enough for a socket or a closed ended box wrench. I decided to remove the whole bracket while attached to the condenser.
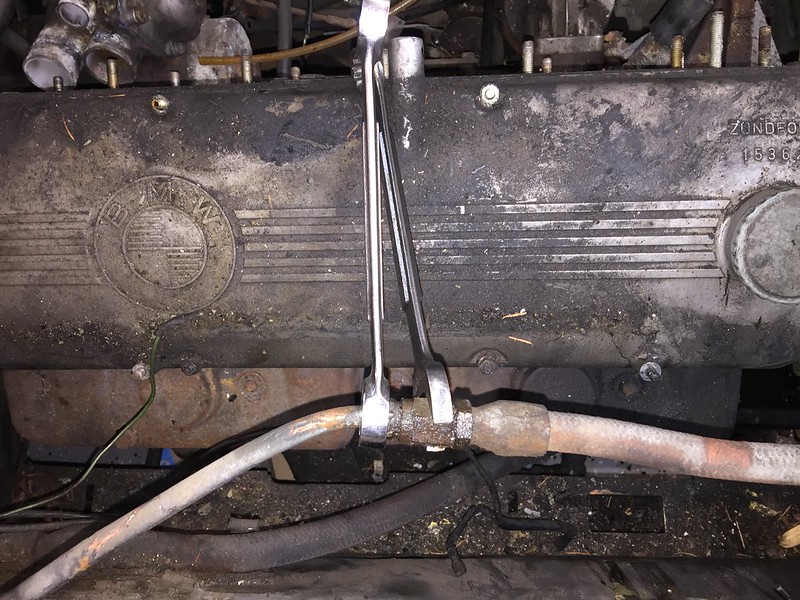
These AC lines aren't budging. So they are stuck in the firewall. A cheater bar just caused the wrench to slip. I was actually struggling to find a cheater bar in my garage then I realized that my jack handle would be perfect (almost perfect - it's aluminum). I can keep trying, cut the hoses, or enlarge the opening in the firewall to clear the flare nut on the hard AC line (to pull it through).

I removed the AC fan blade. There are four 10mm bolts holding the blade on, plus another four 10mm bolts holding the clutch and pulleys on. You can spot them here:

So anyway, drain the coolant from the radiator then pull it. I also drained the coolant from the block where the water pump mounts. Ewww! This wasn't necessary to remove the condenser but it gave me extra room and I had the extractor out and full of coolant.

The condenser is held in place by three 10mm bolts. The brackets that the condenser is bolted to are also removable and I presume they are important for an AC upgrade. The large bolt at the top of this pic is where you would adjust the height of the hood up front. This may give one perspective on what we are looking at. Picture taken from the front of the car with the headlight grilles and kidney grille removed.

From the engine side, you can see how close the nuts are on the condenser bracket. Barely enough room to fit an open ended wrench, but not enough for a socket or a closed ended box wrench. I decided to remove the whole bracket while attached to the condenser.

These AC lines aren't budging. So they are stuck in the firewall. A cheater bar just caused the wrench to slip. I was actually struggling to find a cheater bar in my garage then I realized that my jack handle would be perfect (almost perfect - it's aluminum). I can keep trying, cut the hoses, or enlarge the opening in the firewall to clear the flare nut on the hard AC line (to pull it through).

Last edited:
